More and more people are discovering that Kdenlive is not only free but also supports a variety of professional video editing functions. Using it to edit YouTube videos can create more creative new videos. In this MiniTool Video Converter article, I will tell you how to save videos from the YouTube website, and import a YouTube video to Kdenlive.
About Kdenlive
Do you know what Kdenlive is? You may already know it as a video editing software, but you may not know everything about it. Well, please take a look at our comprehensive introduction to Kdenlive below.
What Is Kdenlive?
Kdenlive is a popular video editing application that supports Windows, Linux, and macOS systems. Among these systems, the Linux version is the most popular one, because Kdenlive is optimized for this system. Kdenlive’s performance is very stable and consumes very little power when playing videos.
Kdenlive’s interface has many options and looks complicated. But in fact, for a novice, you only need to master the basic editing functions to edit a good video. For professional video editors, or those who have used other editing software, Kdenlive can be quickly used! It contains many advanced features and supports multiple formats. Therefore, it can be used for professional video editing. Overall, Kdenlive is an excellent video editor for both beginners and professional editors.
What Formats Does Kdenlive Support?
Here is a list of Kdenlive’s supported formats. Now, let’s take a look at all the formats and codecs it supports:
- Video: DV, HDV, MPEG, AVI, MP4, MOV, FLV, OGG, WMV, M2TS, TS, MKV, WebM, H.264, H.265, ProRes 422, RAW, VOB, and AVCHD.
- Audio: MP3, AAC, FLAC, WMA, OGG, M4A, WAV, AIFF, ALAC, WavPack, 5.1 surround sound, Dolby AC3, and E-AC3.
- Image: PNG, JPEG, BMP, TIFF, SVG, HEIF/HEIC, AVIF, WebP, GIF, and APNG.
- Other: SRT, ASS/SSA, XML, LOTTIE, RAWR, FFV1, MXF, AAF, EDL, and XML.
The formats supported by Kdenlive are enough to show the professionalism of this editing application. It can meet most editing needs. That’s why most editors prefer Kdenlive.
What Are the Features of Kdenlive?
Kdenlive can be used as a professional video editor because it has many professional features. The following are some key features of Kdenlive:
- Multi-track Mixing: Support arbitrary mixing of audio and video tracks. You can process 16 tracks at the same time and each track can be locked or muted for your convenience.
- Set Interface Layout and Shortcuts: You can customize the layout of the interface and shortcuts to suit your editing habits.
- Add Multiple Effects and Transitions: It provides dozens of effects and transitions to add appeal to your video.
- Audio and Video Scopes: Monitor your audio levels or check the color scopes to ensure that your material is properly balanced.
- Cross-platform Compatibility: Format interoperability between Windows, macOS, and Linux platforms is achieved through FFmpeg.
- Proxy Editing: Automatically generate low-resolution proxy files to improve the efficiency of editing high-bitrate materials.
- Automatic Backup: Your project files will be automatically backed up every few minutes. In addition, the previous versions of the project files will also be saved.
Is Kdenlive a Free Application?
Yes, Kdenlive is a free and open-source video editing tool! It does not include any license fees, registrations, subscriptions, or premium features. Although there are many video editing applications to choose from, Kdenlive is relatively suitable for beginners. Therefore, it is very suitable for beginners who are new to video editing. If you are a newbie, you can make a perfect video by yourself without spending money.
How to Add a Video from YouTube to Kdenlive
To import a YouTube video to Kdenlive, you need to download the YouTube video to your computer first. I suggest you choose some reliable third-party software or website to download YouTube videos. Then transfer the downloaded YouTube videos to Kdenlive.
Part 1: Download YouTube Videos to Your Computer
The following 3 YouTube downloaders are all excellent and worth a try! Check out which one is more suitable for you.
#1. MiniTool Video Converter
MiniTool Video Converter is an all-in-one video toolkit. It supports format conversion, YouTube full-content download, and screen recording.
The reason why I recommend you to use MiniTool Video Converter to download YouTube videos is that its YouTube download function can be seamlessly integrated. Because it includes a built-in browser, you can search for YouTube videos and download them directly in it. You don’t have to visit the YouTube URL in the browser anymore.
In addition, you can use MiniTool Video Converter to batch download videos to a playlist on YouTube. Just go to the settings of this free video download app and set the maximum number of videos you can download in batches. You can download up to 10 videos at the same time. This can save a lot of time for users who want to download YouTube playlists.
MiniTool Video Converter can ensure that you can download YouTube videos to your computer with the best quality. Similarly, you can easily get Shorts, podcasts, and music from YouTube.
In addition to YouTube video downloading, MiniTool Video Converter has two other powerful features – audio/video format conversion and screen recording. The format conversion feature supports converting videos or audio to any format losslessly, retaining 4K video quality and original audio fidelity. The screen recording function can capture high-definition MP4 videos, which is perfect for tutorials, games, or live presentations.
Here is a full guide to learn how to download YouTube videos with MiniTool Video Converter:
Step 1. Download and install MiniTool Video Converter.
Click the download button below to get the latest version of MiniTool Video Converter.
MiniTool Video ConverterClick to Download100%Clean & Safe
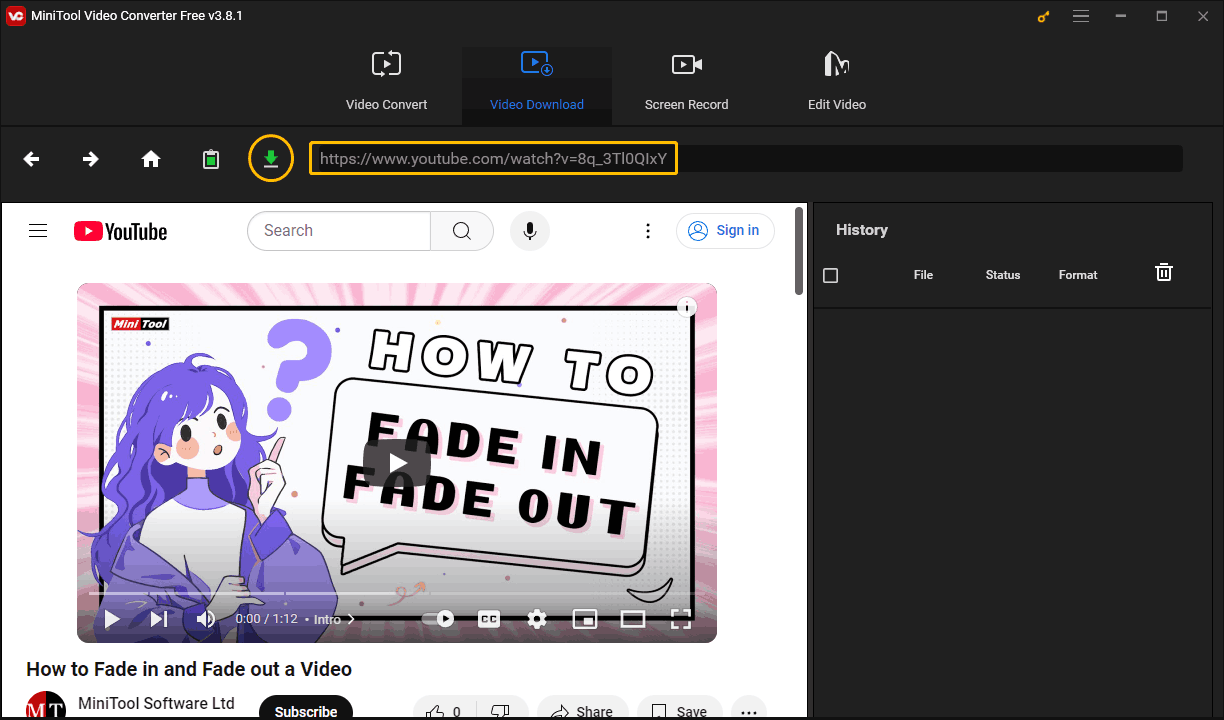
Step 2. Get YouTube video URL.
Way 1: Play the video you want to download and get the URL from the browser’s address bar.
Way 2: Play a video, click the Share icon below the player, and click on Copy to get the video URL.
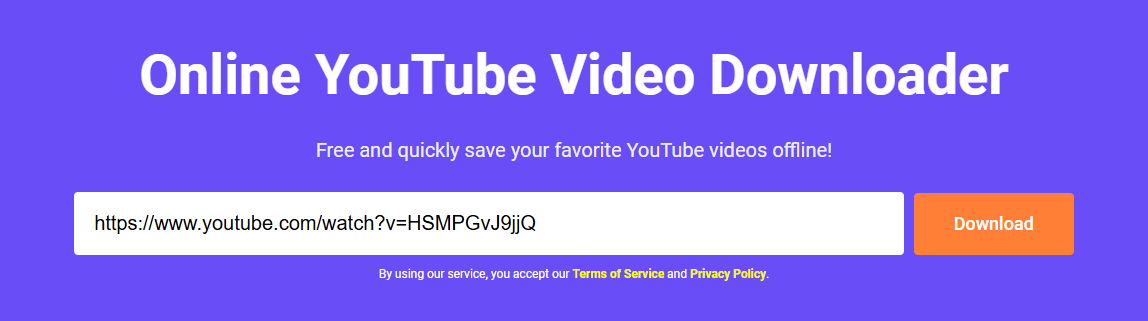
Step 3. Paste the video URL into the address bar of MiniTool Video Converter.
Launch MiniTool Video Converter, choose the Video Download tab, paste the URL into the address bar, and click the Download icon next to it.
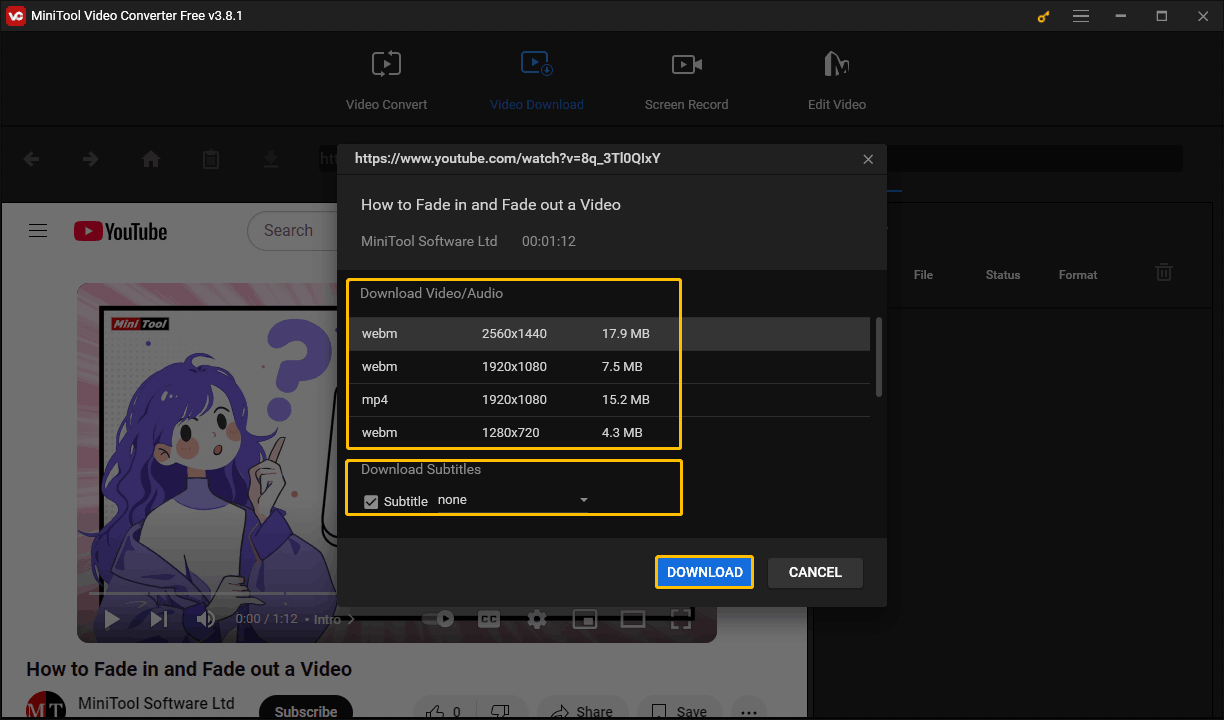
Step 4. Choose output format.
In the pop-up window, select the format you want to download. If you want to download the subtitles, tick on the Subtitle option, and select the language. Then, click the DOWNLOAD button.
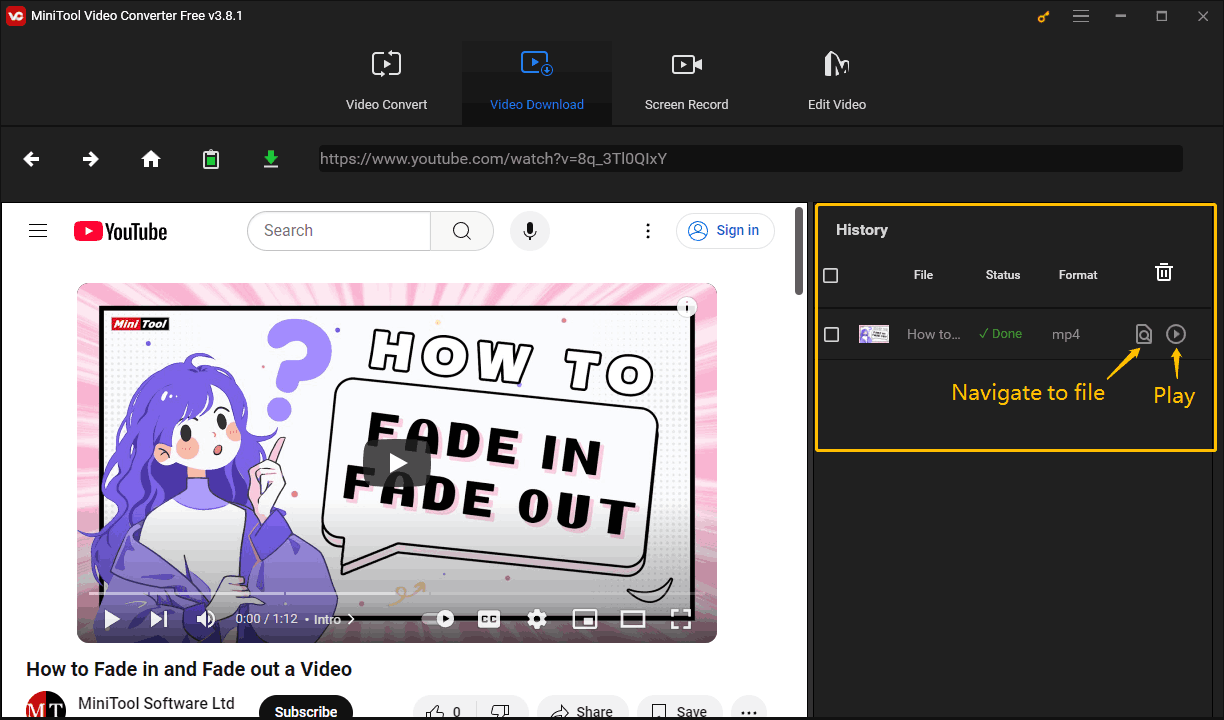
Step 5. Preview the downloaded video and view file location.
After the video download is complete, click on the Play icon to preview the video directly. You can also click on the Navigate to file icon to check the location where the video is saved.
Click to Tweet: MiniTool Video Converter can download YouTube videos quickly. This free downloader can also convert audio and video formats, and supports screen recording. These features are very useful!
#2. Online Video Downloader on viddown.net
Online Video Downloader on viddown.net is a versatile tool for downloading videos on platforms like YouTube, Instagram, TikTok, Twitter (X), and Facebook. It supports high-speed downloads of videos, music, and playlists in various qualities without watermarks. In addition, you can also get thumbnails of videos.
Online Video Downloader on viddown.net does not contain any ads. It is cross-browser compatible and can be accessed smoothly by multiple browsers such as Chrome, Firefox, Edge, etc. Whether using a desktop or mobile device, users can easily save content in HD format. Enjoy a seamless, ad-free experience at the same time. If you need a flexible and reliable video downloader tool, you must not miss this online tool.
Let’s learn how to download YouTube videos with Online Video Downloader:
Step 1. Navigate to the YouTube website and copy the video’s URL.
Step 2. Open viddown.net in any web browser and paste the copied YouTube video URL into the address bar. Afterward, either click the Download button or hit the Enter key on your keyboard to access the available download options.
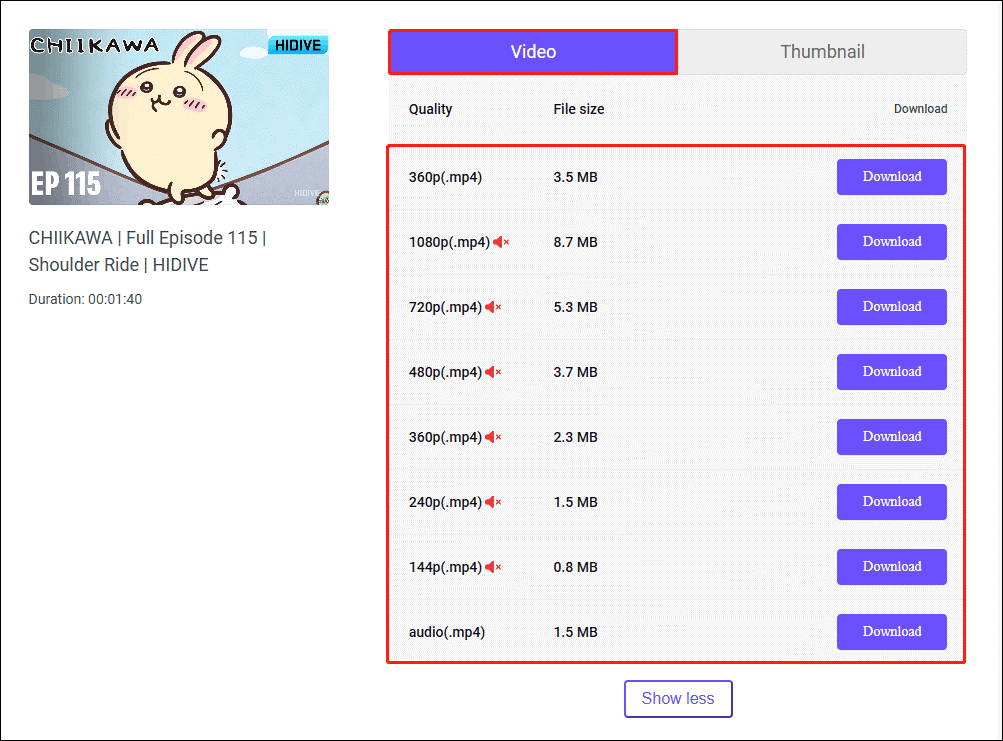
Step 3. When the download options appear below the address bar, click on Show more to reveal all the available video quality options. Select a video quality and then click the corresponding Download button.
Step 4. Occasionally, clicking the Download button may redirect to the video playback page. If this happens, click on the three-dot icon in the bottom-right corner of the player and select the Download option from the menu.
Step 5. After the video has completed downloading, you can find and view it from your browser’s Downloads tab.
Do you see the Thumbnail tab next to the Video tab? Switch to the Thumbnail tab, select a picture resolution, and then you can download the thumbnail of the video. Isn’t it convenient? If you want to download a YouTube video and its thumbnail image instantly, give it a try!
#3. Freemake Video Downloader
Freemake Video Downloader is an application that allows you to download videos and audios from websites, including YouTube and YouTube Music. You can use it to download YouTube videos in MP4, WebM, and Flash FLV formats. All the YouTube videos can be downloaded as offline files. What’s more, Freemake Video Downloader supports more than 500 audio and video formats.
In addition, Freemake Video Downloader supports HTTP and HTTPS protocols and allows users to choose video quality, resolution, and file size. However, the free plan of Freemake Video Downloader automatically adds the Freemake logo when downloading videos. You need to purchase the premium upgrade to remove this logo. After upgrading, you can also download videos longer than 3 minutes.
Step 1. Go to the YouTube wbsite and copy the video URL from the browser’s address bar.
Step 2. Launch Freemake Video Downloader and click the Paste URL button from the top left corner of the interface.
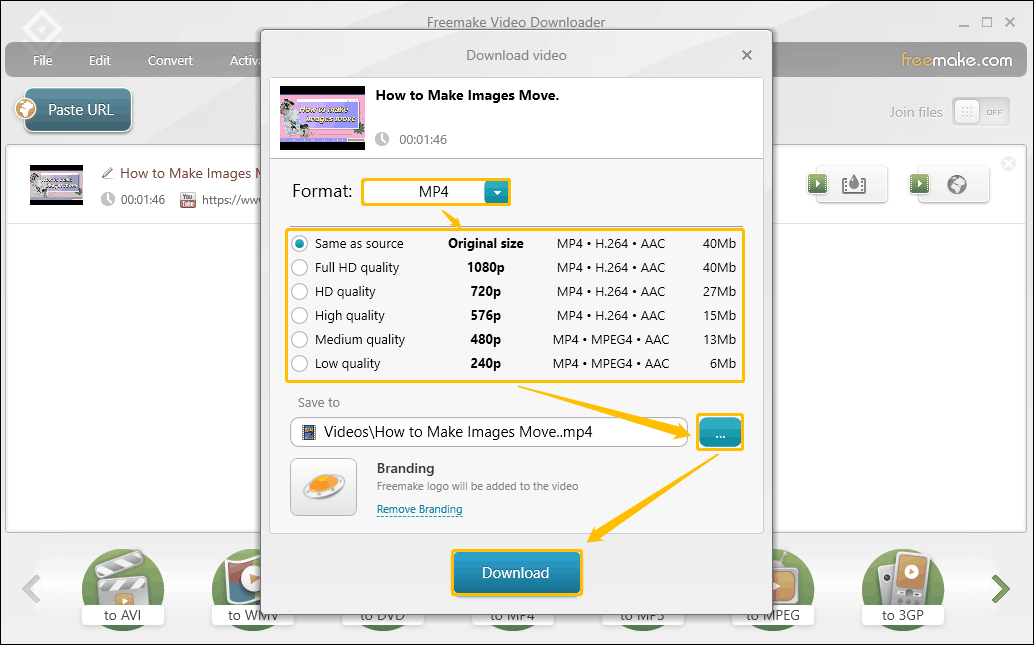
Step 3. Wait a few minutes and a window will pop up. In the Download video window, expand the Format option, and choose a video format you want. Then select a video quality option, click the three-dot button next to the Save to option to choose a folder to store the YouTube video, and finally click the Download button to start downloading.
Step 4. After that, Freemake Video Downloader will ask you whether to download the video without watermark. You can choose Download without logo to download the video without logo, but this requires you to upgrade. Of course, you can also click Continue with logo to download the video with logo directly.
Part 2: Import a YouTube Video to Kdenlive
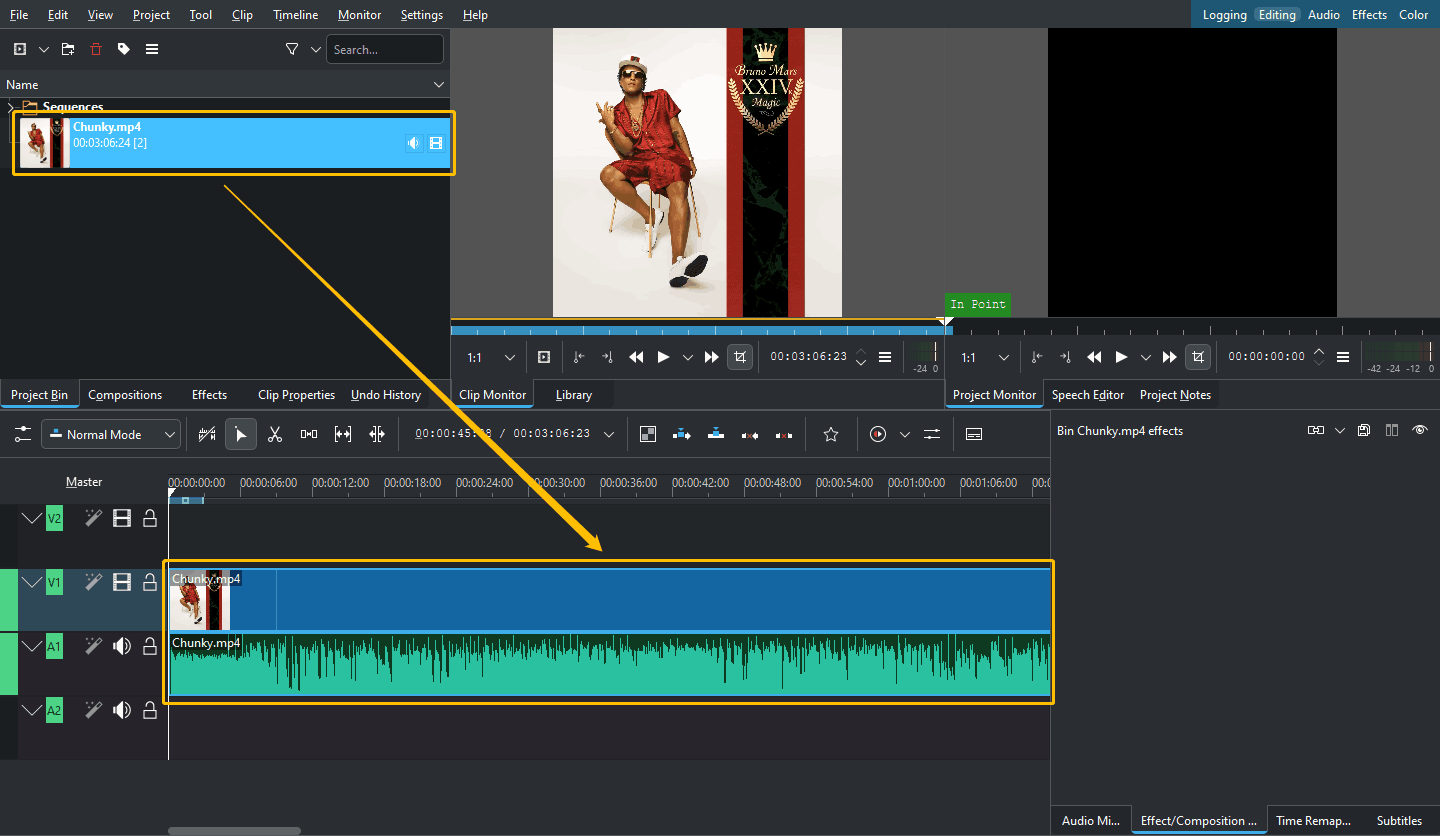
Kdenlive has a lot of options in its interface. Many people may feel overwhelmed when they open it for the first time. Don’t worry, you can follow the steps and the example pictures I provide for you, and upload YouTube videos to Kdenlive step by step.
If you haven’t downloaded Kdenlive yet, go to the official website of Kdenlive (kdenlive.org), and then download the appropriate version of Kdenlive for your computer system. Then, launch this professional video editing application on your computer. You can select video files and import them to Kdenlive in 3 ways:
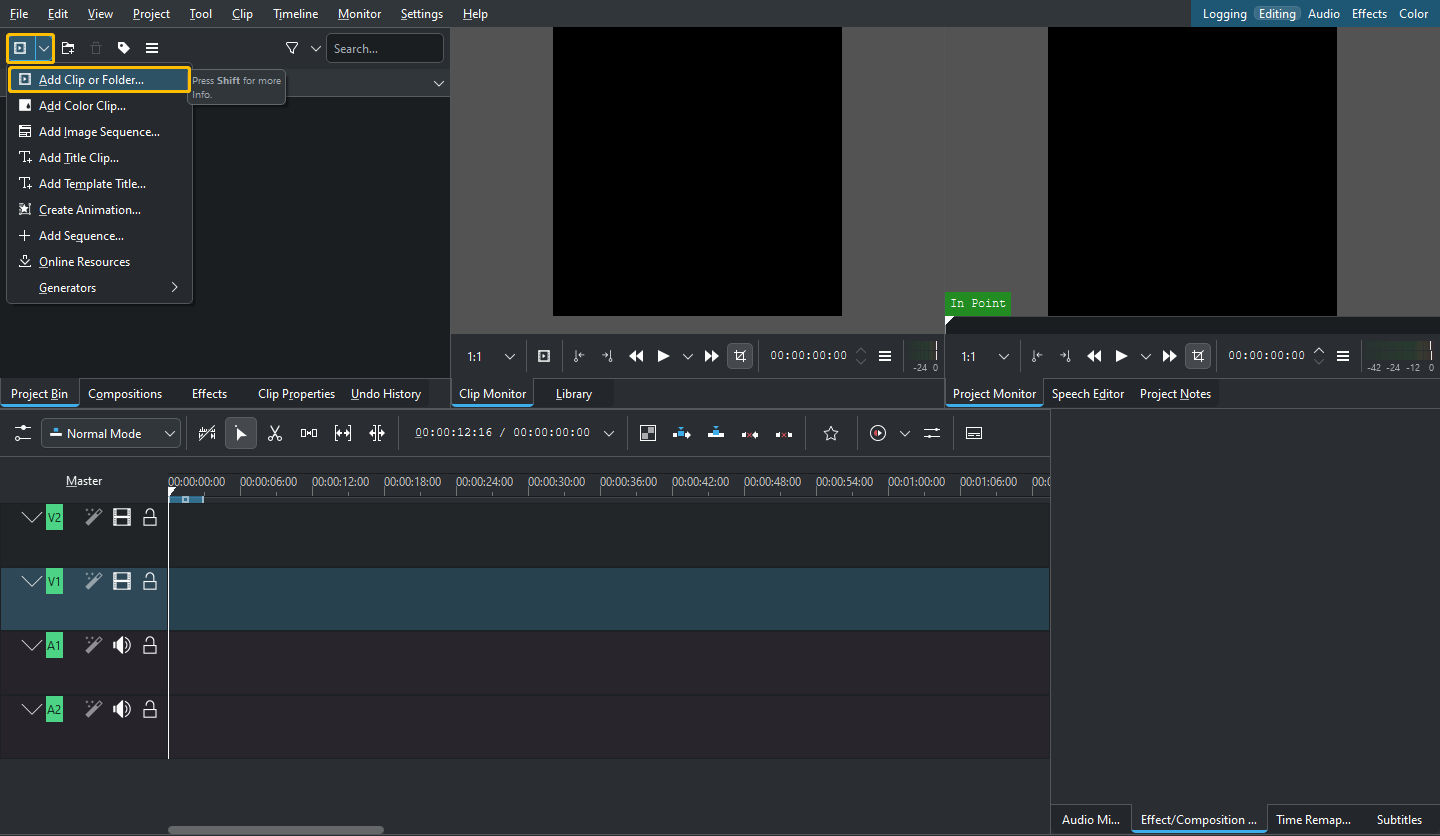
Way 1: Click the button in the upper left corner of the interface to expand more options and select Add Clip or Folder in the drop-down menu.
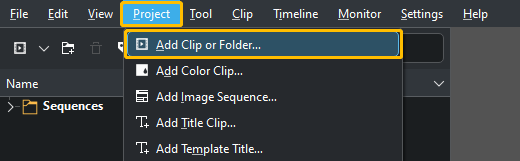
Way 2: There are many options at the top of the screen. Click the Project tab, then select Add Clip or Folder from the drop-down menu.
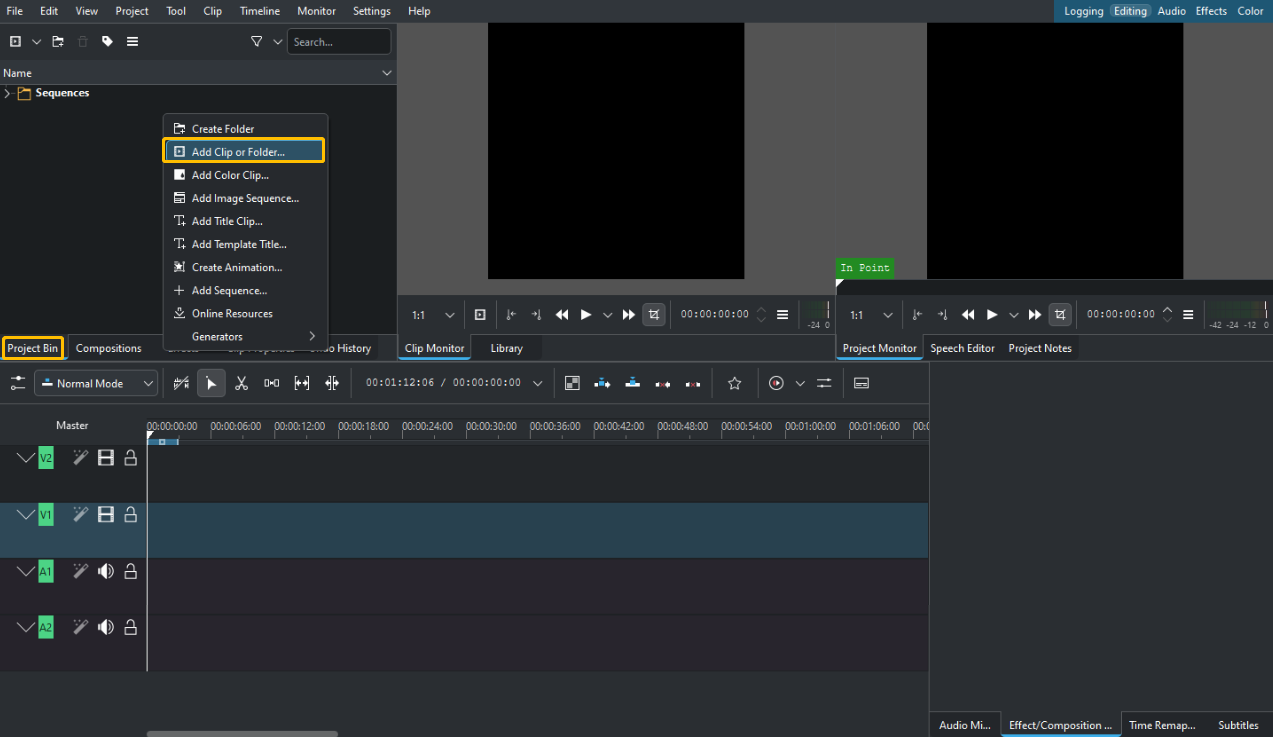
Way 3: In the upper left window of the interface, make sure you select the Project Bin tab. Then right-click any blank area of the window and select the Add Clip or Folder option from the drop-down menu.
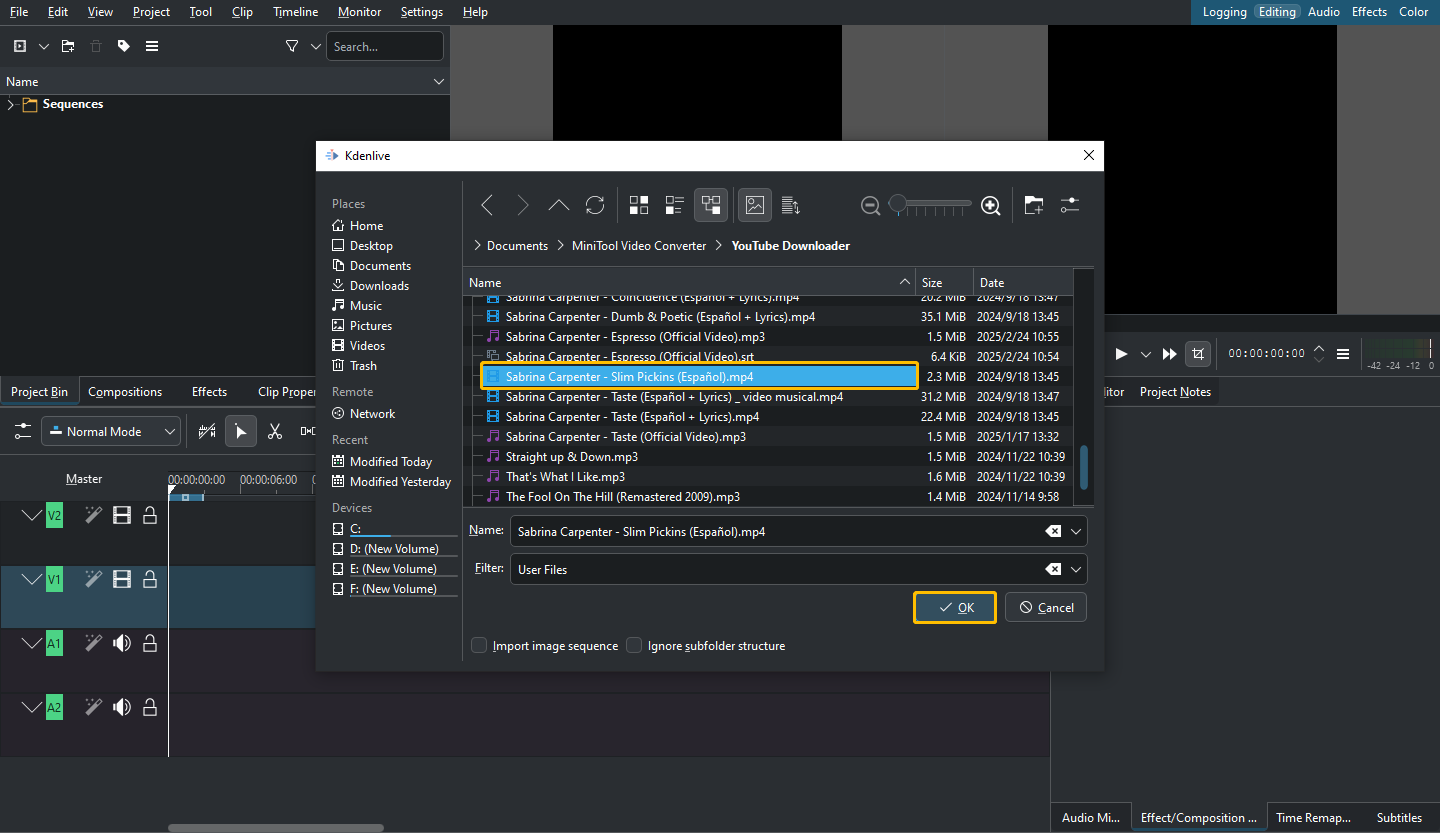
Just use any of the 3 methods to open the file selection window. Then you can select the YouTube video you downloaded from the window. If you need to select multiple videos, you can hold down the Ctrl key on the keyboard, and select the videos you want to add. After selecting, release the Ctrl key, and click the OK button to import all the selected videos into Kdenlive.
The videos you added will be saved in the Project Bin section. Drag and drop the videos to the tracks at the bottom of the interface to start editing them.
Other Video Editor to Edit YouTube Videos
MiniTool MovieMaker is a Kdenlive alternative. You can add effects, transitions, motions, text, and filters to a video. You can also use it to edit YouTube videos, clip a YouTube video, or make a vlog. Compared to Kdenlive, MiniTool MovieMaker is more suitable for video editing beginners.
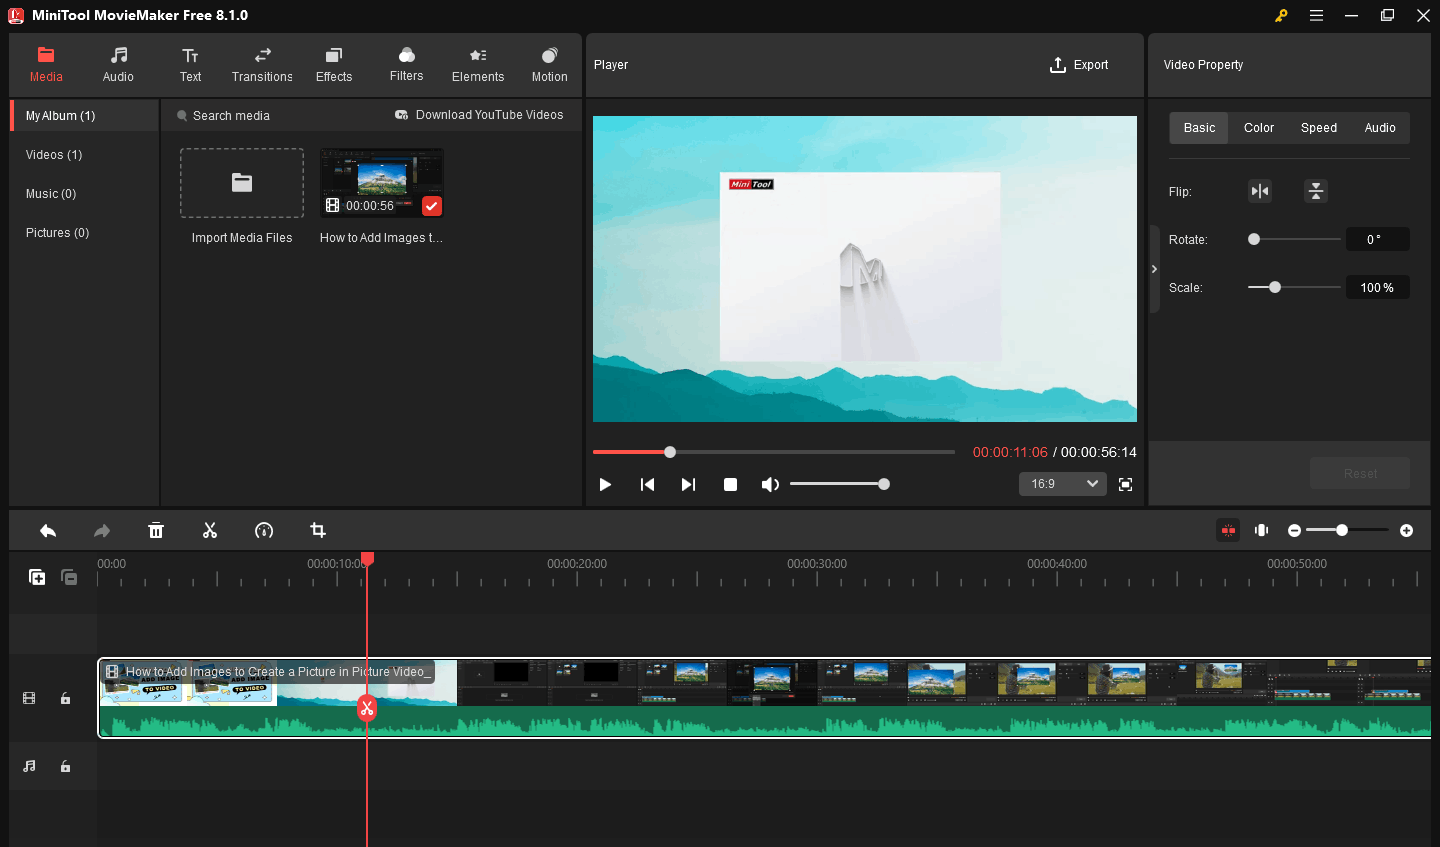
Try making a video with MiniTool MovieMaker now!
MiniTool MovieMakerClick to Download100%Clean & Safe
More options for editing YouTube videos or songs:
Final Words
Kdenlive’s professional functions and stable performance make more and more people prefer it. You can use Kdenlive to edit YouTube videos. Before that, you need to use third-party software to download YouTube videos, such as MiniTool Video Converter. Then you can import a YouTube video to Kdenlive.
If you have any questions when using MiniTool Video Converter to download videos from YouTube, please feel free to contact us at support@minitool.com, or contact me by clicking the Twitter button in the profile card below.
About The Author

Position: Columnist
Mia joined MiniTool as an SEO editor following her university graduation, bringing a strong foundation in digital content optimization. She has since developed extensive expertise in creating technical articles and delivering practical solutions for video conversion, video compression, and audio transcription. She remains current with emerging software trends and continuously refines her content strategy based on real user feedback and industry developments.