DaVinci Resolve is the world’s only solution that combines editing, color correction, visual effects, motion graphics, and audio post-production all-in-one software tool. You may find this application allows you to create a better new video with YouTube videos. How to import YouTube videos to DaVinci Resolve? Here is the comprehensive guide from an audio video converter – MiniTool Video Converter.
Everything About DaVinci Resolve
Here is some information about DaVinci Resolve, especially what video formats it supports. It’s essential for importing YouTube videos to DaVinci Resolve.
What’s DaVinci Resolve
DaVinci Resolve is a video editing application, developed by Australian company Blackmagic Design that combines color correction, visual effects, audio post-production, and more. It is widely used in film and television post-production, available for macOS, Windows, and Linux.
DaVinci Resolve is designed to inspire creativity so you can focus on your best work. It has two versions: the free version and DaVinci Resolve Studio. The free version includes multi-user collaboration and HDR grading. DaVinci Resolve Studio includes everything in the free version, plus the DaVinci Neural Engine, dozens of additional Resolve FX, temporal and AI spatial noise reduction, text-based editing, magic mask, film grain, optical blur, and more.
Features of DaVinci Resolve
As an extremely strong video editing software, DaVinci Resolve is famous for its many prominent features. Let’s have a detailed learning about these features one by one.
- Comprehensive editing tools: DaVinci Resolve supports complex projects and multi-format timelines, enabling efficient editing processes. It provides a full range of video editing tools, including trim, audio processing, and multi-track editing.
- Rich visual effects: The built-in Fusion offers powerful visual effects and animation production capabilities, supporting 2D and 3D environments. It allows users to add various effects like particle effects, light effects, matte painting, and tracking.
- Powerful color correction capabilities: It is equipped with industry-leading color correction tools, enabling precise color grading and adjustment, as well as the application of complex color effects. It provides tools such as primary color wheels, curves, and saturation curves.
- Advanced audio processing: The integrated Fairlight audio tools can handle complex audio editing tasks, supporting up to 1,000 tracks of audio processing. It includes functions such as dynamics processing, EQ, surround sound mixing, noise reduction, and reverb 2.
- Efficient multi-user collaboration: The multi-user collaboration feature is unique and allows multiple people to work on the same project simultaneously, updating and synchronizing changes in real time, thus improving work efficiency.
- Multiple GPUs for real-time playback: Over 100 CPUs accelerate Resolve FX such as blurs, light effects, noise, image restoration, lens flair, stylizing, and more.
The Supported Formats of DaVinci Resolve
DaVinci Resolve is compatible with a wide range of video, audio, and even image formats.
Video formats: Common video formats like MP4, AVI, and MOV. Plus, MXF, DPX, EXR, and more.
Audio formats: AAC, AIFF, MP3, CAF, and more.
Image formats: DNG, DPX, EXR, JPG, PNG, PSD, TIFF, and more.
How to Download YouTube Videos to DaVinci Resolve-Supported Format?
How to import videos in DaVinci Resolve? You need to download the wanted videos to DaVinci Resolve-supported format first and then add them to DaVinci Resolve.
You can find a large number of YouTube video downloaders on the market if you don’t want to subscribe to Premium. Below are two great YouTube video downloaders I recommend to you as consideration to help you download YouTube videos to DaVinci Resolve-supported video format.
MiniTool Video Converter
MiniTool Video Converter is an all-in-one application designed for Windows users, which contains video conversion, video download, and screen recording features.
When it comes to video download, MiniTool Video Converter supports downloading music, playlists, videos, as well as subtitles from YouTube within a couple of minutes. The downloadable video formats are MP4 and WebM while the audio formats are MP3 and WAV.
At the same time, as the name suggests, MiniTool Video Converter can also convert video and audio into more than 1,000 formats like MP4, MP3, WAV, FLV, WebM, MOV, WMV, MKV, and more. In order to save your time and increase your conversion effectiveness, it allows you to convert batch files at once up to 5. You can set the maximum convert tasks on the Settings.
The more special point of this downloader than other downloaders is that it is available to record what happens on your computer with the high-definition MP4 format. You don’t need to worry about the watermarks and time limitations.
Other brilliant features of MiniTool Video Converter:
- Feature with an in-app YouTube browser to find video URLs.
- Directly convert video and audio to device-supported formats in 4K.
- Extract audio from YouTube videos.
- Download videos without logging in or signing up.
- Download videos up to 10 simultaneously.
How to use MiniTool Video Converter to download videos from YouTube to local video files? Learn the steps below.
Step 1: Click the following download button to get this video audio downloader. Then, launch this software on your computer and go to the Video Download tab.
MiniTool Video ConverterClick to Download100%Clean & Safe
Step 2: Click the menu icon on the top-right corner of the main interface and choose the Settings option.
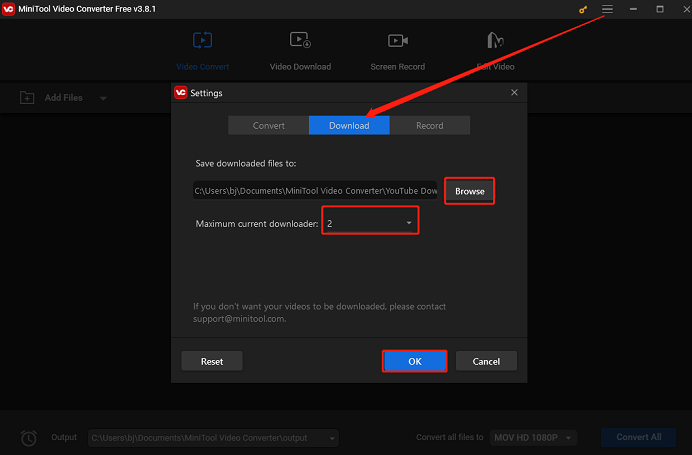
Step 3: In the pup-pop window, switch to the Download button and click Browse to change the position of downloaded files. Then, expand the Maximum current downloader in the drop-down list to decide the number of videos you want to download simultaneously. Lastly, click OK to confirm your change.
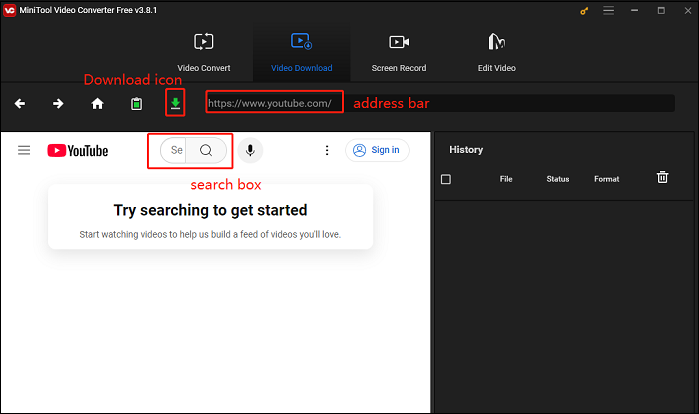
Step 4: Go to the official website of YouTube using your browser, find the video you want to edit, and copy its URL. Then, go back to MiniTool Video Converter, paste the URL of the video into the address bar, and click on the Download icon to continue.
You’re also allowed to directly search for the wanted music in the search box on MiniTool Video Converter.
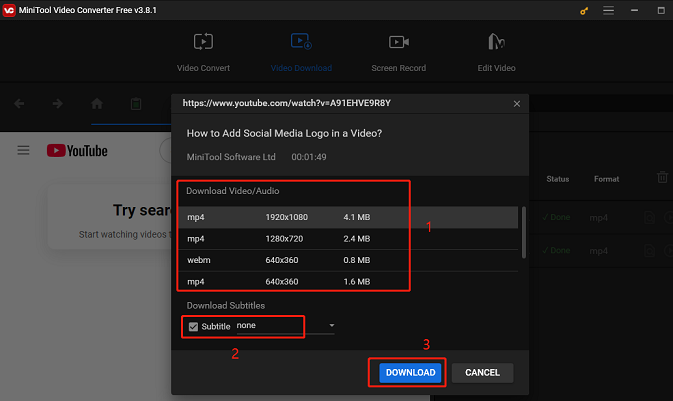
Step 5: In the new window, select mp4 or webm as the output video format under the Download Video/Audio option. Then, choose whether to download subtitles and click on the DOWNLOAD button to start downloading the video.
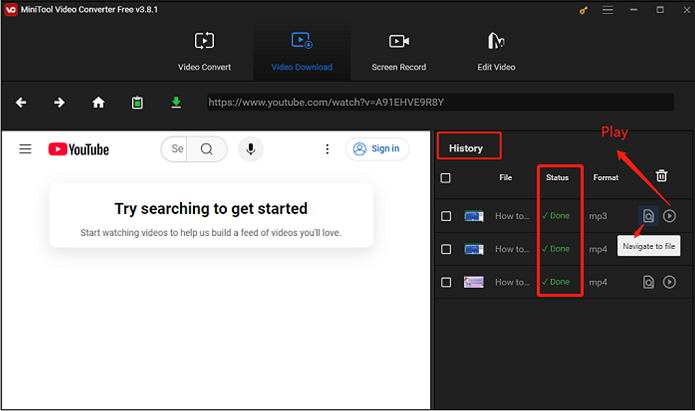
Step 6: When the process ends, the Status will be shown as Done. In the History area, click the Navigate to file icon to find the file position of the downloaded video on your computer, and click the Play icon to watch the video.
Online Video Downloader on viddown.net
If you want to download videos without downloading and installing any software, how about downloading YouTube videos online? Online Video Downloader on viddown.net is for you. With it, you can easily save content from YouTube, Instagram, TikTok, Facebook, Vimeo, and Twitter to your local storage with a few clicks and enjoy them anywhere, anytime.
What’s more, you can access it on any browser on your Android, iOS, Windows, or macOS device. The most special feature of viddown.net is that it allows you to download thumbnails of videos. Plus, unlike other online downloaders, this one doesn’t contain any ads and watermarks.
Main features:
- Free, clean, no ads, and no watermarks.
- Excellent compatibility.
- Support many online video-sharing platforms.
- No installation or registration required.
- Unlimited downloads.
Let’s learn how to download videos from YouTube with Online Video Downloader on viddown.net.
Step 1: Access the YouTube website and get the video URL.
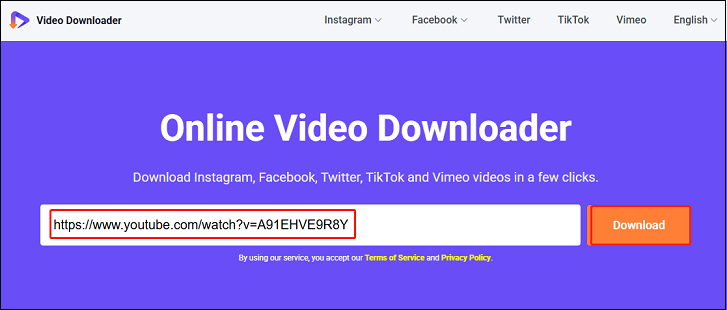
Step 2: Go to viddown.net. Then paste the video link into the address bar and click the Download button.
Step 3: When the download options appear below the address bar, click on Show more to reveal all the available video quality options. Select a video quality and then click the corresponding Download button.
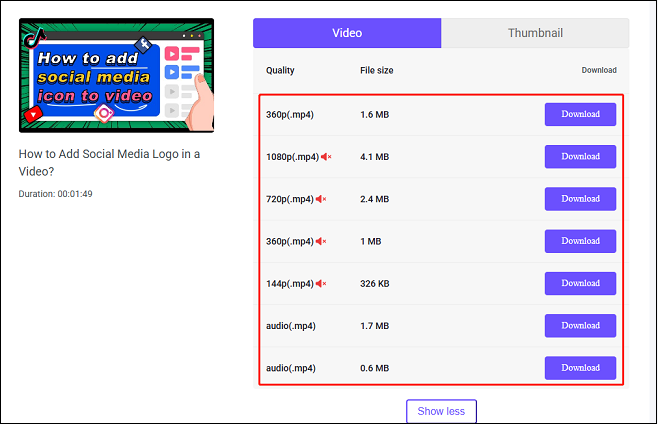
Here, you can switch to Thumbnail to download the video thumbnail if you need.
Step 4: Sometimes, clicking the Download button doesn’t download the video directly but plays the video. If this happens, click on the three-dot icon in the bottom-right corner of the player. Then, select the Download option from the menu.

Step 5: After the video has completed downloading, you can find it in your browser's Downloads tab.
![How to Save Videos from YouTube to Your Devices Free [Full Guide]](https://images.minitool.com/youtubedownload.minitool.com/images/uploads/2024/08/how-to-save-videos-from-youtube-thumbnail.png)
How to Import YouTube Videos to DaVinci Resolve
Up till now, you have downloaded the desired video from YouTube using one of the handy downloaders. If you have installed the DaVinci Resolve app, the only thing is to add the downloaded video to DaVinci Resolve. Now this is the guide on how to add YouTube videos to DaVinci Resolve. We will take Windows as an example. Let’s get started!
Step 1: Open DaVinci Resolve on your computer. You’ll be greeted by a pop-up window allowing you to create a new project or open pre-existing ones. You can customize the file name and click on the Open button on the right side of the interface to enter the editing interface.
Step 2: To import YouTube videos, click on the File > Import > Media. Alternatively, locate the video and drag and drop it to the DaVinci Resolve.
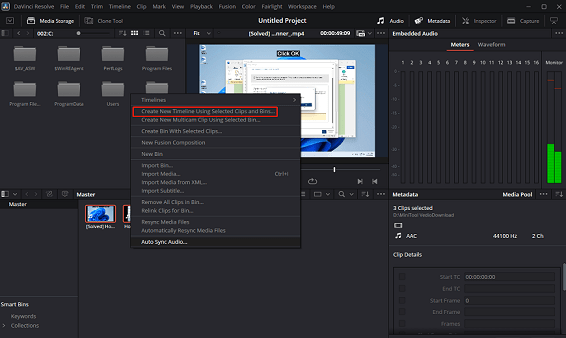
Step 3: All the imported files will appear in Master. To begin editing, you’ll need to mark your footage. To create a new timeline, you’ll right-click inside the media pool and go to Create New Timelines Using Selected Clips and Bins. Then, rename the timeline and click on Create.
Step 4: Now, it’s time to add music, effects, transitions, and texts, and use color correction to make the video satisfy your needs.
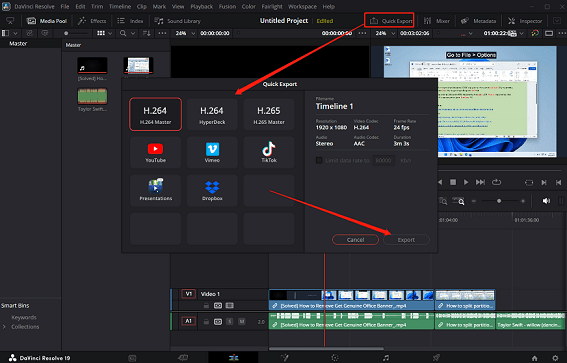
Step 5: Once you’re happy with your edit, click on the gear icon located on the bottom right of the screen to make sure the project settings are correct. Then, click on Quick Export at the top right of the interface. You can save the file to your preferred folder on your computer or directly to YouTube, Vimeo, or TikTok.
Step 6: Press Export.
Bonus: Find the Best DaVinci Resolve Alternative
If you think DaVinci Resolve is too complicated and isn’t suitable for you, consider using the DaVinci Resolve alternative – MiniTool MovieMaker. As a beginner, I usually use it to transform my video into a piece of art and give the video a stunning look.
MiniTool MovieMakerClick to Download100%Clean & Safe
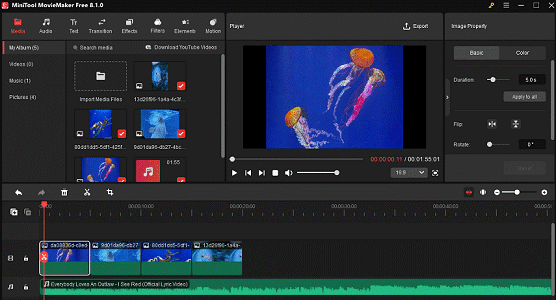
MiniTool MovieMaker, developed by MiniTool Software Ltd. and designed for Windows users, is an excellent editing software. With an intuitive interface and rich features, MiniTool MovieMaker provides a huge library of filters, effects, video transitions, motions, animated stickers, etc.
In addition, MiniTool MovieMaker has basic editing tools, you can split videos, trim videos, crop videos, rotate videos, change video speed easily, reverse videos, change phone’s color, and more. You can do multitrack editing, supporting up to 9 video tracks and 2 audio tracks. With these editing tools, you can make slideshows, DIY videos, vlogs, tutorials, and more.
Lastly, MiniTool MovieMaker can save your videos in standard or HD output video formats like WMV, MP4, AVI, MOV, MKV, WEBM, MP3, GIF, etc. Most notably, it allows exporting videos up to 4K without a watermark, and this is free! You can share them on social media sites like YouTube and Facebook.
To Wrap Things Up
Are you still wondering how to import YouTube videos to DaVinci Resolve? DaVinci Resolve doesn’t support you adding YouTube videos to it directly. All you need to do is download YouTube videos with legal methods and import the downloaded videos to DaVinci Resolve for editing.
You can download videos from YouTube using one of your preferred YouTube video downloaders from this post. Here, I strongly recommend the easy-to-use and free application – MiniTool Video Converter. You can use it not only to download YouTube videos in more formats and optional video quality but also to convert audio and videos.
Please feel free to reach out to us via support@minitool.com or contact me directly on X if you have any questions or suggestions while using MiniTool Video Converter and MiniTool MovieMaker.
About The Author

Position: Columnist
Libur is always willing to try new things and full of enthusiasm for life. At the same time, she is passionate about making fantastic movies. Now, she has become an English editor about multimedia in MiniTool. She is good at writing articles about video editing, video conversion, and screen recording. During her spare time, Libur loves climbing mountains and listening to music. By the way, her favorite singer is Taylor Swift.