Do you ever worry about losing your YouTube videos? If so, we can help. In this guide from MiniTool Video Converter, we’ll walk you through how to back up YouTube videos in two efficient ways. You can either download them to your local device and upload them to a cloud storage service or use Google Takeout. This way, you can ensure that your content is always safe and secure.
Why Back up Your YouTube Videos?
As the most popular video-sharing platform, YouTube can be said to be an ocean of videos. However, the platform does not support automatic backup, so how to back up YouTube videos, channels, and playlists has always been a topic of concern.
Before we delve into how to back up YouTube videos, it’s essential to understand why should you do it. There are several reasons why you may want to back up your YouTube videos.
Firstly, YouTube may delete or remove your videos without your consent, if they violate its terms of service, or if they are claimed by a third party. By backing up your videos, you can have control over your content and avoid losing your precious memories or work.
Secondly, YouTube downsamples your videos when you upload them, which means you will not get the full-resolution original video if you download it from YouTube. By backing up them, you can keep the original quality and format of your videos and enjoy them without any degradation.
Last but not least, YouTube does not allow you to download videos directly from its website unless you subscribe to YouTube Premium, which is a paid service. Backing up your videos can help you watch them offline anytime and anywhere, without relying on an Internet connection or paying a fee.
How to Back up YouTube Videos
There are two main ways to back up YouTube videos: downloading them to your local device o and then uploading them to a cloud storage service, or using Google Takeout. In this section, we will explain in detail how to back up videos on YouTube with both methods. Don’t hesitate to read below!
Way 1: Download YouTube Videos and Upload Them to the Cloud Storage Service
The first way gives you more flexibility in choosing the format and quality of the video, but it may take longer and use more bandwidth.
Stage 1: Download YouTube Videos
To download YouTube videos to your local device, you need to use a third-party tool, such as a website, a browser extension, or a software application. There are many options available, but it’s important to be careful about the tool you choose to ensure it is of high quality, secure, and legal. Some tools may not support the video format, resolution, or length you want, or some may contain malware, viruses, or ads.
Here are some reliable tools for downloading YouTube videos to your local device:
#4K Video Downloader
4K Video Downloader is a free software application that allows you to download YouTube videos in various formats and resolutions, including 4K and 8K. You can also download playlists, channels, subtitles, and 3D and 360-degree videos. It is compatible with Windows, macOS, and Linux.
This free video downloader also supports downloading videos from other sites, such as TikTok, Facebook, SoundCloud, Vimeo, and more. Its built-in browser lets you search for video and audio to download without leaving the application.
Moreover, the Smart Mode feature lets you download videos faster by setting the quality, resolution, and other preferences once and automatically applying them to all future downloads.
Here’s how to download YouTube videos to your local device via 4K Video Downloader:
Step 1. Download and install 4K Video Downloader from its official website, and open the software.
Step 2. Go to YouTube and copy the URL of the video you wish to back up.
Step 3. Go back to 4K Video Downloader and click on the Paste Link button. Then, the tool will automatically parse the video information.
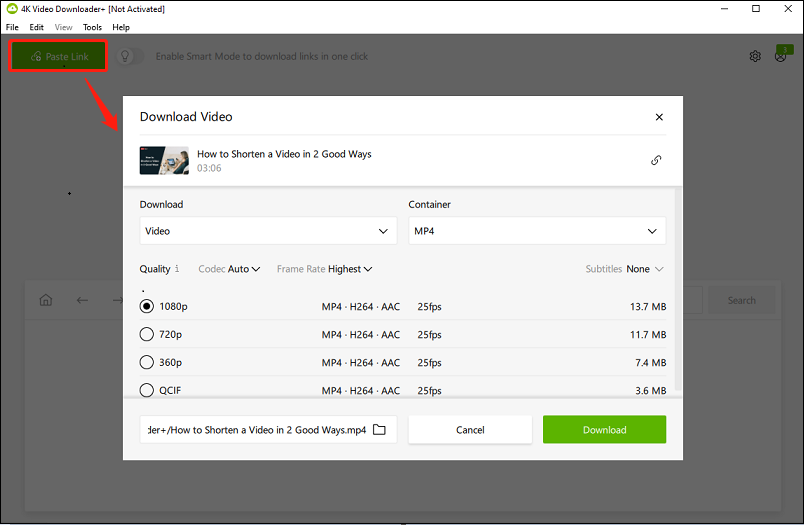
Step 4. On the pop-up window, select your preferred quality, format, and whether to download subtitles, then click the Download option to start downloading.
Step 5. Once the download is finished, the video has been saved to your computer.
#MiniTool Video Converter
MiniTool Video Converter is another reliable and robust video downloader for users who’d like to save videos/music/playlists/subtitles from YouTube. This tool offers you the option to download YouTube videos and audio files in various formats, such as MP4, MP3, WAV, and WebM. On top of that, it offers high-speed and superior-quality downloads.
Apart from video download, it also supports video format conversion and screen recording. Simply put, you can batch convert video files to various formats within minutes. Besides, you can also choose to record the full screen or part of your screen without any watermark or time limit.
The following is a guide on how to download videos from YouTube to your local device using MiniTool Video Converter:
Step 1. Download and install MiniTool Video Converter
Click the download button below to download and install MiniTool Video Converter. Once installed, launch this free audio and video downloader.
MiniTool Video ConverterClick to Download100%Clean & Safe
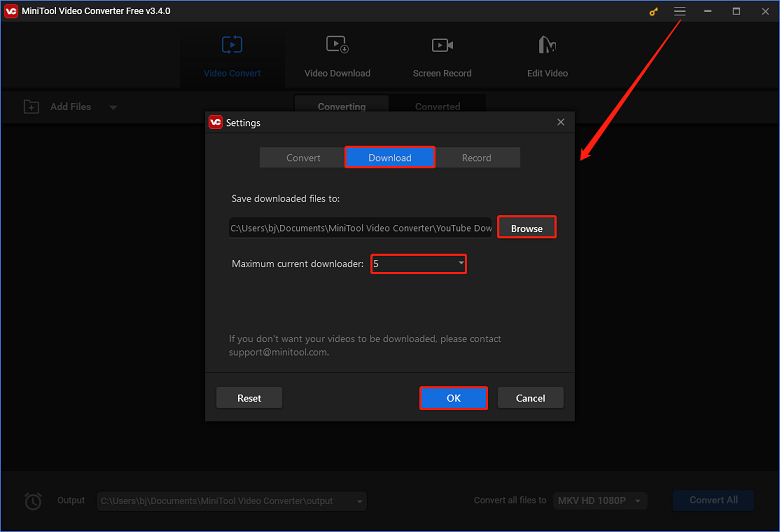
Step 2. Customize the download settings
- Click the Menu icon in the upper right corner and select Settings from it.
- In the pop-up window, go to the Download tab.
- Click the Browse button to choose where to save the downloaded files.
- Expand the Maximum current downloader drop-down menu to determine how many videos can be downloaded simultaneously.
- Click on OK to save the settings.
Step 3. Download YouTube videos
1. Click on the Video Download tab at the top of the screen.
2. Go to YouTube to copy the URL of your desired video and paste it into the address bar of MiniTool Video Converter. Or, you can enter keywords in the search box to search for the videos, channels, or playlists you’d like to download.
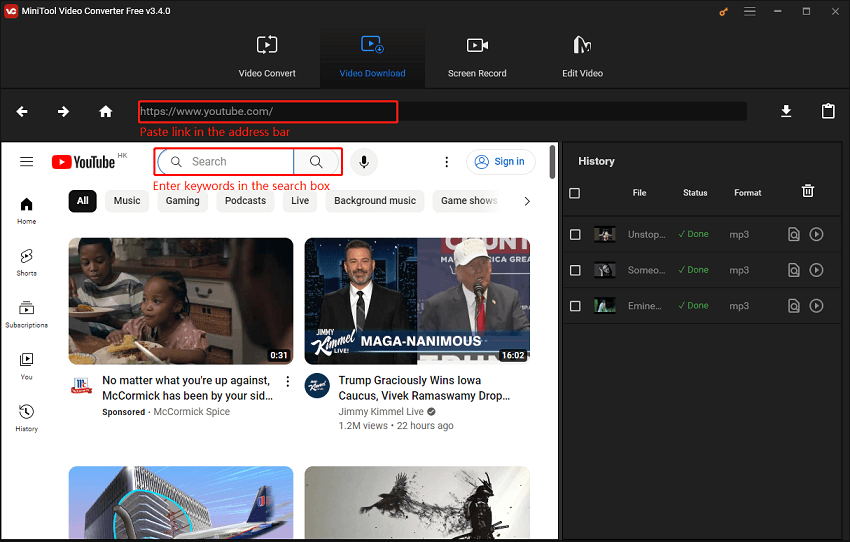
3. Once the video link appears in the address bar, click the Download icon next to the address bar.
4. Select a download format and click on DOWNLOAD to start the downloading process.

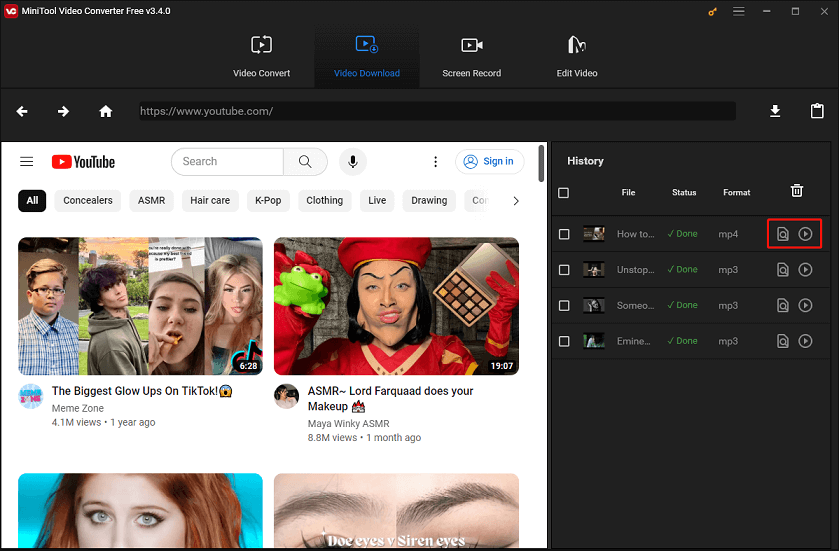
Step 4. Locate or play the downloaded video
In the History panel, you can check the download status. Once it is done, you can click the Navigate to file icon locate the downloaded video on your local file, or click the Play icon to watch it immediately.
#Y2mate
Y2mate is an online tool that allows you to download HD-quality videos and audio from YouTube and other social media platforms like Facebook and Dailymotion. With this tool, videos can be downloaded into various formats, such as MP4, M4V, 3GP, MP3, WebM, etc. What’s more, Y2mate offers unlimited downloads and requires no registration.
Here’s a step-by-step guide on how to download YouTube videos to your local device with Y2mate:
Step 1. Go to YouTube, find the video you’d like to back up, and copy its link from the address bar.
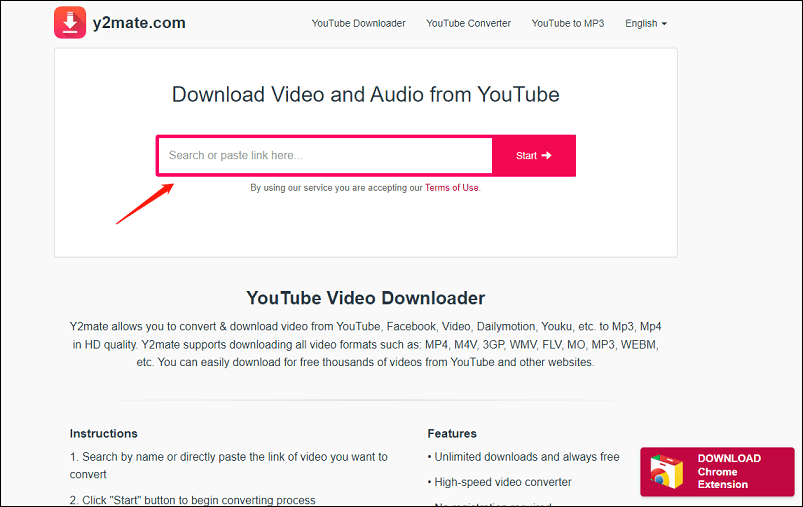
Step 2. Visit the official website of Y2mate on your web browser.
Step 3. Paste the link you copied earlier into the input box. Or, you can search for videos directly within Y2mate.
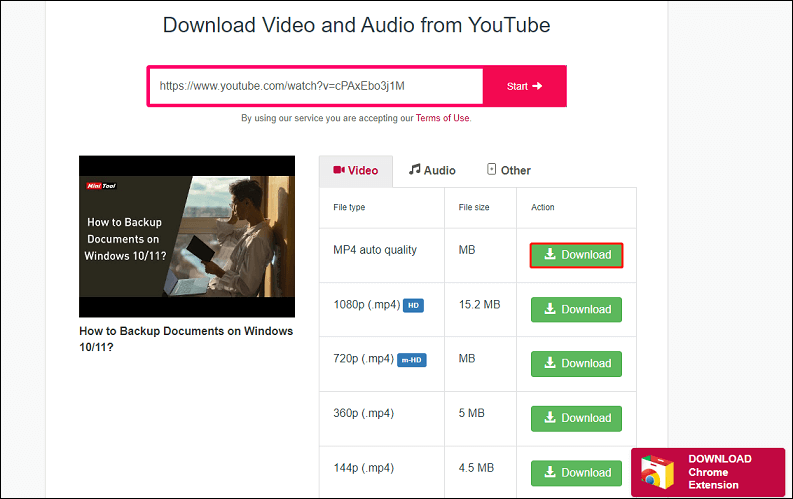
Step 4. Click on Start. Then, choose your preferred download format and quality from the given options and click on Download next to the selected option.
Step 5. Wait for the process to finish and check the location of the downloaded video.
Stage 2: Upload Downloaded YouTube Videos to Cloud Storage Service
Once you have the video file, you can upload it to your cloud storage service such as Google Drive, OneDrive, or Dropbox. This will not only help you free up space on your device but also enable you to access your downloaded videos from any device and location. Moreover, you can also share them with others and sync them across multiple devices.
The process, however, may vary depending on the cloud storage service you use. Let’s have a look at how to upload downloaded YouTube videos to Google Drive.
Step 1. Open Google Drive on your browser and log in to your Google account.
Step 2. Click on the + New button on the left and select File upload.
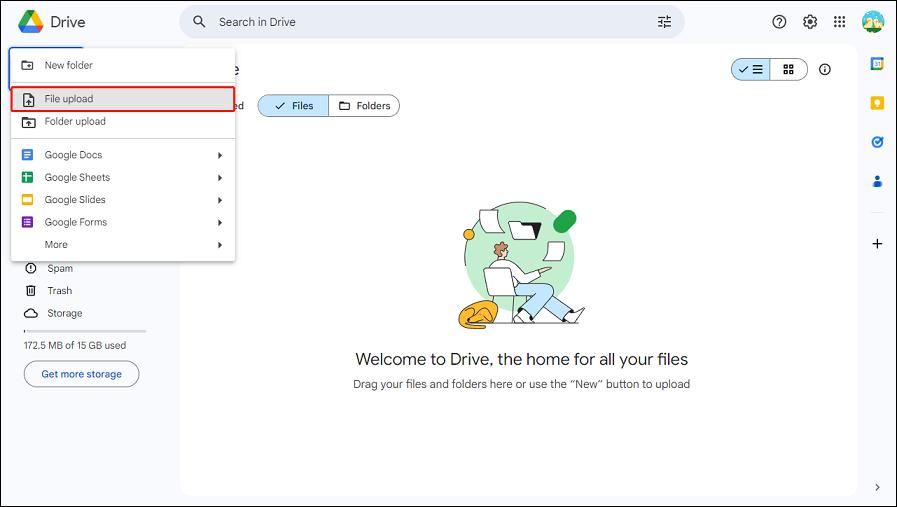
Step 3. Navigate to the folder where the downloaded YouTube video is stored and select it.
Step 4. Click on the Open button to start the upload process.
Step 5. Once the video is uploaded, you can access it from your Google Drive account on any device and share it with others.
Apart from Google Drive, you can also try using other cloud storage services.
Way 2: Use Google Takeout
If you want to back up your own YouTube videos, you can use Google Takeout, also known as Download Your Data, a service provided by Google that enables users to export their data from Google products, including YouTube, into a downloadable archive file.
You can choose which YouTube data to include, like videos, playlists, descriptions, metadata, and other information, and then create an archive that will be sent to your email. Afterward, you can download the zip file and extract the files to a folder on your device. You can also link Google Takeout with Dropbox or other online storage services.
The service is particularly useful for creating a backup of your YouTube data or transferring it to another service. However, the downside is that it can only back up your own videos, not videos uploaded by others. Additionally, you cannot customize the format and quality of your downloads.
So, if you’d like to back up your favorite videos from other channels or want to have more control over the video format and quality, it’s better to try the first method.
Here’s how to back up your own YouTube videos with Google Takeout:
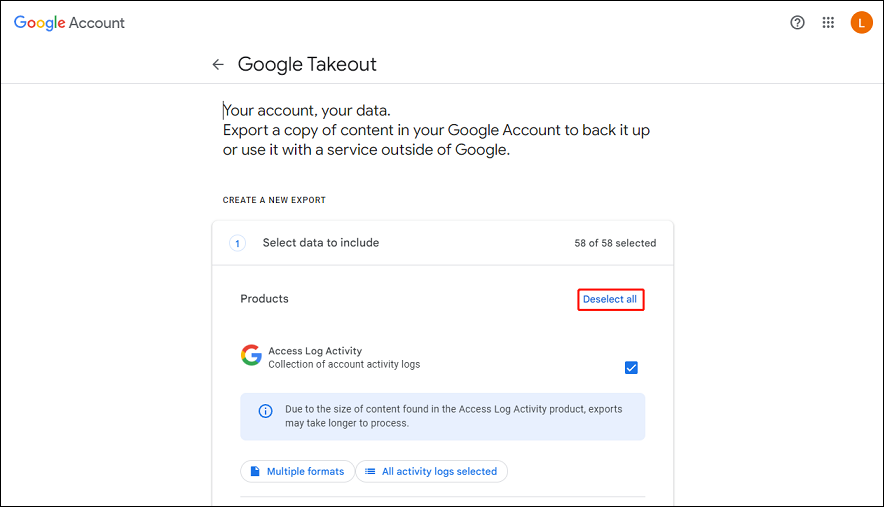
Step 1. Open the Google Takeout page in your browser.
Step 2. It will select all your data from Google products by default. Click on the Deselect all option.
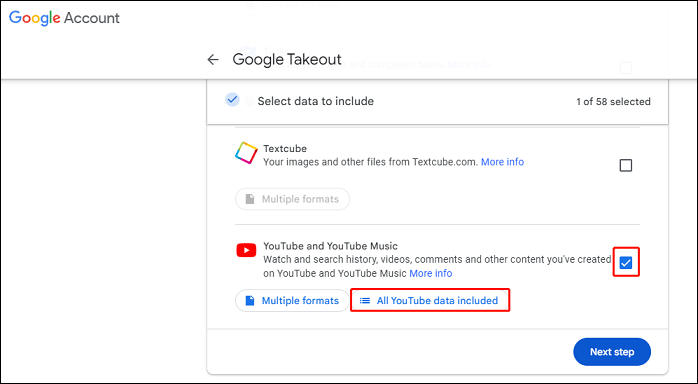
Step 3. Scroll down to the bottom and select YouTube and YouTube Music. Then, click All YouTube data included.
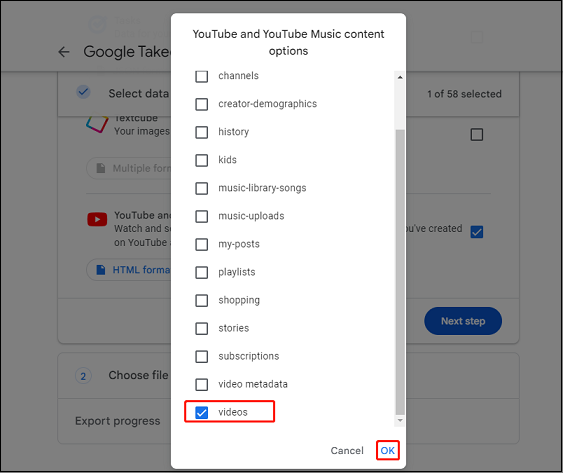
Step 4. Click Deselect all on the new page, then select videos and click on OK. You can also select other options to back up more data from YouTube.
Step 5. Click the Next step button at the bottom right corner of the list.
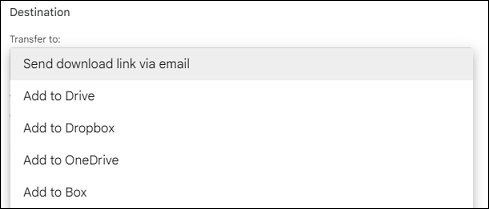
Step 6. Choose file type, frequency & destination.
Choose a destination: You can choose from Send download link via email, Add to Drive, Add to Dropbox, Add to OneDrive, or Add to Box.
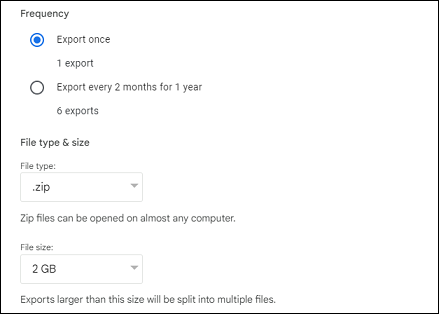
Select export frequency: choose Export once or Export every 2 months for 1 year.
Choose file type & size: Choose .zip or .tgz as your file type; choose file size from 1/2/4/10/50 GB.
Step 7. Click on Create export and wait for the export process to finish.
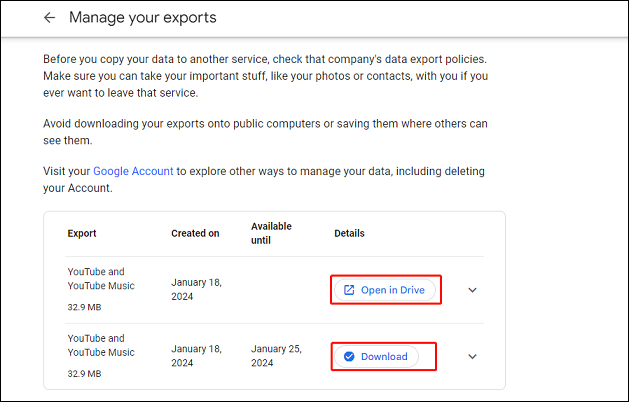
Step 8. After it’s completed, click on Download to download your YouTube videos. If you selected a cloud storage service as the export destination, click the Open in Drive/Dropbox/OneDrive/Box button.
That’s it! You’ve successfully backed up your YouTube videos with the help of Google Takeout.

Conclusion
Backing up YouTube videos is a smart way to protect your content from being lost or deleted. There are two options available - you can either download the videos to your local device and then upload them to a cloud storage service, or use Google Takeout. Both methods have their pros and cons, so it’s important to consider them carefully before deciding. Regardless of which method you choose, they will be able to meet your expectations and requirements.
If you have any questions or suggestions while using MiniTool Video Converter, please let us know by leaving a comment below or contacting us via support@minitool.com.