Dropbox is a popular cloud file storage or file hosting service that allows users to save files within online folders and sync them across devices. This MiniTool Video Converter article will guide you on how to save songs from YouTube to Dropbox. Let’s dive into it.
Can You Save Songs from YouTube to Dropbox
Dropbox is a popular cloud file storage and enables individual users and businesses to store, locate, manage, and share digital assets from a centralized location. Dropbox allows users to save files within online folders, sync them across devices, edit, and collaborate on files. Especially, automatic file backup means users don’t risk losing or misplacing a file and it helps you to save precious storage space as it bypasses the user’s hardware.
When it comes to saving songs from YouTube to Dropbox, the first thing you should know is what types of formats are supported by Dropbox. Actually, the audio-supported formats of Dropbox are AAC, WAV, WMA, FLAC, MP3, and OGA.
YouTube is a popular platform to watch and download music videos, which has millions of songs, playlists, and albums. You can download songs from YouTube with a Premium subscription, but these songs can’t seamlessly integrate with Dropbox.
Can’t we save songs from YouTube to Dropbox? Of course not. Fortunately, Dropbox supports uploading files to it, which means you can first download songs from YouTube and upload them to Dropbox. This is an indirect way to save songs from YouTube to Dropbox. Let’s focus on how to download YouTube songs to local files in a Dropbox-compatible format.
How to Download YouTube Songs to Local Files
You can use a lot of tools and applications to download YouTube songs to local files. Next, this article will recommend 3 useful applications for you to refer to.
#1. MiniTool Video Converter
If I only recommend one application for you to download songs from YouTube, MiniTool Video Converter is a must-download application. It is a free and versatile YouTube audio video downloader for Windows systems. With it, you can download 4K YouTube videos. This software also supports downloading audio, playlists, and subtitles from YouTube.
As the name suggests, MiniTool Video Converter supports converting video and audio to more than 1000 various video and audio formats, such as MP3, MP4, WAV, WebM, WMV, MKV, etc. At the same time, it can also batch convert videos or audio files to the same formats to save you time.
Apart from converting media files and downloading YouTube content, MiniTool Video Converter can also record computer screens without a time limit and watermark, and save the video into MP4, WMV, MOV, TS, FLV, and more formats.
How to use MiniTool Video Converter? Let’s look at the following step-by-step guide.
1. Download and install MiniTool Video Converter with the following installation package.
MiniTool Video ConverterClick to Download100%Clean & Safe
2. After the installation process finishes, launch this software to get into the main interface. Click the menu at the top-right corner of the main interface, choose Settings, and go to the Download tab to change the number of maximum current downloaders and the saved position of downloaded files. After finishing all the settings, don’t forget to press OK to save the changes.
3. Open the official website of YouTube, find the song you want to save to Dropbox, and copy the link of the song.
4. Go back to MiniTool Video Converter, you can see four table options on the screen: Video Convert, Video Download, Screen Record, and Edit Video. Switch to the Video Download option, paste the link of the song into the address bar, press the Enter key on your keyboard, and click on the Download button to download the song. You can also click on the Paste URL icon to enter the URL to download.
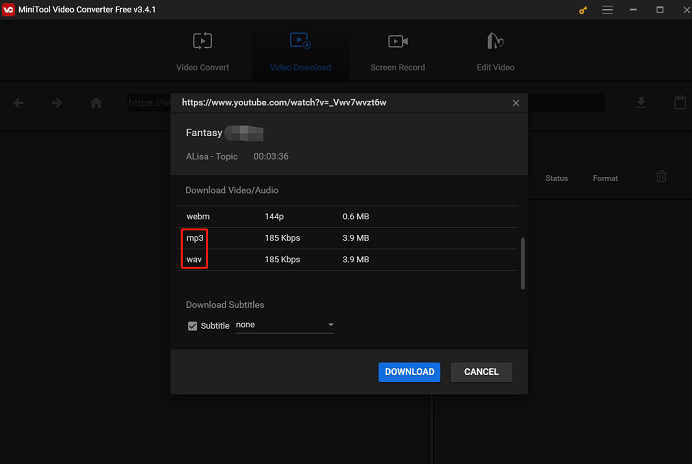
5. In the new window, choose the output format of the song. You can choose MP3 or WAV because these two formats are both compatible with Dropbox. Then, click on the DOWNLOAD button.
6. When the download process is completed, click Navigate to file to find the location of the downloaded song, and you can also click Play to listen to the song.
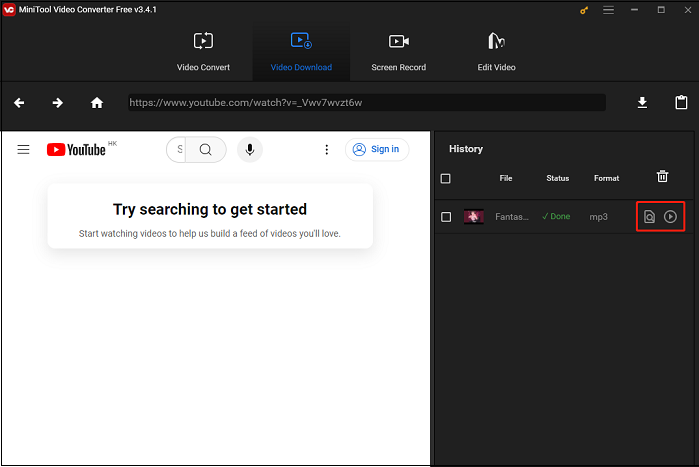
After following these steps, you have successfully downloaded the song you want to save to Dropbox with MiniTool Video Converter. If you think this software is convenient, you can click the following button to share it with your friends.
#2. 4K Video Downloader
Apart from MiniTool Video Converter, 4K Video Downloader is also a wonderful downloader to download songs from YouTube. Except for downloading YouTube songs, it can also download TikTok videos, Instagram photos, Stories, Facebook videos, and more in high quality.
In addition, you can enjoy the sleek design, find videos to download via the in-app browser, and get super-fast results. There is a special functionality in which you can download annotations and subtitles along with YouTube videos, and save them in SRT format. Remember you get subtitles not just for one video, but for an entire YouTube playlist or even a channel.
Additional features:
- Reduce image file size
- Extract audio from the YouTube video
- Convert YouTube to MP3
- Create amazing slideshows
- No watermarks, registration, and payments
- Premium features are available for advanced users
Now, this post will show you how to download songs from YouTube to local files with 4K Video Downloader. Follow the steps below.
1. Download and install 4K Video Downloader to your computer.
2. Launch 4K Video Downloader to get into its main interface and change the settings of Download, Quality, Format, and Save to at the top of the screen.
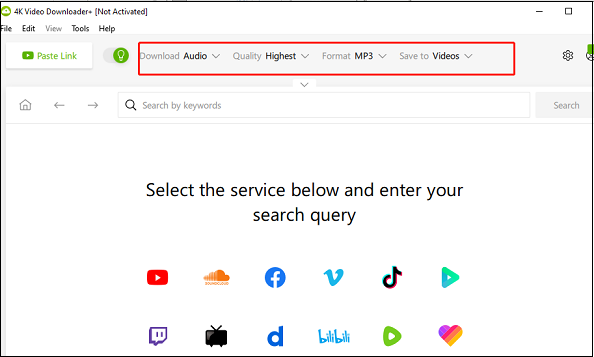
3. Visit YouTube’s official website using your browser, find the song you want to save to Dropbox, and copy the link of the song.
4. Go back to 4K Video Downloader and click Paste Link at the left-top corner of the screen. The song will be automatically detected and downloaded.
5. When the download process is finished, you can see two buttons.
Show in Folder: Find the file’s position of the downloaded song on your computer.
More: you can copy the link address, open the link in the browser, paste the link, remove, delete the file, and remove all.
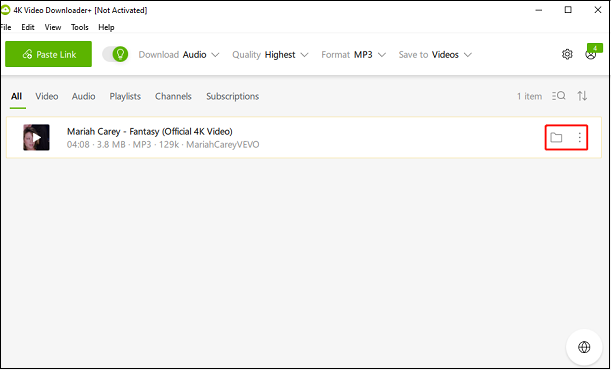
Up till now, this post has introduced two applications for you to download songs from YouTube. There is a last way to download YouTube songs which is VLC media player. Let’s read the following paragraphs to understand it.
#3. VLC media player
VLC media player is not only a free cross-platform multimedia player that plays most multimedia files as well as DVDs, audio CDs, VCDs, and various streaming protocols but also a converter that can convert video and audio files.
Furthermore, VLC media player is compatible with many platforms including Windows, macOS, Android, iOS, Windows Phone, and so on, and you can download YouTube videos and audio using VLC media player. Before you use this application, you need to download it from the official site.
Now, this post will offer you a detailed guide on how to download songs from YouTube with VLC media player. Let’s dive into it.
1. Launch VLC media player on your computer to get into its main interface.
2. Choose the Media option at the top-left corner of the screen and click on the Open Network Stream button from the drop-down menu.
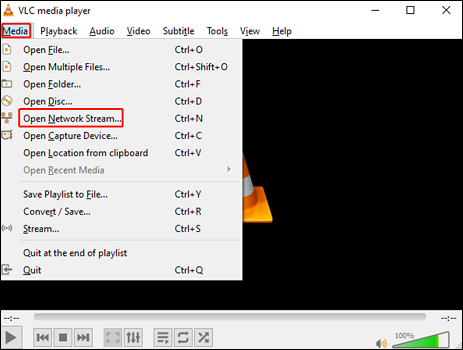
3. Go to YouTube’s official website to find the song that you want to save to Dropbox. Copy its link from the address bar.
4. Go back to VLC media player, under the Network Protocol, paste the song link into the Please enter a network URL, and clickon the Play button.
5. The song will automatically play on the screen and you need to click on the Tools button at the top of the screen and choose Codec Information at the drop-down menu.
6. In the pop-up window, click the codec option and copy the information at the bottom of behind Location.
7. Paste the information into the address bar of a web browser and click Enter on the keyboard.
8. Now, you can see the song appears and you need to click the 3 dots at the left-bottom of the song. Then click the Download icon to download the song and save the song to your computer.
All in all, VLC media player is not only a media player but also a useful YouTube content downloader, but sometimes it refuses to work. If you meet this situation, you can read the following recommended article.
How to Save Songs from YouTube to Dropbox
Now that you’ve successfully downloaded YouTube songs to local files with one of the downloaders above, the next step is to add YouTube music to Dropbox. This post will offer a step-by-step guide on how to add songs from YouTube to Dropbox. Let’s get started.
Step 1: Enter the official website of Dropbox using your browser and log in or sign up for a Dropbox account.
Step 2: Select the Create folder option on the main interface, give it a fitting name in the pop-up window, and click Create.
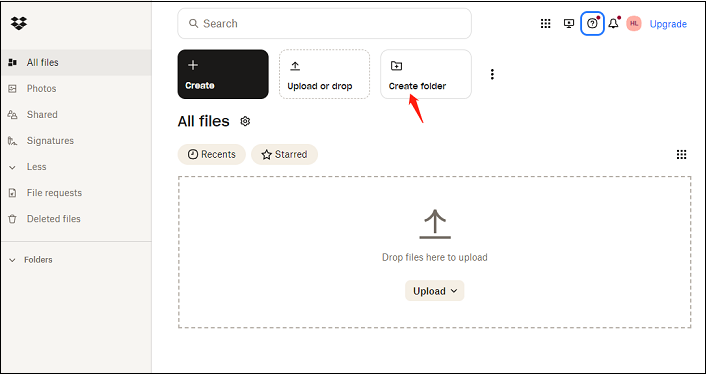
Step 3: In the main interface, you can see the folder you just created and four ways to add content to the folder: Drop files here to upload, Open this folder on your desktop, Request files to be added to the folder, Share and manage access to this folder. Here, you can drop files to upload.
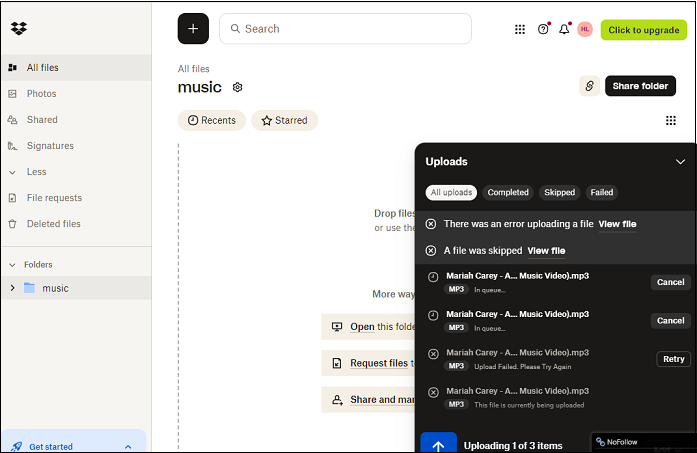
After following these steps, the song from YouTube is safely saved in Dropbox. You can share this folder with others.
Conclusion
All in all, although you can’t directly save songs from YouTube to Dropbox, you can download songs first and save the downloaded songs to Dropbox. In these three ways to download songs from YouTube, MiniTool Video Converter is the best-worthy application to try. It not only can help you download YouTube videos but also convert videos and audio into various formats, as well as record the computer screen.
If you have any questions about using MiniTool Video Converter, please feel free to contact us via [email protected]. We will get back to you as soon as possible.
You may like:


