iCloud is a popular cloud file storage that allows you to store various types of data, including music, photos, videos, and documents. You can download numerous music tracks on YouTube. How to save YouTube music to iCloud? This MiniTool Video Converter article will offer the solutions for you to save songs from YouTube to iCloud. Let’s dive into it.
iCloud is Apple’s cloud storage that allows Apple devices and other Apple systems to connect seamlessly. You can store all data like photos, videos, documents, contacts, and more. These files are stored securely in the cloud, ensuring you can access them from any device with an Internet connection.
With iCloud, users are also able to synchronize data across devices. Whether you have an iPhone, iPad, Mac, or Apple Watch, iCloud keeps all your data synchronized across these devices. That means any changes made to files on one device are automatically reflected on other devices that are connected to your iCloud account.
YouTube is the world’s largest video-sharing platform with more than 2 billion active users. At the same time, YouTube has a vast collection of music videos and playlists. You can save your favorite videos into playlists and download them onto your computer. Do you want to save YouTube music to iCloud? Please continue to read this post.
What Types of Formats Does iCloud Support
Before achieving the integration of YouTube music and iCloud, you should figure out what types of formats iCloud supports. iCloud supports audio formats like MP3 and WAV while image formats like PNG, JPEG, GIF, and TIFF. Therefore, you can make sure the format is supported by iCloud to avoid the issue of incompatibility. When you download YouTube music, you should choose MP3 or WAV as the output format.
How to Download Music from YouTube to iCloud-Supported Formats
Now, you know the formats of iCloud support and the next step is to download music from YouTube. How to download YouTube music? This post will provide several best ways to help you.
#1. MiniTool Video Converter
MiniTool Video Converter is a versatile YouTube audio downloader, that not only can download YouTube music, playlists, and videos without losing quality but also download YouTube subtitles for free. You can download audio formats by MiniTool Video Converter like MP3 and WAV.
Additionally, MiniTool Video Converter also enables you to complete the conversion between video and audio formats. You can convert videos and audio into more than 1000 formats. Meantime, you can also convert multiple files at once. Lastly, one of the most popular points is that it can record the computer screen without time limitations and a watermark.
Main features of MiniTool Video Converter:
- Convert video and audio into over 1000 popular formats
- Capture computer screen activity without time limitation
- Free download video and audio to MP4, WebM, MP3, and WAV formats
- Batch video conversion at once
- Download YouTube subtitles in SRT format
How to download YouTube music to iCloud-supported formats with MiniTool Video Converter? Continue to read this post.
Step 1: Download and install MiniTool Video Converter to your computer by clicking the following download button.
MiniTool Video ConverterClick to Download100%Clean & Safe
Step 2: Launch MiniTool Video Converter and you can see there are four functional tables: Video Convert, Video Download, Screen Record, and Edit Video. Switch to the Video Download tab at the top of the interface.
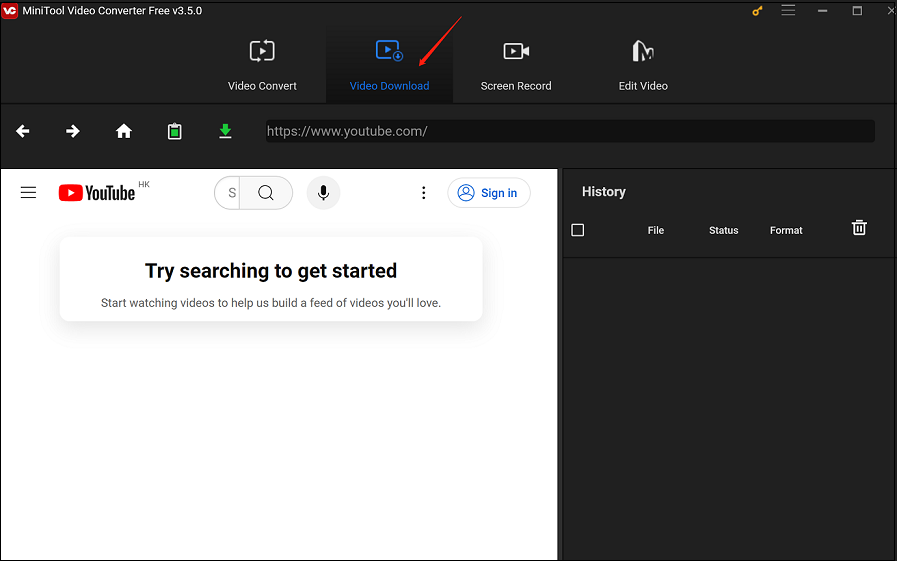
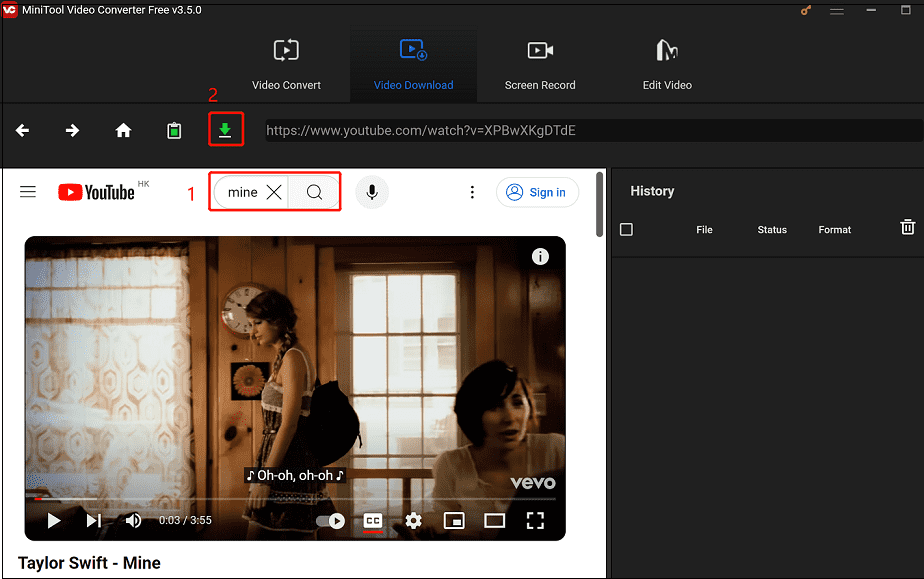
Step 3: Type the name of the desired music into the search box, press Enter on your keyboard, and click the music you want to save to iCloud. Then, click on the Download icon next to the address bar.
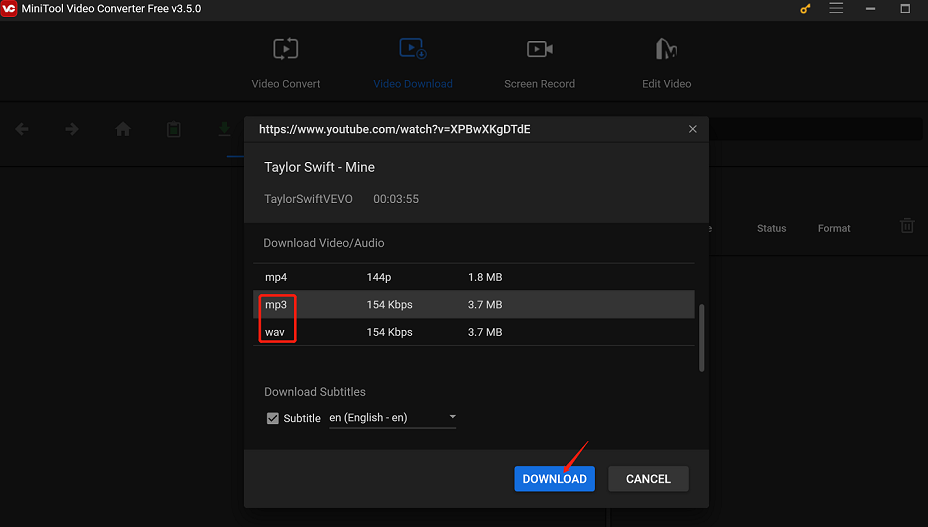
Step 4: In the pop-up window, choose the audio format supported by iCloud under the Download Video/Audio option. Here you can choose WAV or MP3 as the output format, and click on the DOWNLOAD button.
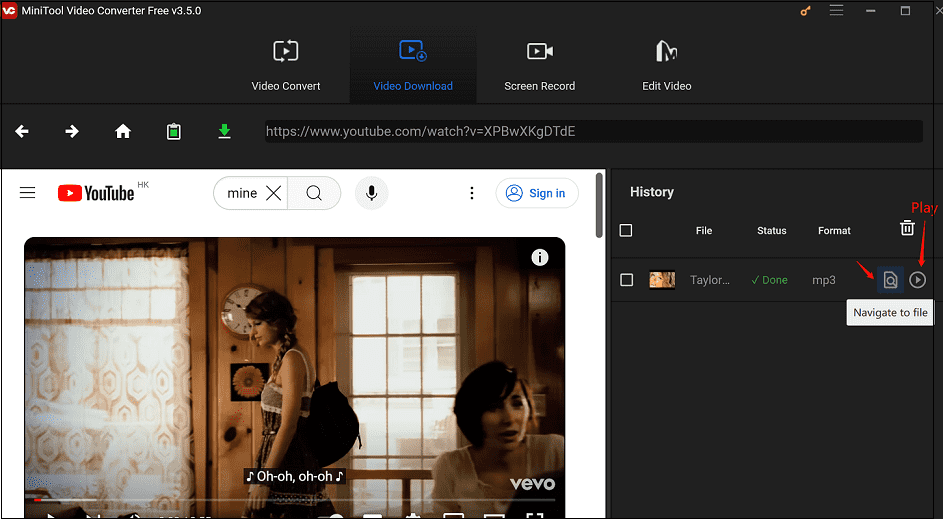
Step 5: Under the History panel on the right side of the screen, the Status of the music is Done, and you can click on Navigate to file to find the save location of the YouTube music. Meantime, click on the Play icon to listen to it directly.
#2. NoteBurner YouTube Video Downloader
NoteBurner YouTube Video Downloader is a top-notch free tool that enables users to download YouTube videos effortlessly and quickly without any bundled programs or additional costs. This smart tool is completely dedicated to helping users download YouTube videos for free and is a great choice for hassle-free video downloads.
In addition, it offers more than video downloads, as it can also assist with extracting songs or playlists from YouTube in a range of formats, including M4A. After adding videos, the program automatically detects and lists all audio tracks, making it easy to select the desired track and download it. Additionally, it is capable of downloading YouTube Shorts, further enhancing its versatility as an exceptional video downloader tool.
Main features of NoteBurner YouTube Video Downloader:
- Free download YouTube video in 1080P, 2K, 4K, 8K
- Support downloading music from YouTube
- Best video quality, fast speed
- User-friendly and intuitive interface, easy-to-use
- No bundled program or extra fee
- Support 25 languages, allowing you to use it worldwide
- Pause and resume the download process to get full control over the downloads
Here is the guide on how to download YouTube music to iCloud-supported format with NoteBurner YouTube Video Downloader.
1. Visit the official website of NoteBurner YouTube Video Downloader, download and install this application to your computer.
2. Launch it to get into its main interface, click the Settings icon at the top right of the screen, and choose Video Quality, Subtitle Language, Save Subtitle as, and Output Folder under the Downloading Settings option.
3. Navigate to YouTube to find the music you want to download and copy the music link from the address bar.
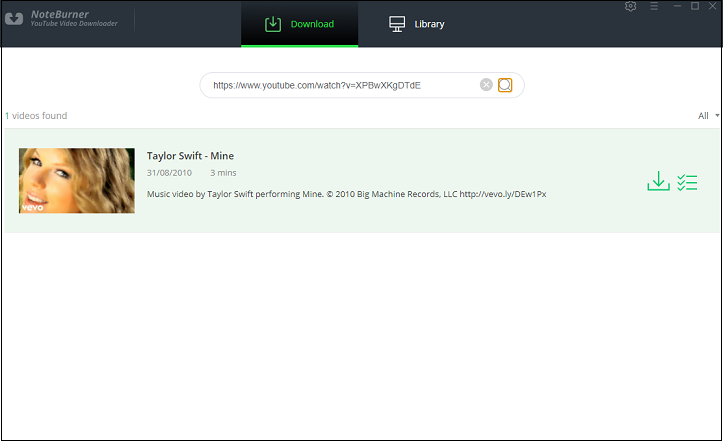
4. Go back to NoteBurner YouTube Video Downloader, paste the URL of the music into the search box, and click on the Advanced Download button.
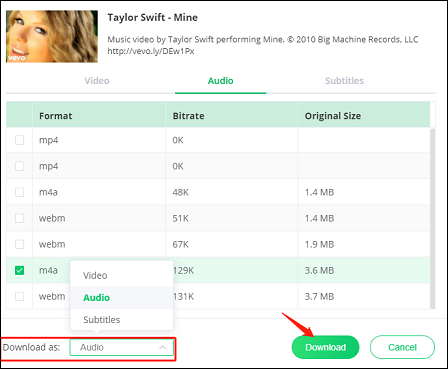
5. In the new interface, choose Audio under Download as, check the box next to the selected format, and click on the Download button.
6. Once downloaded, you can switch to Library, and click the File icon to find the YouTube music.
#3. Freemake Video Downloader
Freemake Video Downloader allows you to fast and easily download video and audio files from a wide variety of popular sites, including YouTube, Facebook, Vimeo, Dailymotion, Twitch, Liveleak, Veoh, and more. Whether you download videos daily or only on occasion, this app will make the process straightforward.
At the same time, it can also convert YouTube videos free to MP4, AVI, MKV, WMV, WebM, 3GP, FLV, iPhone, Android, and more. The list is consistently updated. Freemake Video Downloader is available for Windows PC and MacOS PC and supports 4K & HD quality video clips.
Main features of Freemake Video Downloader:
- Download video from 10,000 sites for free
- Download YouTube in any formats
- Original video quality is preserved.
How to download music from YouTube to iCloud-supported format with Freemake Video Downloader? Here is the step-by-step tutorial.
Step 1: Download and install Freemake Video Downloader on your computer. Once installed, open this free downloader.
Step 2: Go to YouTube to copy the link of the music you want to add to iCloud, return to Freemake Video Downloader, and click on Click URL on the top left of the screen.
Step 3: After the music is inspected, you need to choose the output format, and quality of the music. Then, click 3 dots under the Save to button to change the save position of the music.
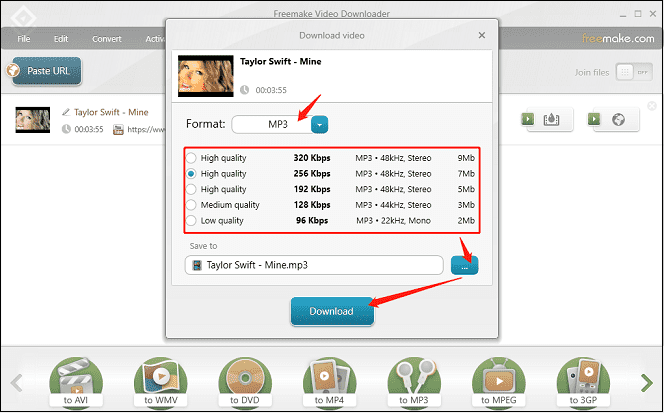
Step 4: Wait for the download process to finish and press OK. You can find the downloaded music in your folder.
How to Upload Downloaded Music to iCloud on Mac/iPhone
You have successfully downloaded YouTube music to iCloud-supported audio format by one of the audio downloaders above. Now, you can upload the downloaded music to iCloud. Let’s have a look at how to upload YouTube music to iCloud on Mac/ iPhone one by one.
#1. Upload YouTube Music to iCloud on Mac
To help you upload music from YouTube to iCloud on Mac, you can follow the step-by-step guide below:
1. Ensure you’re signed in to iCloud on your Mac. Open the Finder, click on Go in the top menu, and select iCloud Drive.
2. Create a new folder to save the YouTube music within iCloud Drive by right-clicking, choosing New Folder, and giving it a name that resonates with your music collection. You can also choose an existing folder.
3. Simply drag and drop your freshly downloaded YouTube music into the designated iCloud Drive folder. Alternatively, you can copy and paste it. A stable internet connection ensures a smooth upload.
#2. Upload YouTube Music to iCloud on iPhone
Follow the easy steps to save YouTube music to iCloud on your iPhone:
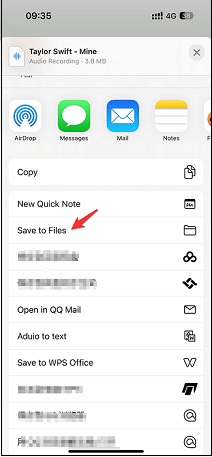
1. Transfer the downloaded music from your computer to your iPhone, open the music on your iPhone, click Open With Another APP, and find the Save to Files option.
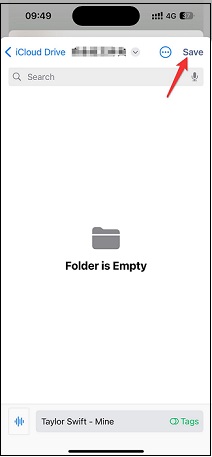
2. The iPhone interface will automatically jump to iCloud Drive, choose a file location to save the music, and click the Save button at the upper right of your iPhone interface.
Following these steps above, you can save YouTube music to iCloud on Mac and iPhone.
Final Thoughts
iCloud has the benefit of synchronizing data across devices. After reading this post, you have understood how to save YouTube music to iCloud on iPhone and Mac. The most important thing is to download YouTube music to the iCloud-supported format. You can use MiniTool Video Converter, NoteBurner YouTube Video Downloader, as well as Freemake Video Downloader.
This post sincerely recommends MiniTool Video Converter for you to have a try. This versatile YouTube Downloader not only helps you download YouTube music to your iCloud-support formats but also convert them into different kinds of other formats, as well as record computer screens.
If you have any questions while using MiniTool Video Converter, please don’t hesitate to contact us via [email protected]. We will answer you as soon as possible.
Read more:


