30 fps is ideal for live news and sports broadcasts. It's also useful for adding extra detail to fast-moving content. On the other hand, 60 fps is great for shooting slow-moving content. It creates a smooth effect for high-quality videos. This article from MiniTool Video Converter will focus on 30 fps vs 60 fps for YouTube, and you will learn which frame rate is better, how to play a YouTube video at low fps offline, how to convert the video from a low fps to 60 fps, as well as how to make a video to the recommended frame rate.
30 FPS vs 60 FPS for YouTube: Which One Is Better?
The content should be encoded and uploaded at the same frame rate as when it was recorded. Common frame rates contain 24 fps, 25 fps, 30 fps, 48 fps, 50 fps, and 60 fps (Any other frame rate is acceptable as well). Before uploading interlaced content, it should be deinterlaced. 1080i60 footage should be deinterlaced to 1080p30.
A lot of gamers will say that there is no distinction between 30 fps and 60 fps, or any other frame rate higher than 30 fps for that matter. As long as the frame rate is stable at or near 30 fps, it will be “buttery smooth” and give a pleasant experience.
Do you know why 60 fps looks better than 30 fps? They show you how quickly the image is changing across the screen, thus a higher frame rate means the footage looks smoother and more fluid. Simply put, 30 fps means 30 still images will be displayed per second, and 60 fps means 60 still images will be displayed per second.
About whether 30 fps or 60 fps is better for YouTube, as you can see, the higher the frame rate, the more frames per second and the smoother it looks, but the larger the file size and the less network friendly it is. The choice between 30 fps and 60 fps is mostly determined by your recording and editing device, as well as your video quality requirements.
Would you rather have 1080p 24-30fps or 720p 60fps? Without a doubt, 720p 60fps. Going up from 720p to 1080p and sacrificing about 30 fps is not worth it if you want a smooth and entertaining experience when gaming.
Related article: The Best YouTube Video Size + Top 9 Tips
When it comes to 1080p 30fps or 1080p 60fps for YouTube, you need to know that frame rates over 30fps, especially the most popular 60fps, are best reserved for situations with a lot of motion. Shooting sporting events at 60fps is a good idea and will allow you to slow down the action for replays.
Talking about 4K 30fps or 4K 60fps for YouTube, each frame of 30fps is exposed to light twice as long as 60fps, so it will be brighter. Of course, a lower frame rate equals a higher exposure (more light) since the camera has more time to pick up more light in each frame. This is how all the cameras work in the world.
In addition, if speed is your concern, 1080p 60fps video is better than 4K 30fps video. 1080p at 60fps is inferior to 1080p at 40fps. It doesn’t look as choppy as 4K 30fps.
Which is better 60 fps vs 30 fps for YouTube? In general, 30 fps video offers the best quality and space-saving balance, but 60 fps video will retain the video with better motion graphics.
Save Low FPS YouTube Videos for Offline Playback on Your Computer
After knowing 30 fps vs 60 fps for YouTube, let’s look at how to save YouTube videos below 60 fps for offline playback on your computer. This is where MiniTool Video Converter comes in, a free and no-ads multimedia software that works well in saving all kinds of YouTube videos. Besides, this free video downloader allows you to save YouTube playlists, save YouTube music, and save subtitles from YouTube videos.
Furthermore, it supports batch conversion of multiple audio or video files at the same time. And, the software enables you to import all major digital audio or video file formats and effortlessly edit over 1000 output formats. With it, users are also capable of recording everything that happens on their computer screens for free and in high quality.
When you don’t want the video that you are going to save to take up too much storage space on your computer, you can keep an eye on the following guide on how to save a low fps YouTube video with MiniTool Video Converter.
Guide to saving a low fps YouTube video for offline playback:
Step 1: Click the below Download button to install the free multimedia software on your computer.
MiniTool Video ConverterClick to Download100%Clean & Safe
Step 2: Launch MiniTool Video Converter to enter its main screen. Then, you will notice four sections at the top of the main screen: Video Convert, Video Download, Screen Record, and Edit Video. Just go to the Video Download section.
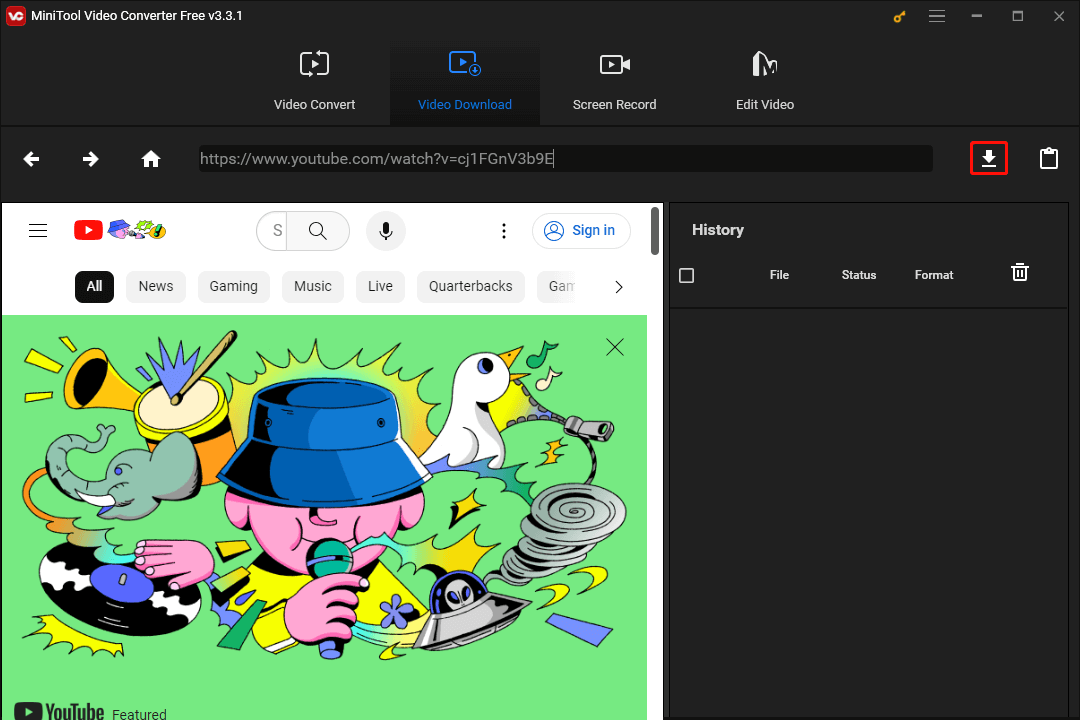
Step 3: Now, copy the URL of the YouTube video you are going to save, paste the URL into the search bar, and click the Download icon.
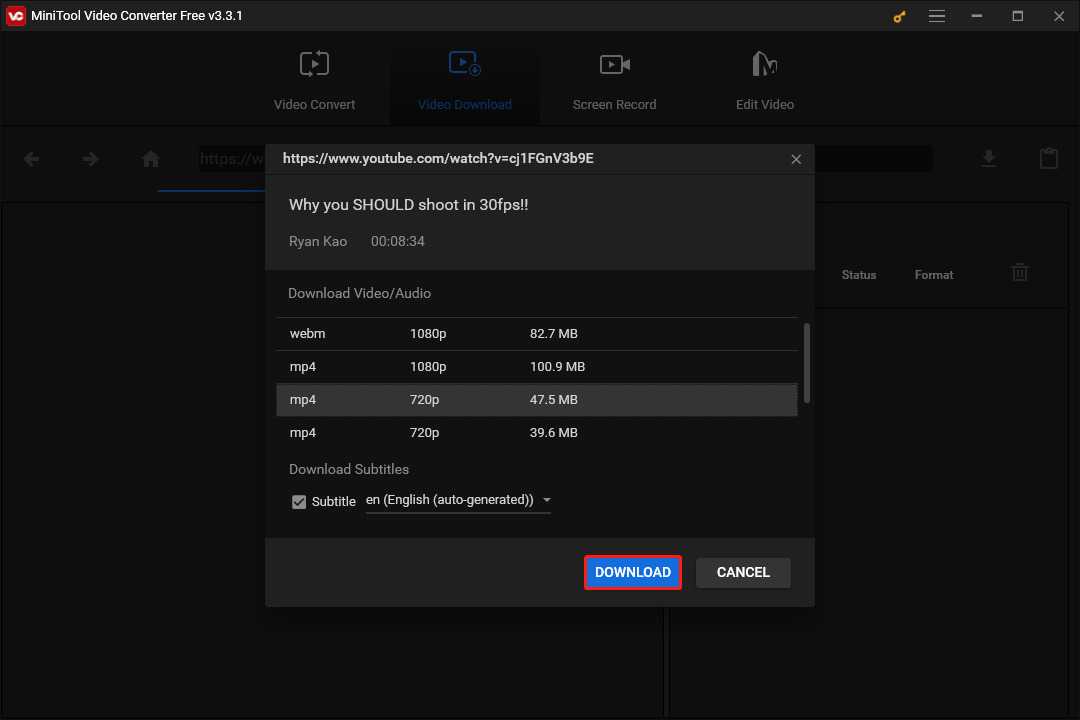
Step 4: Select a video format with a low frame rate and click the DOWNLOAD button.
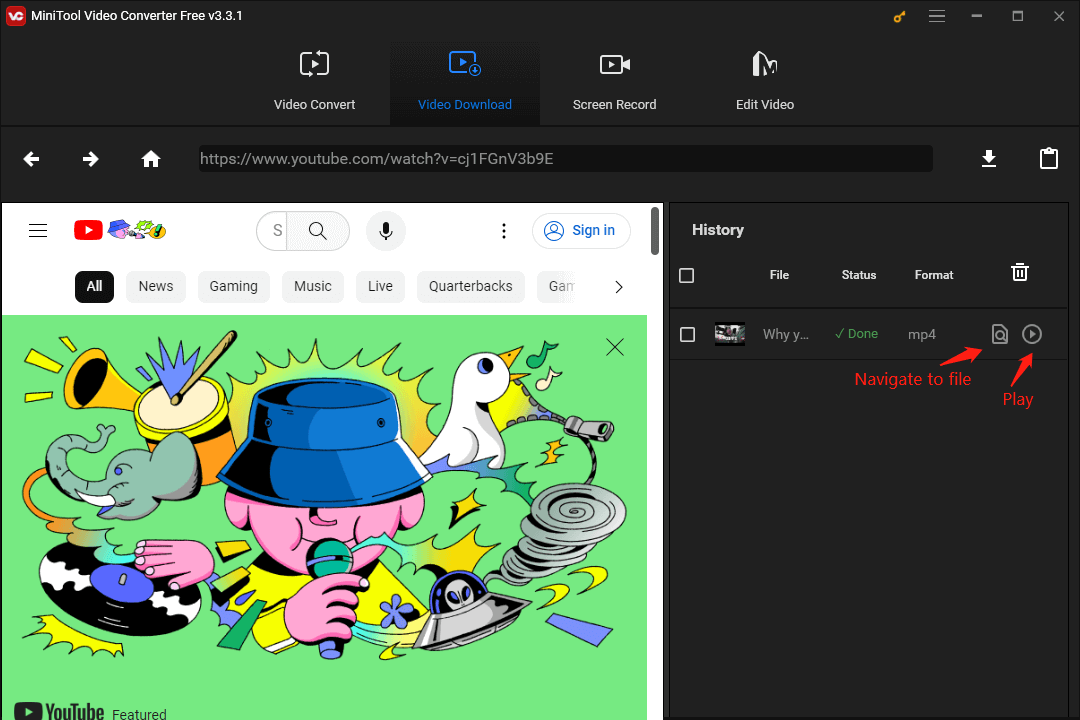
Step 5: After downloading, you can not only click the Play option to play the downloaded low fps YouTube video directly but also click the Navigate to file option to locate the video and then play it offline.
Convert Your YouTube Video from Low FPS to 60 FPS to Make It Look Smoother
To opt for 30 fps vs 60 fps for YouTube, 60 fps is the highest frame rate standard and the majority of the videos on YouTube are not yet at that standard. When you’re done saving the above low fps YouTube video with MiniTool Video Converter, you can go ahead and follow the guide below to learn how to convert it to 60fps video to make it look smoother.
Guide to converting the low fps YouTube video to 60fps:
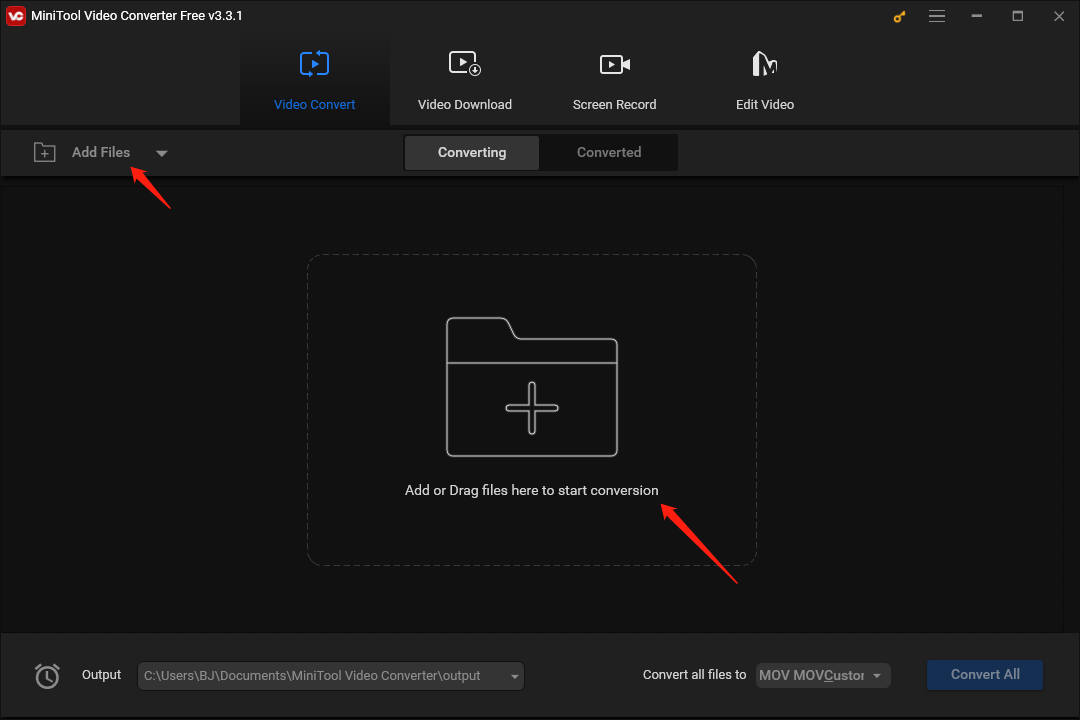
Step 1: Go straight to the Video Convert section from the main screen of MiniTool Video Converter.
Step 2: Click the Add Files or Add or Drag files here to start conversion area to import the YouTube video in low fps to this YouTube video converter.
Step 3: Click the edit icon in the Target area to open the output settings window after importing the YouTube video at low fps.
Step 4: Click the Video tab to view all of the output video formats, such as MP4, MKV, AVI, MOV, WMV, M4V, XVID, ASF, DV, etc.
Step 5: Select an output format that is the same as or different from the source video format, as needed. Click the edit icon next to the target output format.
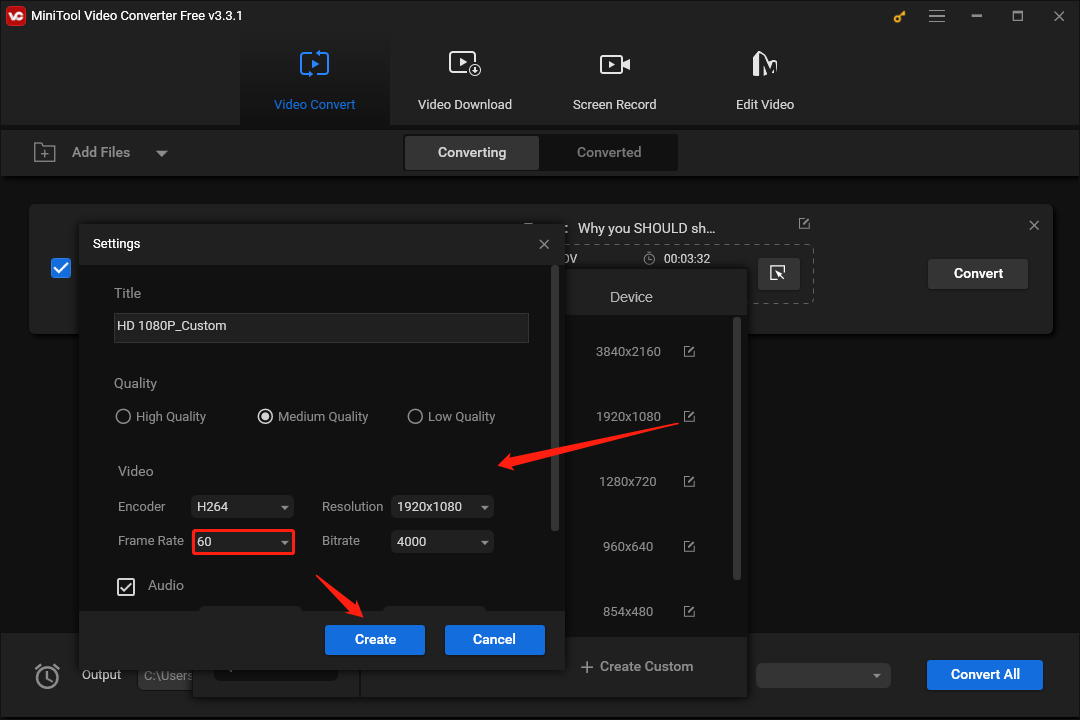
From the popup window, expand the Frame Rate drop-down menu and select 60. Click the Create button to save the changes. Scroll down to find the one you just edited and hit it.
Step 6: Click the Output menu in the lower-left corner of the screen to set the destination folder for the converted video.
Step 7: Click the Convert button to start the conversion process.
Step 8: Finally, switch to the Converted tab and then click the Show in folder button to locate the converted video.
A Decent Video Editing Software for Making Recommended Frame Rate Videos
Setting the right frame rate (e.g., 30 fps vs 60 fps for YouTube) is critical. This part will introduce users to a professional and powerful video editor, MiniTool MovieMaker, which can help users create and edit a video to the recommended frame rate.
This video editing software comes with tons of great features and tools, allowing you to add video transitions, motions, filters, titles, captions, credits, and animated stickers. Further, you can take advantage of the advanced functions to spice up your videos, for example, split/trim/crop videos, flip/rotate videos, speed up / slow down videos, reverse videos, and more.
Here are the steps to create a recommended frame-rate video:
Step 1: Click the Download button below to install the video editing software on your computer, then launch MiniTool MovieMaker.
MiniTool MovieMakerClick to Download100%Clean & Safe
Or, go straight to the Video Editor section from the main screen of MiniTool Video Converter, if you already have this video editor.
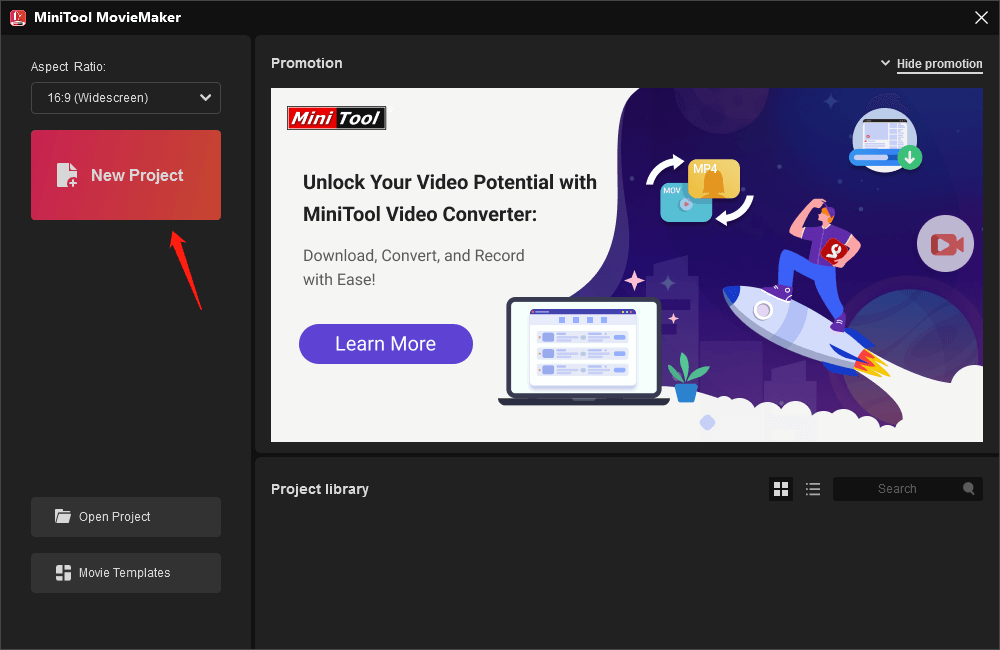
Step 2: Click the Aspect Ratio drop-down menu in the upper left corner of the Project library window to choose a suitable aspect ratio and click the New Project button to start the recommended frame rate video editing workflow.
Step 3: Click the Import Media Files option under the Media tab to open your video and drag and drop it to the timeline.
Step 4: Now you can personalize your video by applying various video effects, adding music to the video, changing the video speed, or determining the video length.
You may also like: How to Edit Videos with YouTube Video Editor – 3 Tips
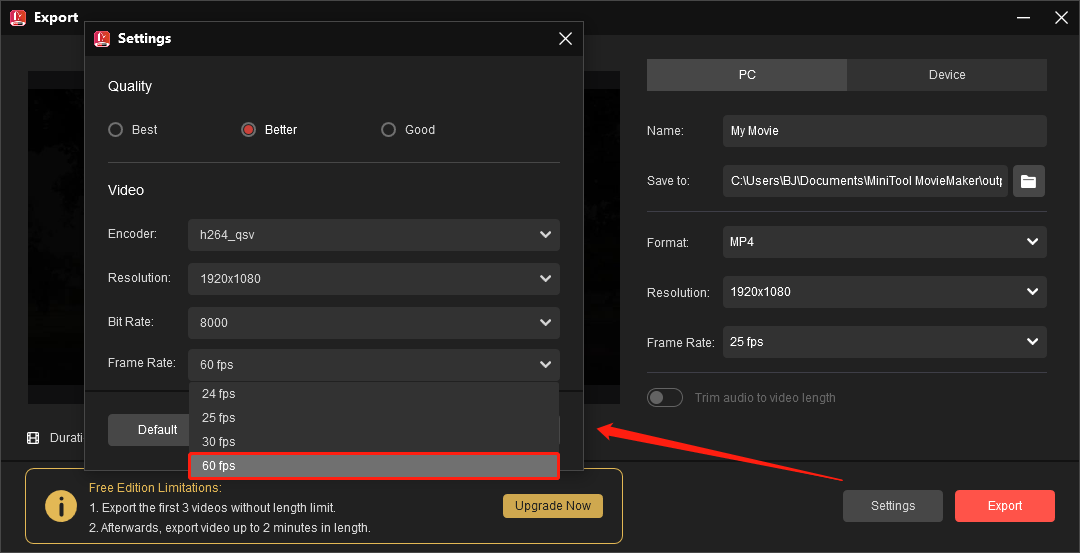
Step 5: Once the editing is complete, it’s time to export the video. Click the top Export button to open the Export window. After that, click the Settings button to access the Settings window, expand the Frame Rate drop-down menu, and select 60 fps. Click the OK button to save the changes. Lastly, click the Export button to save the recommended frame rate video to your computer.
Conclusion
In a nutshell, this article highlights which is better 30 fps vs 60 fps for YouTube, how to play a YouTube video in low fps offline and convert the video from a low fps to 60 fps with MiniTool Video Converter, as well as how to make a video to the recommended frame rate with MiniTool MovieMaker.
If you have any questions or problems with MiniTool Video Converter or MiniTool MovieMaker, please contact us via [email protected] for help.
30 FPS or 60 FPS FAQs
Do Not Miss:


