iDrive is a powerful cloud storage solution that enables users to securely store, backup, and access their files from anywhere. For those who want to save their YouTube videos to storage space, iDrive is a great choice. This article from a free video downloader will provide a comprehensive guide on how to add YouTube to iDrive, covering all the necessary steps.
About iDrive
iDrive is a cloud storage service that offers users a convenient way to safeguard their digital assets. It supports multiple device types, including computers, smartphones, and tablets, allowing seamless synchronization across all your gadgets.
With features like versioning, which keeps track of different iterations of your files, and encryption to protect data privacy, iDrive provides a reliable and secure storage environment.
Users can choose from various subscription plans, with options for different storage capacities, depending on their needs. Whether you’re a casual user looking to back up personal photos and documents or a professional with a large volume of work-related files, iDrive has a plan to suit you.
Here are the plans of the iDrive for you to learn about. Choose one of them that is suitable for you.
- Basic: Free; 10 GB.
- iDrive Mini: $2.95/year; 100GB storage; one user; 500GB for $9.95.
- iDrive Personal: $69.65 for first year; 5TB storage; one user for multiple computers.
- iDrive Team: $69.65 for first year; 5TB storage; five users for five computers.
- iDrive Business: $69.65 for first year; 250GB storage; unlimited users and computers, exchange SQL/NAS device.
![The Ultimate Tool to Save YouTube Music to iCloud [2026 Update]](https://images.minitool.com/youtubedownload.minitool.com/images/uploads/2024/06/save-youtube-music-to-icloud-thumbnail.jpg)
Step-by-Step Guide to Add YouTube to iDrive
Here are two steps on how to upload videos from YouTube to iDrive successfully. Step 1 is to save videos from YouTube, and Step 2 is to add the downloaded videos to iDrive for backup forever.
Step 1: Save YouTube Videos on Your Device
In order to help you get videos from YouTube easily, here are two free downloaders I will share with you.
MiniTool Video Converter
When it comes to saving videos from YouTube, MiniTool Video Converter is my first choice. This desktop app is free to use and has no interrupted ads. Its interface is simple, making it easier for novices to get started.
With MiniTool Video Converter, you can save videos, music, playlists, movies, etc from YouTube in multiple formats and high quality. If you want to download multiple songs in a playlist, simply paste the URL of the playlist to batch download up to 10 songs at once, without the need to paste individual URLs repeatedly. Plus, other videos from websites, such as Facebook, Twitter, TikTok, and Instagram, can also be downloaded.
Here’s how to use MiniTool Video Converter to get YouTube videos.
1. Download and install MiniTool Video Converter on your PC.
MiniTool Video ConverterClick to Download100%Clean & Safe
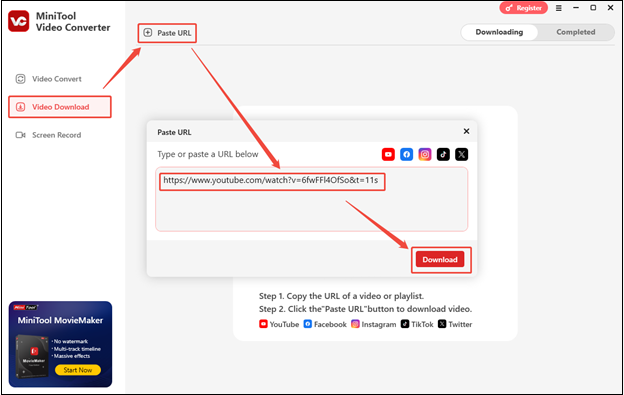
2. Go to YouTube to copy the video link from the address bar and return to MiniTool Video Converter.
3. Go to Video Download, click on Paste URL, paste the video link into the address bar, and click on Download.
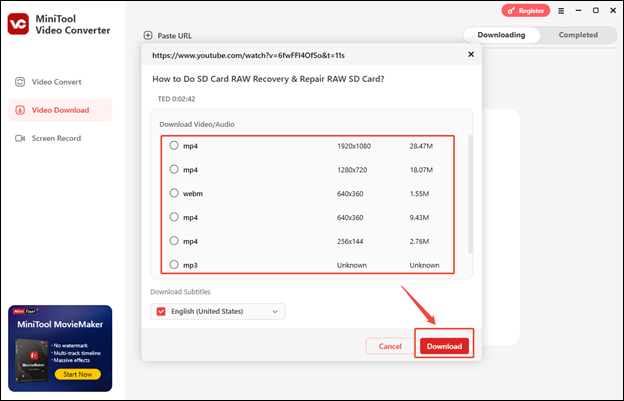
4. In the new small window, choose an output format, and click on Download.
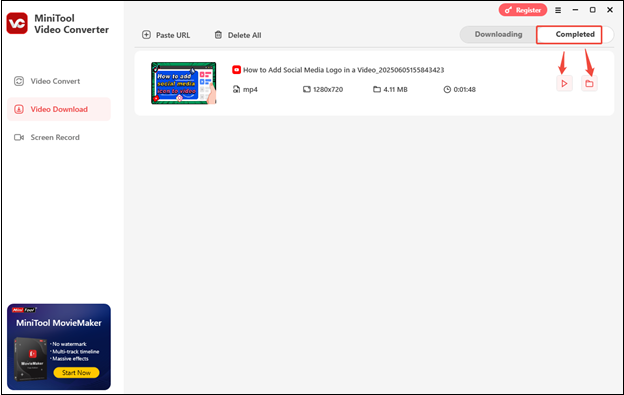
5. Once the video is downloaded, switch to Completed, click on play to view the video, and click on the folder icon to find the downloaded YouTube video.
Apart from being a video downloader, MiniTool Video Converter is also a video and audio converter and recorder. It allows you to convert the downloaded files to other formats. Plus, you can also batch convert up to 5 files at the same time, which can greatly improve conversion efficiency.
Lastly, MiniTool Video Converter can easily capture what happens on your computer in MP4 format. You can use it to record gameplay, meetings, and presentations. Customizing the hotkeys before you record the screen is available. All the recordings are without watermarks and time limitations.
Online Video Downloader on viddown.net
For those who don’t want to download the application to save videos, Online Video Downloader on viddown.net is your best choice. It doesn’t need you to register for an account and install extensions. All you need to do is prepare a URL.
Apart from downloading videos from YouTube, other popular platforms, including Instagram, TikTok, Facebook, Vimeo, and Twitter, can be downloaded in MP4. The most special feature of viddown.net is that it can capture the thumbnail of the video in high-quality PNG format.
How to save YouTube videos with viddown.net? Follow the guide:
1. Copy the YouTube video link from the official YouTube website.
2. Visit viddown.net with your favorite browser, paste the video link into the box, and click on the Download button.
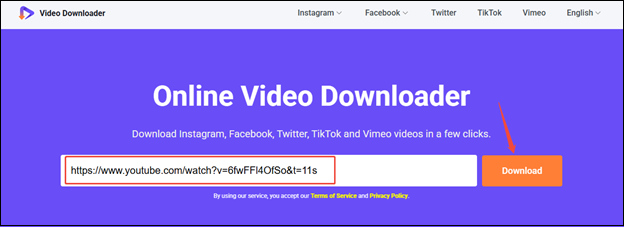
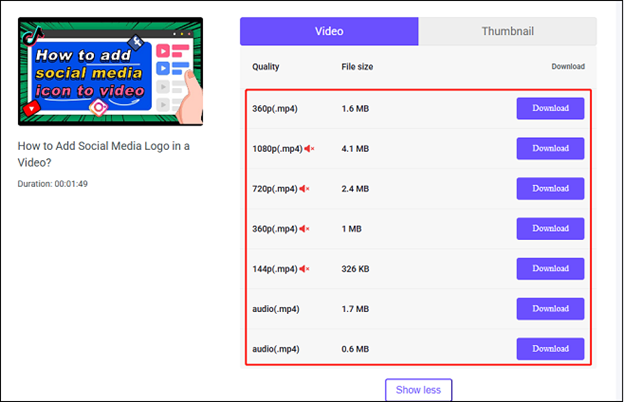
3. In the new interface, the tool will analyze the link and display the video’s thumbnail, title, and duration, as well as all the downloadable options. Choose the video quality you want and press the Download button.
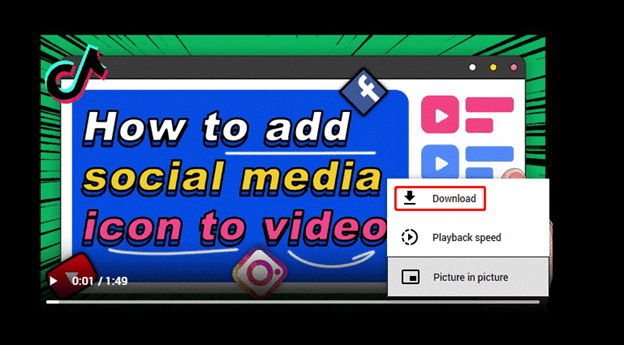
4. A new tab will appear to play the YouTube video. Click the three-dot icon in the lower right corner of the player and select Download from the menu.
5. You can find the downloaded video in the Downloads section of your browser.
Step 2: Add YouTube Videos to iDrive
Once you save the YouTube video on your computer with one of the tools, it’s time to upload it to iDrive.
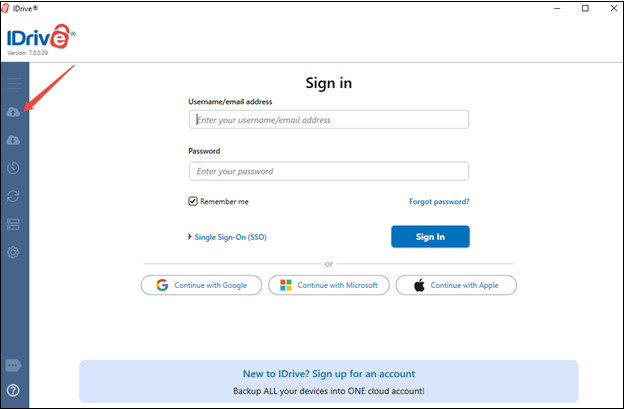
1. Launch the iDrive application on your computer. If you’re using it for the first time, you’ll need to log in using the email address and password associated with your iDrive account.
2. Click on the Upload icon, locate the folder on your computer where the downloaded YouTube videos are stored, and click on Upload. iDrive will start transferring the videos to your cloud storage account.
Through these two steps above, I believe you have already uploaded YouTube videos to iDrive.
Conclusion
Adding YouTube to iDrive can be a valuable addition to your digital workflow, providing you with greater control over your YouTube content. By following the steps outlined in this guide, you can get your favorite YouTube videos or music, upload them to iDrive, and organize them for easy access and backup.
If you encounter any problems while downloading with MiniTool Video Converter, please feel free to reach out to us via support@minitool.com for further assistance.
About The Author

Position: Columnist
Libur is always willing to try new things and full of enthusiasm for life. At the same time, she is passionate about making fantastic movies. Now, she has become an English editor about multimedia in MiniTool. She is good at writing articles about video editing, video conversion, and screen recording. During her spare time, Libur loves climbing mountains and listening to music. By the way, her favorite singer is Taylor Swift.