Especially for small events or DJ’ing a party, crossfade is a really cool feature. But YouTube Music does not add this feature like Spotify does. Fortunately, in this article, we'll explore a workaround to crossfade YouTube Music songs through Spotify with a few effective tools, including MiniTool Video Converter, DRmare Audio Capture, and Pazu YouTube Music Converter. Plus, we’d like to show you how to fade in and fade out music in the video with MiniTool MovieMaker.
There is a technique referred to as crossfading in the music industry. As the name implies, crossfading is the process of fading out one song while starting another at the same time, making a blend between tracks. Audiophiles and DJs alike enjoy the feature to make a smooth and magical listening experience.
Stated that the majority of music fans want to know “Does YouTube Music have a crossfade feature?”. Regrettably, most of the popular music platforms - including YouTube Music - don’t provide crossfading. But don’t worry, in this article, we’ll discuss another way to help you crossfade YouTube Music and improve your YouTube Music experience with smooth transitions. Now, let's find out what's going on.
Part 1: How to Crossfade YouTube Music Songs via Spotify?
Can you crossfade on YouTube Music? As mentioned above, YouTube Music does not currently support cross-fade. To accomplish this task, we can first make use of several tools to get YouTube Music songs, and then crossfade the acquired songs via Spotify.
For your convenience, we have selected three good programs to help you download songs from YouTube Music. They are:
#1. MiniTool Video Converter
MiniTool Video Converter provides a user-friendly interface and a wide range of functions. This program not only supports converting video to audio and vice versa but also can convert both media files to multiple formats (e.g. MP4, MOV, WMV, AVI, MKV, MP3, WAV, M4A, AAC, etc.) at the same time. Using it, one can also capture all or part of the computer screen in different formats with high quality.
What’s more, MiniTool Video Converter makes downloading YouTube music, videos, playlists, and subtitles a breeze. The video and audio formats it supports to download are MP4, WEBM, MP3, and WAV. The YouTube downloader is compatible with Windows 10/11.
Here is a step-by-step tutorial on how to download YouTube Music songs using MiniTool Video Converter.
Step 1: Click on the download button below to get the installation package of the tool immediately. After installing it on your Windows PC, run MiniTool Video Converter and click the Video Download tab at the top of the main interface.
MiniTool Video ConverterClick to Download100%Clean & Safe
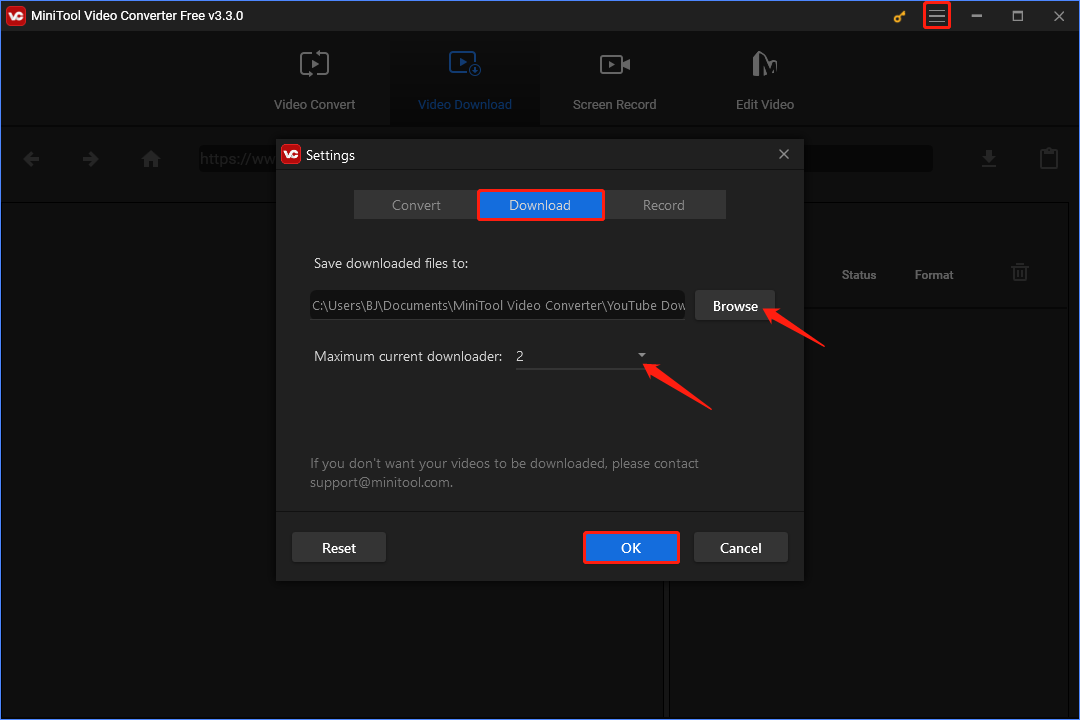
Step 2: Click the Hamburger icon located in the upper right corner and select the Settings option. From the pop-out window, switch to the Download tab. Click the Browse button and choose the save path where you want to download the song. Expand the Maximum current downloader option and select the desired number. After that, click the OK button to save the adjustments.
Step 3: Type "YouTube Music" in the search box on the left side of the interface to find and access YouTube Music without having to sign in to a YouTube Music account.
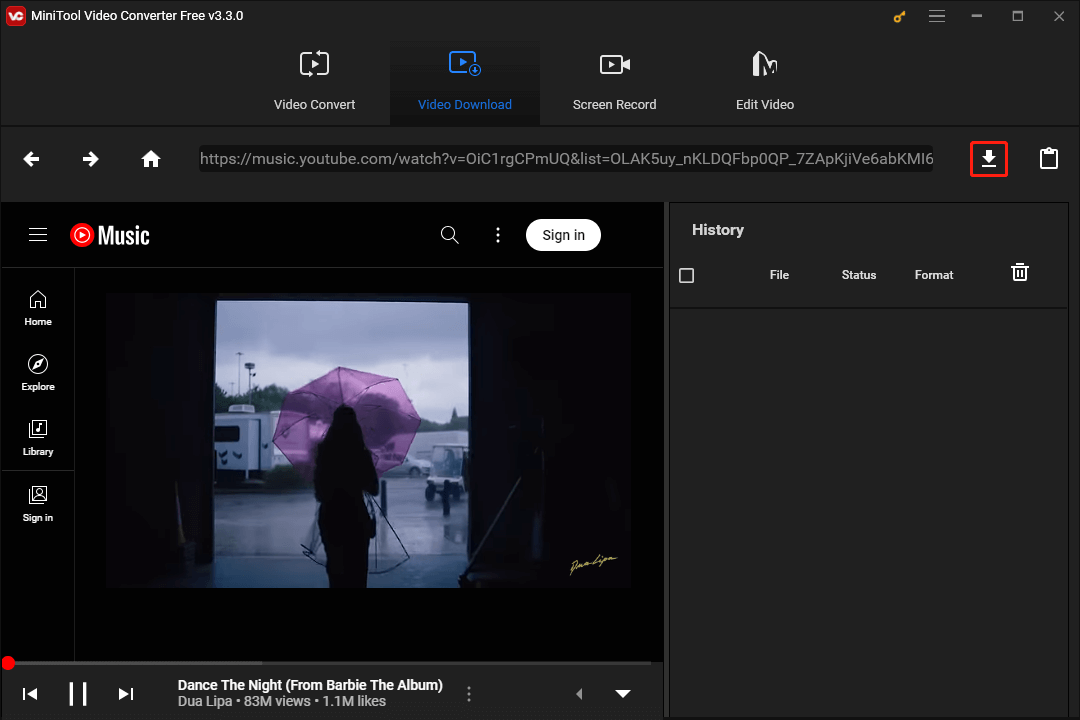
Step 4: Browse or search for the song you want to download and play it when you find it. Now, you can see the link to the song being played automatically appear in the search box at the top of the interface. Click the Download icon to continue.
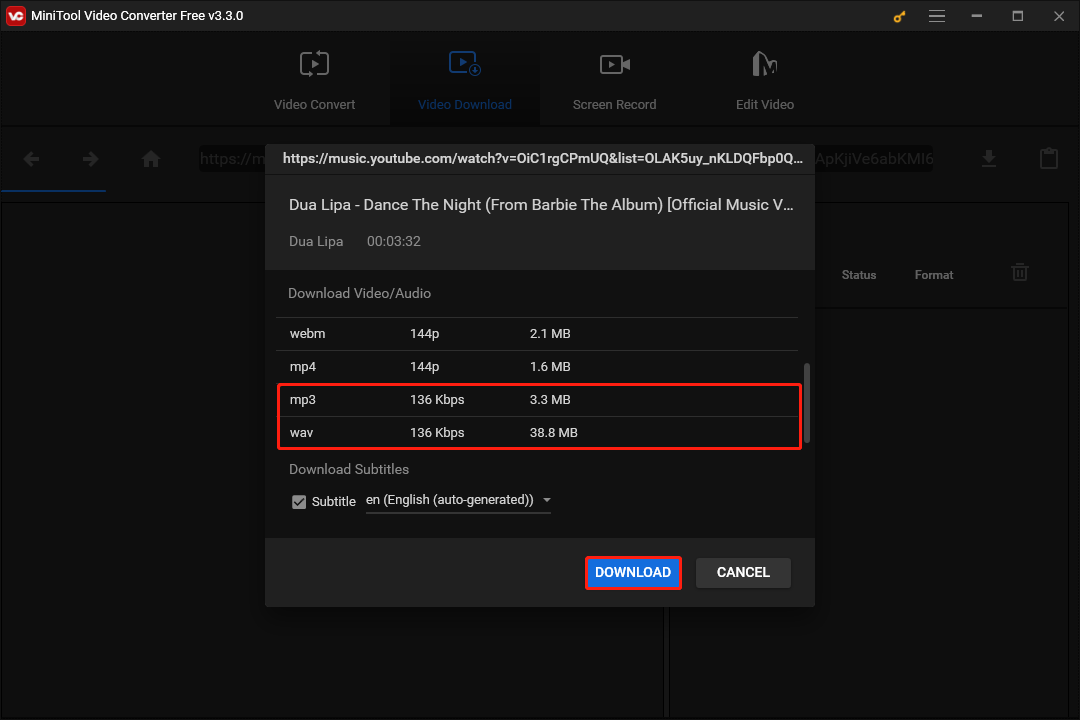
Step 5: On the pop-out window, select MP3 or WAV as the output song format and click the DOWNLOAD button to start downloading.
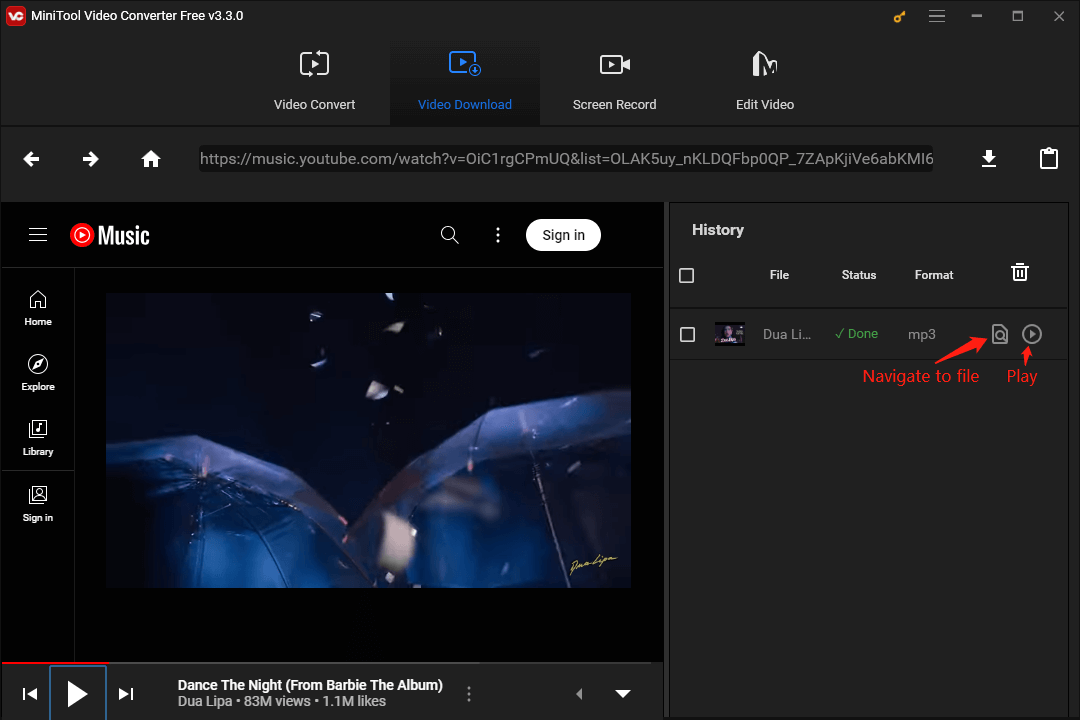
Step 6: You can view and manage the downloaded song in the right History area. Once the song is downloaded, you can click on the Navigate to file icon to locate it or click on the Play icon to play it.
If you're interested in how to transfer songs from YouTube Music to Amazon Music, check out this article: How to Transfer YouTube Music to Amazon Music?
#2. DRmare Audio Capture
DRmare Audio Capture comes with an intuitive user interface. This tool offers a comprehensive approach to capturing and saving audio played on your PC, including the YouTube Music app. It also records high-quality audio and converts it to common audio file formats, like MP3, FLAC, M4A, M4B, and others for better compatibility.
Furthermore, the audio recording process is completely lossless. Hence, whether capturing songs from YouTube Music or other platforms, DRmare Audio Capture does not affect the quality of the original audio.
Not only that, the tool’s robust recording technology enables you to batch record multiple songs at once, saving you time and energy. In addition, it provides a set of editing features, like cutting, trimming, duplicating, and merging the recorded songs before getting them to your PC. Then, you have the option to transfer your local YouTube Music songs to other devices or platforms for use without any limitations.
Below is a detailed guide on how to record and convert YouTube Music songs using DRmare Audio Capture.
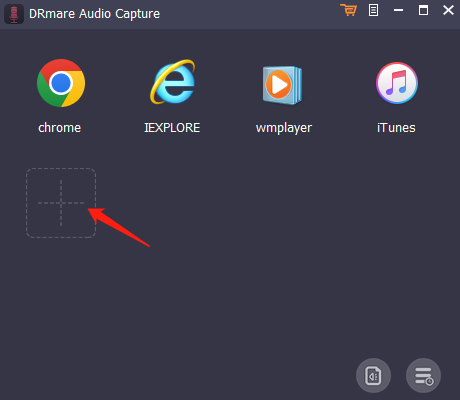
Step 1: Go to the official DRmare Audio Capture website to download and install it on your PC. Open it and click the + button to add the app you want to rip YouTube Music.
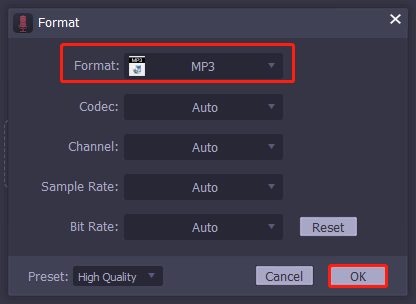
Step 2: Set up the audio output parameters for your YouTube Music songs. To choose your preferred audio format, access the Format window and expand the Format drop-down list. To customize the output settings of YouTube Music, you can also adjust the codec, channel, sample rate, and bit rate according to your needs. Next, click the OK button.
Step 3: Play one song you would like to record from the YouTube Music platform. After that, this tool will detect and begin recording audio from the platform immediately.
Step 4: The recording will stop automatically when the song ends. Hover over the recorded audio file and hit the Edit icon to trim/duplicate/merge.
Step 5: Click the Save button to keep the captured YouTube Music song on your PC. If you need to find a specific audio track within your PC’s folders, click the History > Search icon.
#3. Pazu YouTube Music Converter
Pazu YouTube Music Converter, as an MP3 music downloader, is designed for downloading YouTube Music songs on Windows PC and Mac. Songs can be downloaded in MP3 format up to 320kbps and saved to your device with ID3 tags. Also, you can download YouTube Music songs in WAV, AAC, M4A, FLAC, and AIFF formats.
The following is a step-by-step guide on how to download YouTube Music songs to MP3 using Pazu YouTube Music Converter.
Step 1: Visit the official Pazu YouTube Music Converter website to download and install it on your Windows PC or Mac. After downloading and installing, launch this MP3 music downloader.
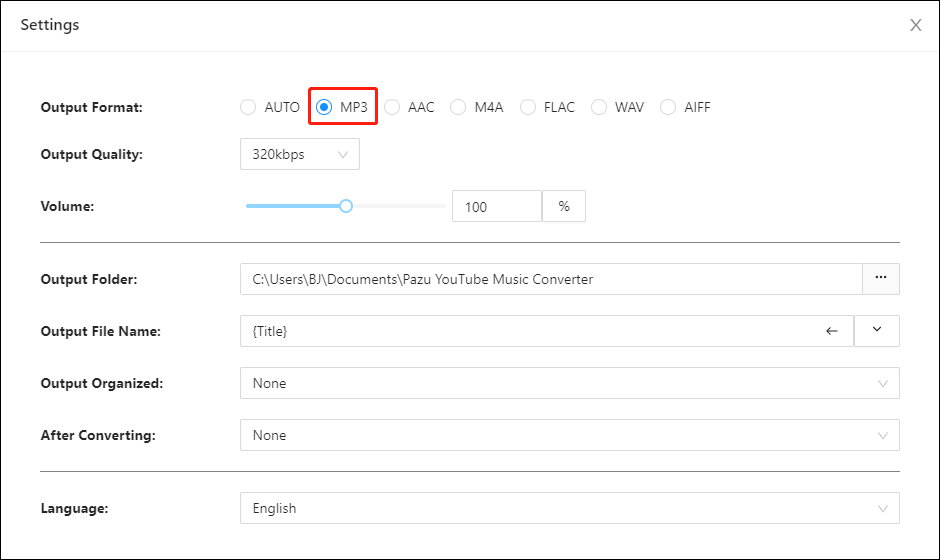
Step 2: If you need to change the output format to another format such as MP3, click the Settings icon in the upper right corner and select MP3 from the Output Format option. Additionally, you can adjust the output quality, volume, output folder, etc. as needed.
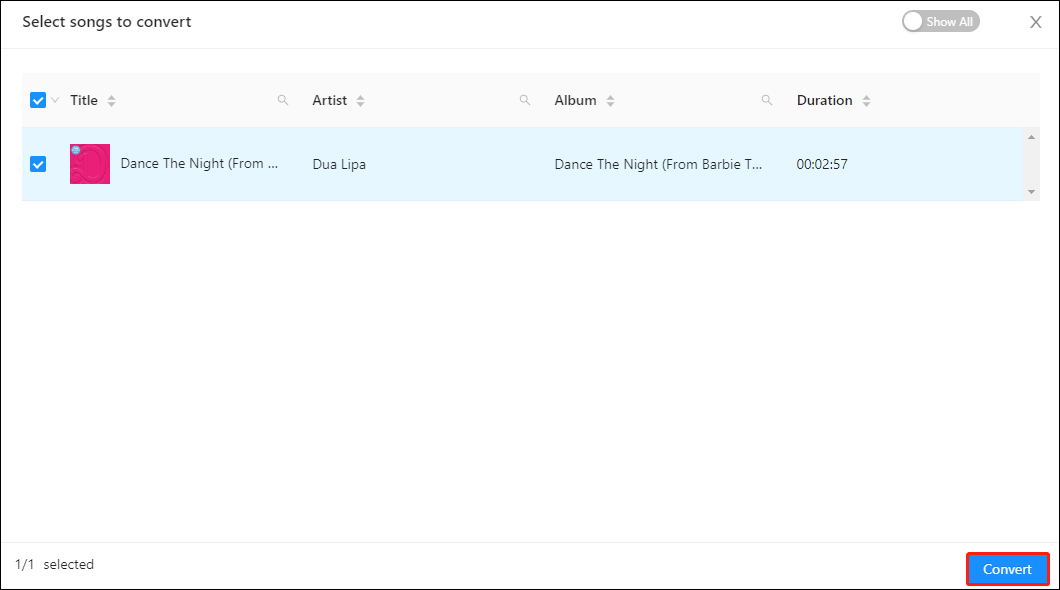
Step 3: Browse or search for a song to download. Once you have found the desired song, click on the Red icon to load it.
Step 4: After choosing the song, click the Convert button to start downloading it to the format you select. A progress circle will appear indicating that the song is downloading.
Step 5: Once the download process is over, click the Folder icon to quickly locate it. Further, you can click on the History icon next to the Settings icon to view and manage the downloaded song.
Crossfade YouTube Music Songs via Spotify
As soon as you acquire YouTube Music songs, you'll be able to crossfade them through Spotify. Here's how to do that:
- Fire up the Spotify desktop app and sign in to your Spotify account.
- Click your profile name in the upper right corner of the screen and select Settings.
- Scroll down to the Local Files section and enable the Show Local Files option.
- Click on ADD A SOURCE to select the downloaded YouTube Music song above.
- Find the selected song in the Local Files folder in Your Library.
- Go to Settings again, scroll down to the Playback section, and enable the Crossfade songs option. Or, you can move the slider to adjust the crossfade length.
When the crossfade feature is turned on, Spotify will crossfade between tracks that use the same channel count (mono or stereo) and sample rate.
Part 2: How to Fade in and Fade out Music in the Video with MiniTool MovieMaker?
Do you want to find out how to fade music in a video? Before learning how to do this, make sure you have a decent video editor. MiniTool MovieMaker is a great option that will help you fade in and fade out the music in your video in just a few simple steps.
This movie maker has an intuitive UI and a suite of effective editing tools. You can try it out for free and even use it to create videos without watermarks.
To diversify your video, MiniTool MovieMaker delivers a rich library of special effects, including transitions, filters, pan and zoom effects, captions/titles/credits, animated elements, etc. Beyond that, this free video editor enables you to split, trim, crop, rotate, flip, reverse, and combine videos.
Here are the easy steps on how to fade in and fade out music in video using MiniTool MovieMaker.
Step 1: Download and install MiniTool MovieMaker on your computer.
MiniTool MovieMakerClick to Download100%Clean & Safe
Step 2: Launch it after successful installation, close the pop-up window, and click Import Media Files to import your video with music.
Step 3: Drag and drop the imported video to the video track in the timeline below.
Step 4: Make sure the video on the video track is highlighted and click the Audio tab under the Video Property area.
Step 5: Drag the Fade in and Fade out sliders respectively to set the duration of the fade-in and fade-out effects. Or, you can move the Volume slider to make the video quieter or louder.

Step 6: Click Export to make some output settings, for example, change the file format, resolution, bit rate, and frame rate, and then hit the red Export button to save the edited video.

Conclusion
Crossfading is a popular technique in the modern music age. To make exceptional music mixes, audiophiles desire to crossfade their favorite music from different music streaming services. Thankfully, perfecting the art of YouTube Music crossfade is no longer a difficult feat. With MiniTool Video Converter, even a novice can save songs from YouTube Music and then add them to Spotify to crossfade YouTube Music songs.
If you have any questions while using MiniTool Video Converter or MiniTool MovieMaker, you can contact us at support@minitool.com.