Are there any solutions for importing local music and playlists from your devices to Amazon Music? This article published on MiniTool Video Converter will enlighten you on the best methods to transfer YouTube Music to Amazon Music, including how to transfer music from YouTube Music to Amazon Music and how to transfer playlists from YouTube Music to Amazon Music.
When compared to other music streaming services, one of the attractions of YouTube Music is that it collects not only official tunes but also some covered songs or mixed versions. But, the music streaming services such as Apple Music, Spotify, or Amazon Music can use audio-only mode for streaming, yet audio-only or offline streaming is only accessible for subscribers on YouTube Music, otherwise, you will consume a large amount of data consumption.
In light of this, have you ever thought about how you can import playlists from YouTube Music to Apple Music, Spotify, or Amazon Music and you’ll be capable of mixing the tracks and streaming them together? All you have to do is save the playlist to a local drive and then import it into one of the aforementioned music apps. In this article, we will focus on the different ways how to transfer YouTube Music to Amazon Music.
Can I Directly Import My Own Music into Amazon Music?
The answer is no. The reason is that Amazon Music has stopped the music upload feature. However, the good news is that it now supports music imports from Windows Media Player and iTunes. Apart from that, several solutions have been innovated to make playlist transfer from other music platforms easier. Users can also complete the task with Amazon Cloud.
Continue reading to discover how these approaches work!
How to Transfer YouTube Music to Amazon Music from Local Drive?
Despite the fact that you cannot upload your own music collections to Amazon Music, there are still a few solutions at your disposal.
Solution 1: Import Music or Playlists to Amazon Music from Your Computer
If you need to transfer music from YouTube Music to Amazon Music or transfer playlists from YouTube Music to Amazon Music, MiniTool Video Converter can help you save your favorite music or playlist to your computer effortlessly, then sync the saved music files from Windows Media Player and iTunes to Amazon Music.
Part 1: Get Music or Playlists from YouTube Music with MiniTool Video Converter
As the name implies, MiniTool Video Converter is a free video converter software and its most direct function is to convert video and audio files to multiple formats (e.g. MP4, MKV, MOV, AVI, WMV, MP3, WAV, M4A, AAC, etc.). Also, it supports capturing all or part of the computer screen, with the option to add audio from the microphone or system.
One feature that should not be overlooked is that MiniTool Video Converter facilitates you to download 4K YouTube videos, download YouTube playlists to MP4/MP3, extract audio from YouTube, and download subtitles.
Now, let’s see how to download music or playlists to your computer with MiniTool Video Converter.
Step 1: Download MiniTool Video Converter and install it on your computer.
MiniTool Video ConverterClick to Download100%Clean & Safe
Step 2: Once the download and installation process are complete, you will be able to open it on your computer immediately. There are 4 sections in which you can perform different tasks: Video Convert, Video Download, Screen Record, and Edit Video.
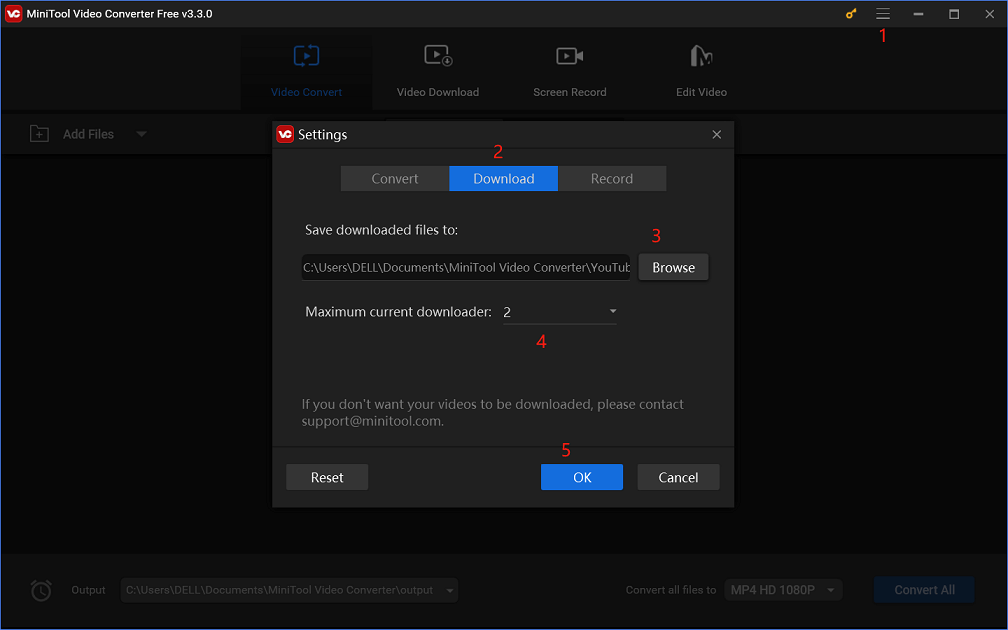
Step 3: Click the More icon next to Minimize icon and select the Settings option. Next, click the Download tab from the pop-up window. From there, you can choose where to save the music or playlist and change the maximum number of current downloads as per your requirements. Click the OK button to save the changes.
Step 4: Go to the Video Download section. To the right of the YouTube logo, use the search box to search for “YouTube Music,” then select YouTube Music to continue.
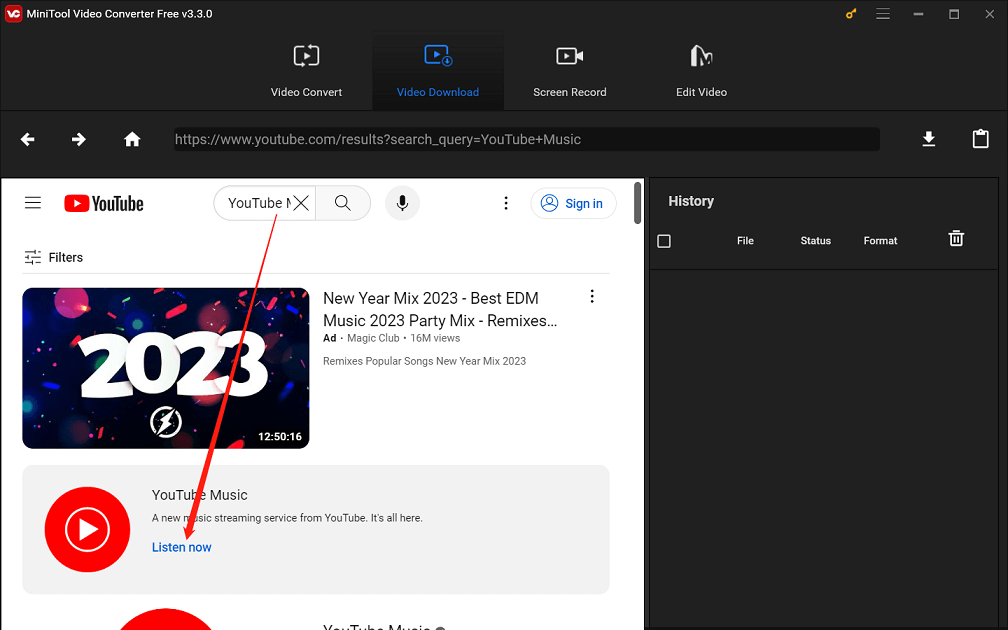
Step 5: Here, you can directly listen to recommended music or playlists provided by the platform or use the Initiate search tool to search for music or playlists you are familiar with and love. Confirm and click on the music or playlist you would like to save to your computer.
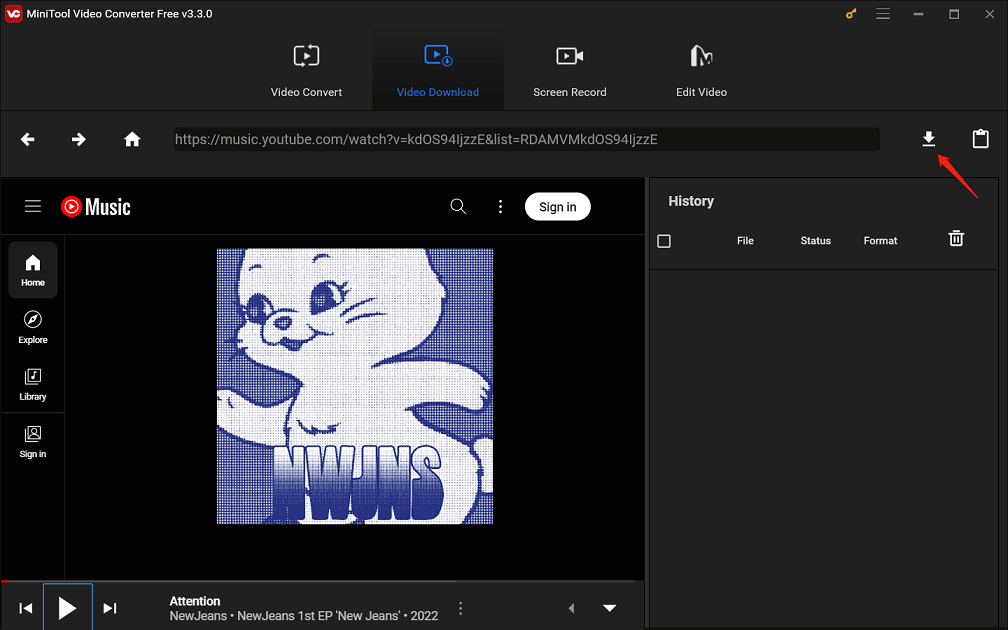
Step 6: When the corresponding music or playlist link appears in the search box at the top of the interface, click the Download icon to the right of the search box.
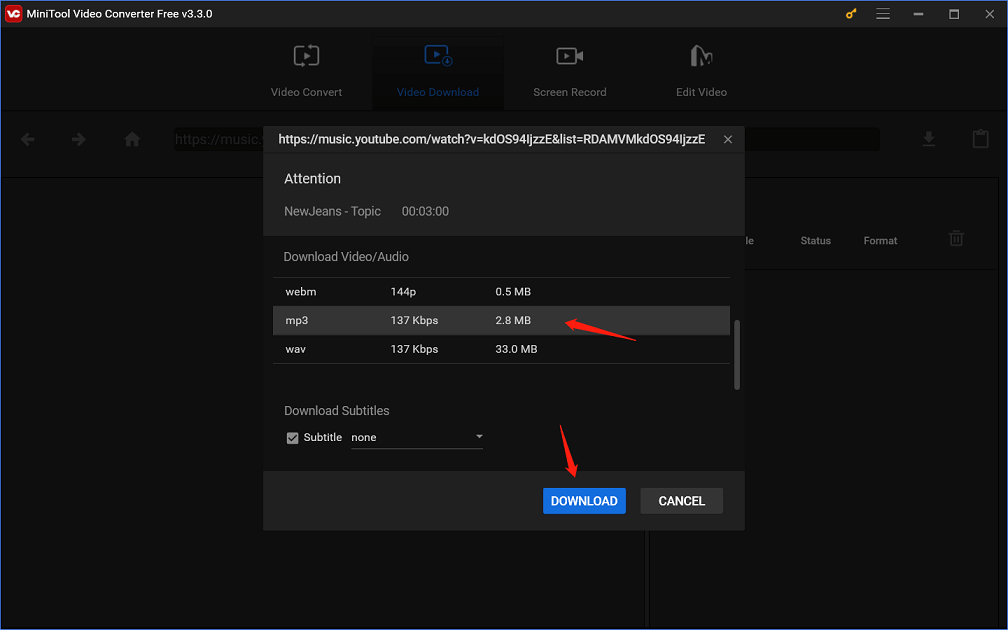
Step 7: On the pop-up window, select MP3 or WAV as the output audio format and click the DOWNLOAD button.
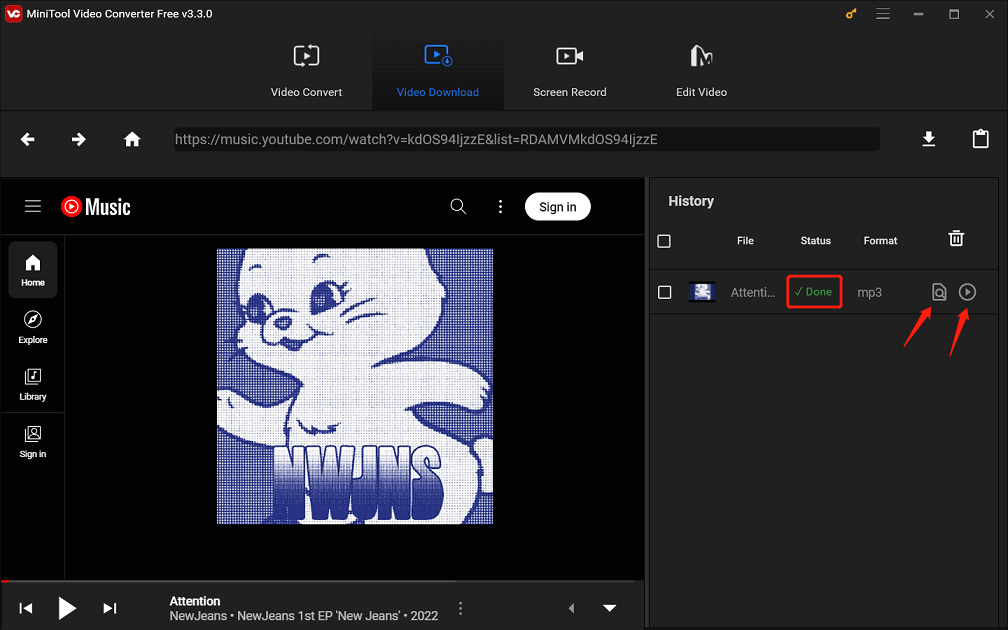
Step 8: When the download process is over, its status will show as Done. Finally, you can click the Navigate to file button to straight gain access to the destination folder or click the Play button to play the downloaded music or playlist.
Part 2: Sync the Downloaded Music or Playlist from Windows Media Player and iTunes to Amazon Music
After importing downloaded music or playlists from Windows Media Player and iTunes, customers can transfer the music or playlists on their computer to Amazon Music. Simply follow the steps below:
Step 1: Import the downloaded music or playlist to Windows Media Player and iTunes.
- For Windows Media Player: Start the Windows Media Player on your computer and click the drop-down icon beside Organize. Select Manage Libraries > Music to import the local music files.
- For iTunes: Start iTunes on your computer and click File from the menu bar. Select Add File to Library to import the local music files.
Step 2: Open Amazon Music and sign in to your Amazon account.
Step 3: On the right side, click on your name icon and select Settings.
Step 4: Locate and select the option Automatically Import Music From.
Step 5: Enable the toggle buttons next to iTunes and Windows Media Player.
Step 6: To sync the imported music or playlist from Windows Media Player and iTunes to Amazon Music, scroll to the bottom and hit Reload Library.
Solution 2: Import Music or Playlists to Amazon Music Using Amazon Cloud
The Amazon Cloud is designed to allow people to access their music or playlists from any device. As a result, by uploading songs from your device to Amazon Cloud, you can listen to them on Amazon Music as long as you use the same account. Just follow the steps below:
Step 1: In your browser, go to the Amazon Cloud Service website.
Step 2: Start Amazon Music and sign in to your account.
Step 3: Head to Library and utilize the filter feature to select Location as Cloud. After that, you can access your device’s music or playlists on Amazon Music.
How to Transfer YouTube Playlist to Amazon Music from Other Services?
The above solutions are useful if you are importing music or playlists to Amazon Music from your device. In addition, you can use the following tools if you would like to import a playlist from another music platform to Amazon Music.
Option 1: Transfer YouTube Playlist to Amazon Music Using TuneMyMusic
TuneMyMusic is a popular online tool that allows users to transfer music from one platform to another. While it is not completely free, its free version can help you quickly transfer up to 500 tracks from music services, such as YouTube Music, Apple Music, Spotify, iTunes, and so on to Amazon Music.
Price: Free; $2 per month (Annual Billing); $4 per month (Monthly Billing)
Compatibility: Online
Here’s how to import a YouTube playlist to Amazon Music with TuneMyMusic:
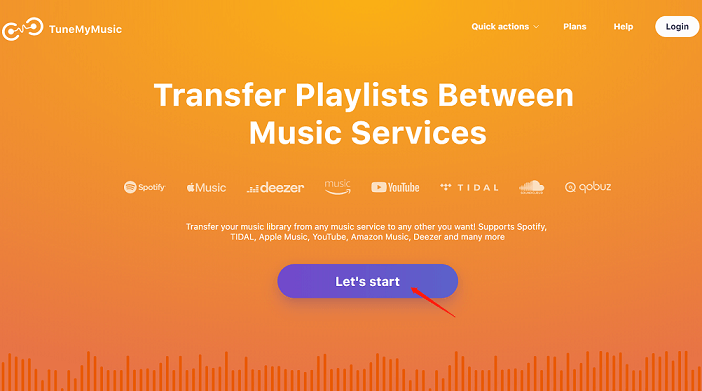
Step 1: Go to https://www.tunemymusic.com/ on your device’s web browser and click on the Let’s Start button.
Step 2: Choose the source music service from which you want to import the playlist. Under the circumstances, we should use YouTube Music.
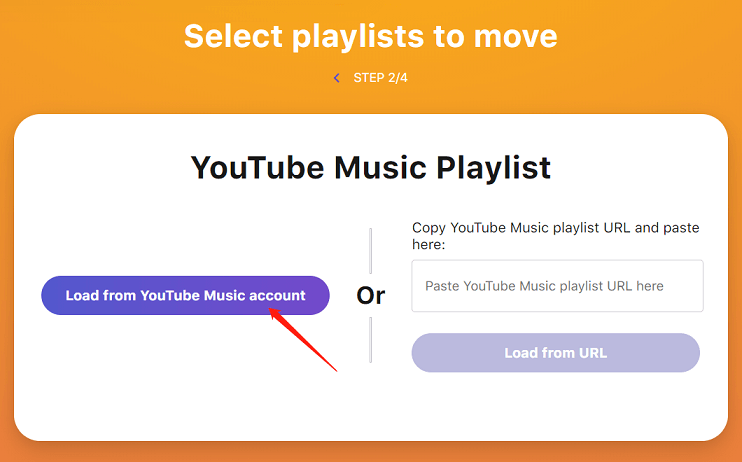
Step 3: Sign in to your account and click the Load from YouTube Music account button. In this way, TuneMyMusic enables you to automatically access your playlist. Pick the playlist you wish to import to Amazon Music.
Step 4: Select Amazon Music as your destination music platform and sign in to your Amazon account.
Step 5: Click on Start Moving My Music to start the music importation to Amazon Music. This only takes a few minutes to accomplish.
Option 2: Transfer YouTube Playlist to Amazon Music Using SongShift
SongShift is also a great tool for transferring music across streaming platforms, yet unlike TuneMyMusic, it’s an iOS-only app. It permits people to share playlists from YouTube Music, Apple Music, Spotify, and other platforms to Amazon Music.
With the free plan, you can transfer unlimited tracks for each playlist as well as review the process. But, you need to upgrade to the premium plan if you wish to batch-transfer your playlists or import multiple source platforms.
Price: $4.99 per month (Monthly Plan); $19.99 per year (Yearly Plan); $39.99 (one-off payment)
Compatibility: iOS
Here’s how to import a YouTube playlist to Amazon Music with SongShift:
Step 1: On your iPhone, download and install the SongShift app from the App Store.
Step 2: Fire it up, select YouTube from the list, and connect your account.
Step 3: Select Amazon Music from the list and sign into your Google account.
Step 4: Tap on the Continue button, then hit Get Started.
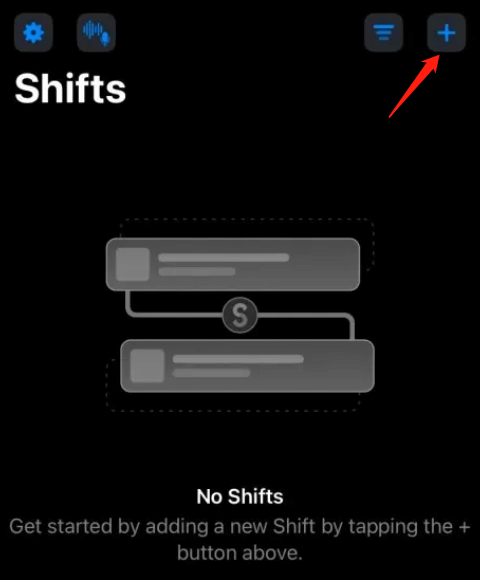
Step 5: Tap on the Plus (+) icon in the upper right corner of the screen.
Step 6: Tap on YouTube > Playlist > Select the playlist you wish to transfer.
Step 7: Press the Confirm button.
Step 8: Select Amazon Music as the destination.
Step 9: Press the Start Shifts button.
The playlist transfer process will start. Once the process is finished, you can tap on the Review button to check if all the tracks have been transferred from YouTube Music to Amazon Music.
Bottom Line
In general, even though Amazon Music discontinued the music upload feature, fortunately, there are still several ways to transfer YouTube Music to Amazon Music. Whether you want to transfer music or playlists from YouTube Music to Amazon Music via your local drive, or you want to transfer YouTube playlists to Amazon Music via other services, the above instructions can help you a lot.
If you have any questions or suggestions when using MiniTool Video Converter, please feel free to leave us a message or contact us at [email protected].


