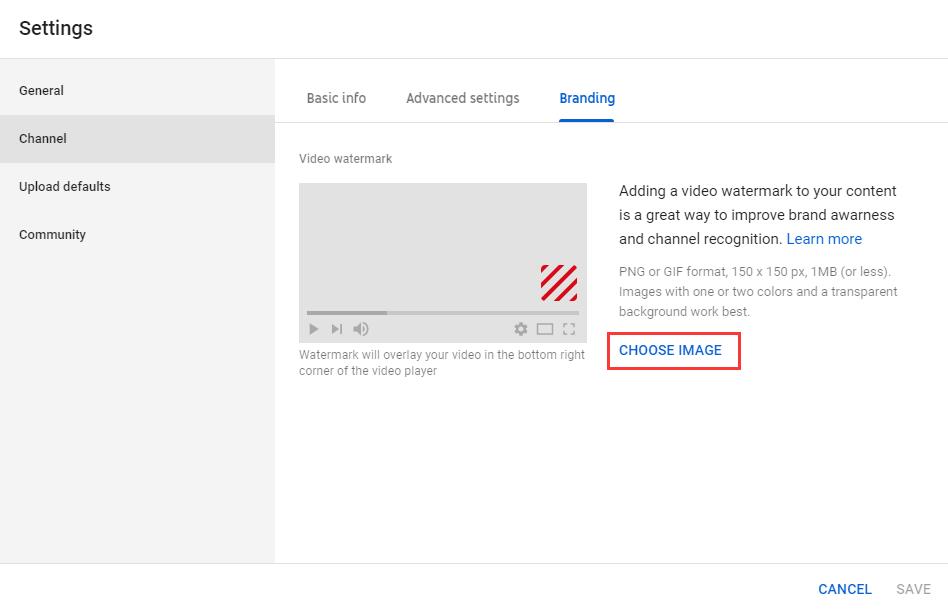
YouTube watermarks are often referred to as custom subscription buttons. If you add a watermark to your videos, viewers can subscribe directly to your channel by hovering over the watermark.
When it comes to YouTube, most branding is done through the watermark feature. Many people don’t know that this feature is available for free because it is hidden below the Channel settings. A great brand can not only make your videos more professional, but also help you increase your channel visibility.
How to Add Watermark to YouTube Videos
Add Watermarks to Existing YouTube Videos
Step 1. Navigate to YouTube in a browser and log in to your YouTube account.
Step 2. Click your profile at the top right of the screen and choose YouTube Studio.
Step 3. Select the Settings option from the left menu.
Step 4. Choose Channel in the left pane and then tap on the Branding button.
Step 5. Select CHOOSE IMAGE and choose which image you’d like to use as your branding watermark.

Step 6. Then you need to select the display time for the branding watermark:
- End of video: The branding watermark will appear for the last 15 seconds of the video.
- Custom start time: The branding watermark will begin showing at a time you choose.
- Entire video: The branding watermark will appear throughout the entire video.
Step 7. Tap on the Save button to save all changes.
After that, enter the Videos page and open one of your videos. As you can see, the watermark has been added on your video.
What’s better is you can also monitor the performance of your branding watermark on your YouTube videos. Look at the Annotations report in your YouTube Analytics and from there you will be able to see the click through rate, impressions, clickable impressions, closable impressions, close rate, and clicks.
Also read: How to Remove Watermark from Video and Photo Efficiently
Add Watermarks to Videos Before Uploading to YouTube
Beecut is a desktop video editing software that can help you add watermark to YouTube video easily. Now let’s check how to add watermark on YouTube with this video editing software.
- Download and launch the software.
- Choose the aspect ratio that you need for your video. The standard aspect ratio for YouTube on desktop is 16:9.
- From the dropdown menu of Edit, select Import and then tap on Import file to import all the files that you need.
- Drag and drop the video and the watermark to the video and PIP timeline. Then you can start to edit them.
- When you finish your editing, you can preview and export your video, and then upload it to your YouTube channel.
Tips on YouTube Watermark
- YouTube watermark size: The watermark should be transparent, square, and should be larger than 50×50 pixels, because when the watermark appears in the corner of the video, the size of the watermark will be shrunk down. At the same time, the watermark size should be less than 1MB.
- YouTube watermark color: It is recommended to use a single color, preferably no more than three colors. Too gorgeous watermarks can cause viewers to focus on the video content itself.
Also read: How to Upload a Video to YouTube from Computer and Phone
Bottom Line
Now, it’s your turn. Try encouraging viewers to subscribe to your channel by adding a YouTube branding watermark to your videos. If you have any questions or suggestions about it, please let us know via [email protected] or share it in the comments section below.

