Why Post YouTube Videos to Instagram
Most creators use multiple social media platforms to make their content reach more viewers. If you’re a YouTube creator, I recommend creating accounts on other social platforms, such as Instagram, Facebook, and TikTok. Then, share your YouTube videos on these platforms.
Instagram is a popular video platform that has billions of active users. Therefore, you can upload YouTube videos to Instagram to attract new audiences.
Videos on Instagram differ from those on YouTube. Instagram focuses on short videos like Reels and Stories, while YouTube primarily focuses on long videos. Therefore, you can post the most engaging clips from your YouTube videos to Instagram. This can attract more people to your channel and generate higher views.
In short, there are many benefits to posting YouTube videos on Instagram. How to do that? Below, I will walk you through the process.
How to Upload YouTube Videos to Instagram
This section provides a comprehensive guide on how to post a YouTube video on Instagram, including downloading and editing YouTube videos, and posting the edited YouTube videos to Instagram.
Part 1. Download YouTube Videos
First, to save the most attractive part of a YouTube video, you need to download the entire YouTube video. I have selected two tools for you to save YouTube videos. One is a desktop application, and the other is an online tool.
#1 MiniTool Video Converter
MiniTool Video Converter is the most recommended video downloader. It can download all YouTube videos to your computer, including long YouTube videos, as well as music videos, podcast episodes, playlists, and Shorts on YouTube. You can also use it to download the audio of YouTube videos.
I really like that MiniTool Video Converter doesn’t add a watermark to downloaded videos. Many apps add their logos to downloaded YouTube videos, but MiniTool Video Converter guarantees pristine video quality. It also supports batch downloads of YouTube videos. If you need to download a playlist quickly, you can set the maximum number of simultaneous downloads to 10 to improve download efficiency.
It’s very simple to use MiniTool Video Converter. Next, let me show you how to use it to save a YouTube video:
Step 1. Install and Launch MiniTool Video Converter
Click on the download button below to get the latest version of MiniTool Video Converter on your computer. Then, launch it to access its main interface.
MiniTool Video ConverterClick to Download100%Clean & Safe
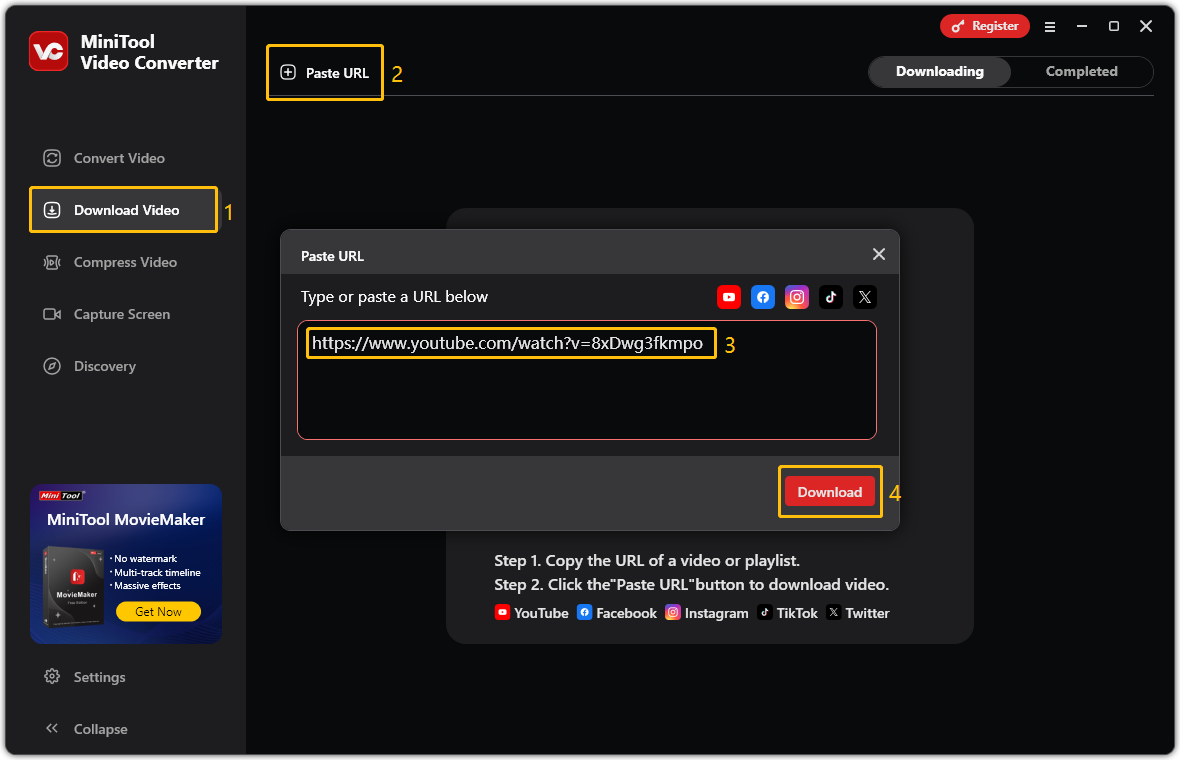
Step 2. Get a YouTube Video Link
Choose a browser to visit the official website of YouTube. Then, find the video you want to download, and copy its link from the browser’s address bar.
Step 3. Analyze the YouTube Link
Back to MiniTool Video Converter, switch to the Download Video tab. Then, choose the Paste URL option. In the pop-up window, paste the copied video link into the given box, and click on Download.
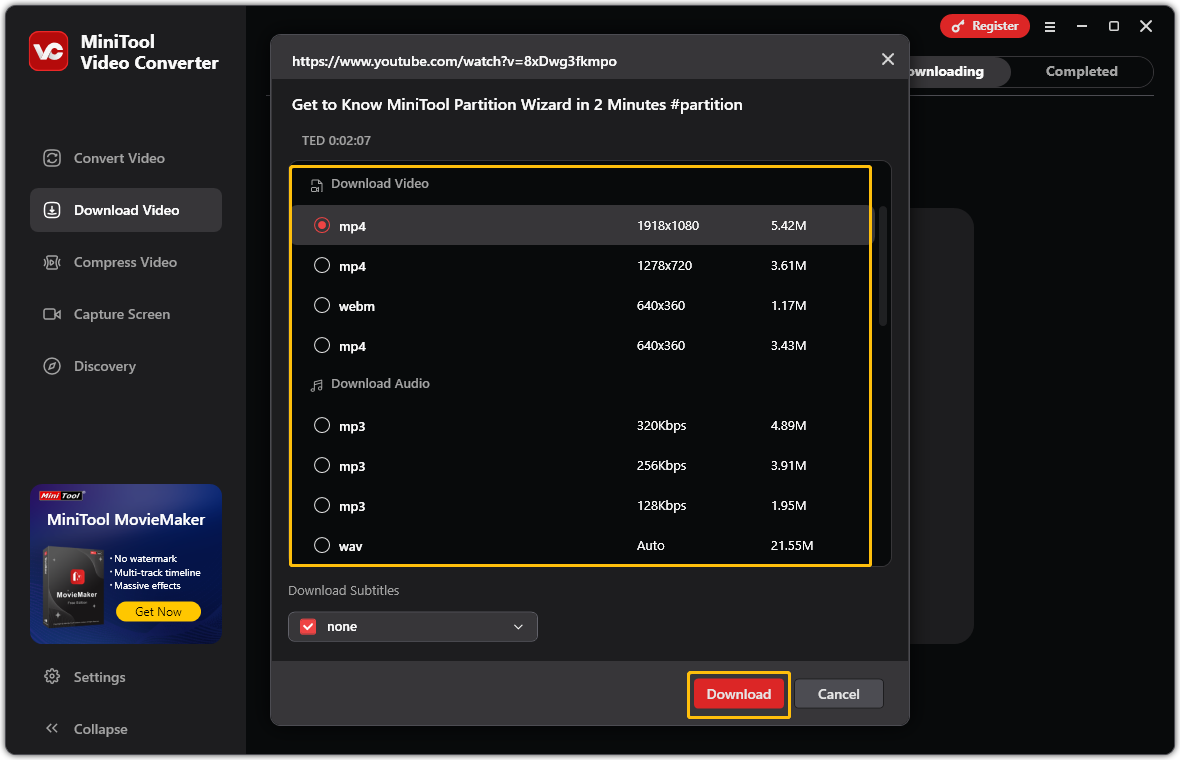
Step 4. Choose Output Format and Start Downloading
In the next pop-up window, you can choose to download the YouTube video in video or audio format. If you want to select a video format, you can also select the desired video resolution. Then, click Download to start the download.
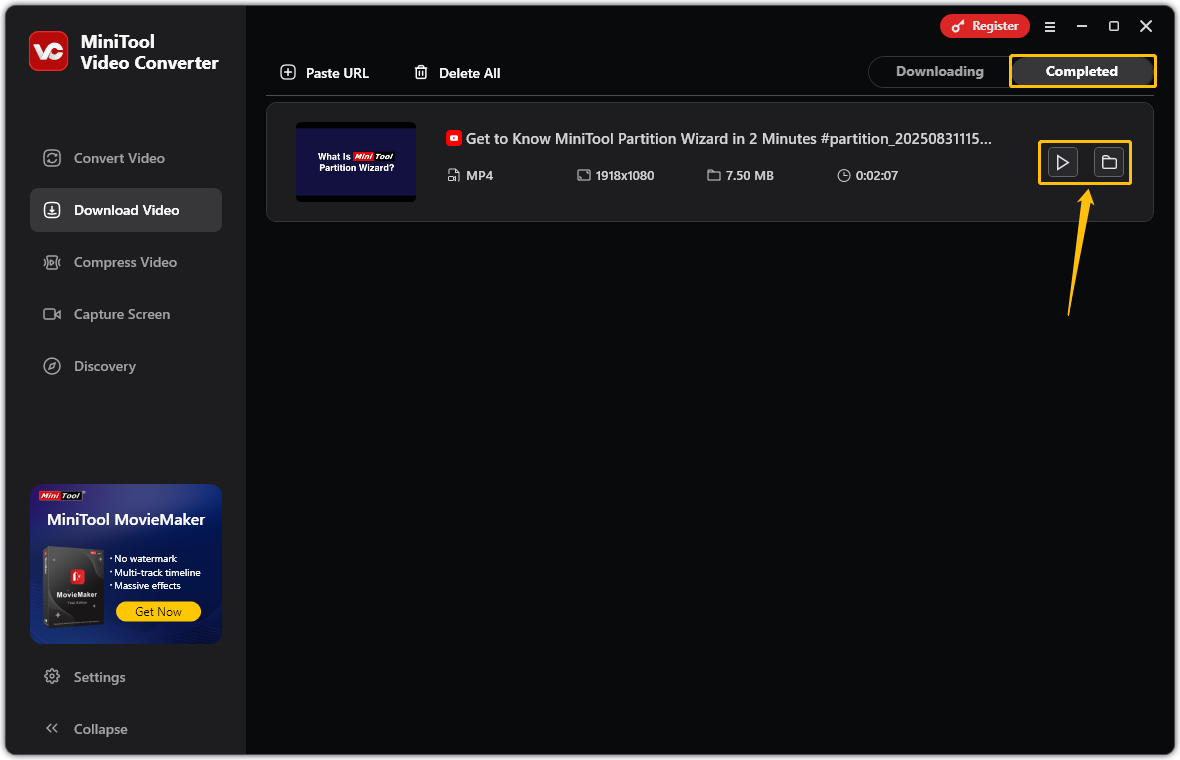
Step 5. Find the Downloaded YouTube Video
When the download process ends, you will be taken to the Completed tab. Then, you can click on the folder icon to navigate to the downloaded video’s save location.
In addition to saving YouTube videos, MiniTool Video Converter also supports downloading videos from Facebook, TikTok, Instagram, and Twitter.
MiniTool Video Converter doesn’t just offer downloading capabilities. As the name suggests, it’s also an excellent video converter. It supports over 1,000 formats and codecs, allowing you to convert any audio or video you need.
In addition, if you’re unable to upload a video due to the size limits, you can use MiniTool Video Converter to compress your video without quality loss. You can adjust the compression percentage from 10% to 100% and even preview the quality of the compressed video.
Furthermore, MiniTool Video Converter also includes a screen recording feature. It allows you to record the entire screen or a selected region of your screen and then save it in MP4 format. There’s no time limit for recording, and recorded videos don’t have watermarks.
If you don’t want to use desktop software to download videos, online download tools are also a good choice. Next, I will introduce you to a simple and easy-to-use online video downloader.
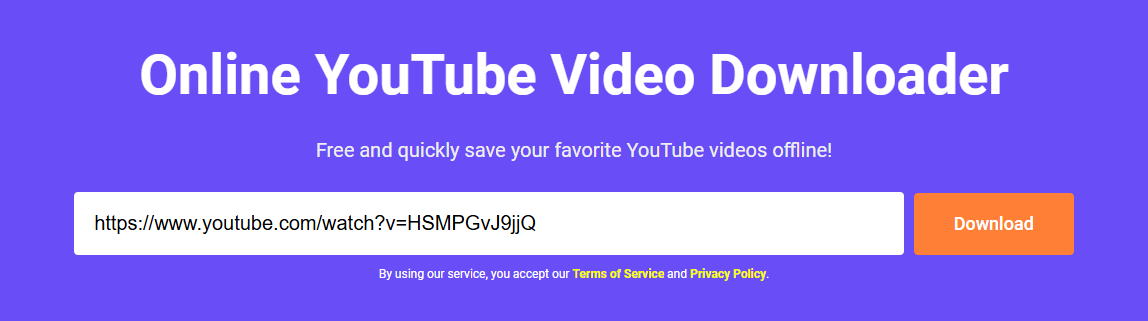
#2 Online Video Downloader on viddown.net
viddown.net includes an Online Video Downloader. You can use it directly without downloading any software. It supports downloading YouTube videos and playlists. It also downloads videos from many mainstream video platforms, including Vimeo, Instagram, and Facebook. I discovered that it also supports downloading video thumbnails.
Online Video Converter on viddown.net is compatible with various devices, including Windows, Mac, Linux, Android, and iOS. It is also compatible with multiple browsers, including Edge, Chrome, and Firefox. You can use this online tool on your computers, tablets, or mobile phones. Furthermore, it is completely free and you don’t need to worry about watermarks or video length limits.
Here’s how to use Online Video Downloader on viddown.net to save a YouTube video:
Step 1. Copy the Video URL
Go to the YouTube website and copy the video URL.
Step 2. Paste the URL into viddown.net
Use a browser to visit viddown.net, paste the video URL into the address box, and click the Download button.
Step 3. Choose the Downloaded Video Quality
When the video thumbnail appears below the address bar, select the video quality you want on the right side and click the Download button for the corresponding option.
Step 4. Check the Downloaded Video
When the download completes, check your browser’s Downloads section to locate the video.
Both MiniTool Video Converter and Online Video Downloader on viddown.net are very useful. After downloading your video, it’s best not to upload it to Instagram right away. This is because Instagram Reels can only be up to 3 minutes, and Stories can only be up to 60 seconds long. Therefore, you can use a video editor to clip the best part of your video before posting it on Instagram.
Part 2. Clip the YouTube Video
MiniTool MovieMaker is a super simple video editor. It’s perfect for beginners. This video editor can perform basic trimming, splitting, and cropping features. You can also use it to change the aspect ratio of videos. Therefore, it’s perfect for clipping downloaded YouTube videos.
Below, I’ll show you how to use MiniTool MovieMaker to clip a YouTube video.
Step 1: Download and Install MiniTool MovieMaker
Click the button below to download and install MiniTool MovieMaker on your desktop. Then, launch this free software.
MiniTool MovieMakerClick to Download100%Clean & Safe
Step 2: Import the Video
In MiniTool MovieMaker’s main interface, click the Import Media Files option to add the downloaded YouTube video. Then, drag and drop the video to the video track.
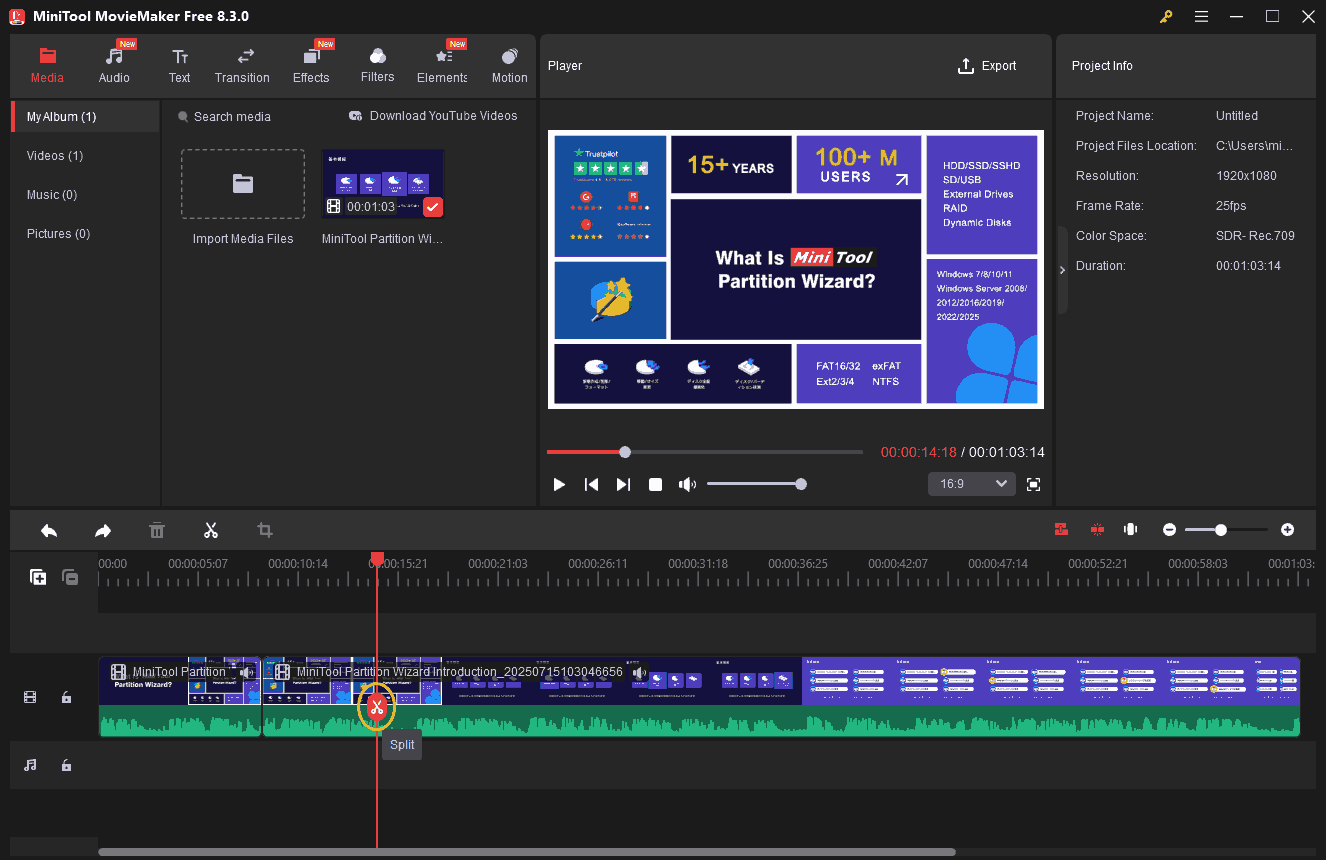
Step 3: Clip the Video
There are two ways to extract the most important part of a YouTube video: trim or split.
Trim:
- Click the video on the main video track.
- Move the cursor to the start of the video clip until it changes to a right-pointing arrow.
- Drag the arrow rightwards to the beginning of the desired part.
- Place the cursor at the end of the video clip until it changes to a left-pointing arrow.
- Drag the arrow leftwards to the end of the desired part.

Split:
- Select the video on the main track.
- Move the playhead to the beginning of the clip you want and click the Split icon.
- Move the playhead to the end of the clip you want and click Split again.
- Click on the unwanted clips and press the Delete key on your keyboard to remove them.
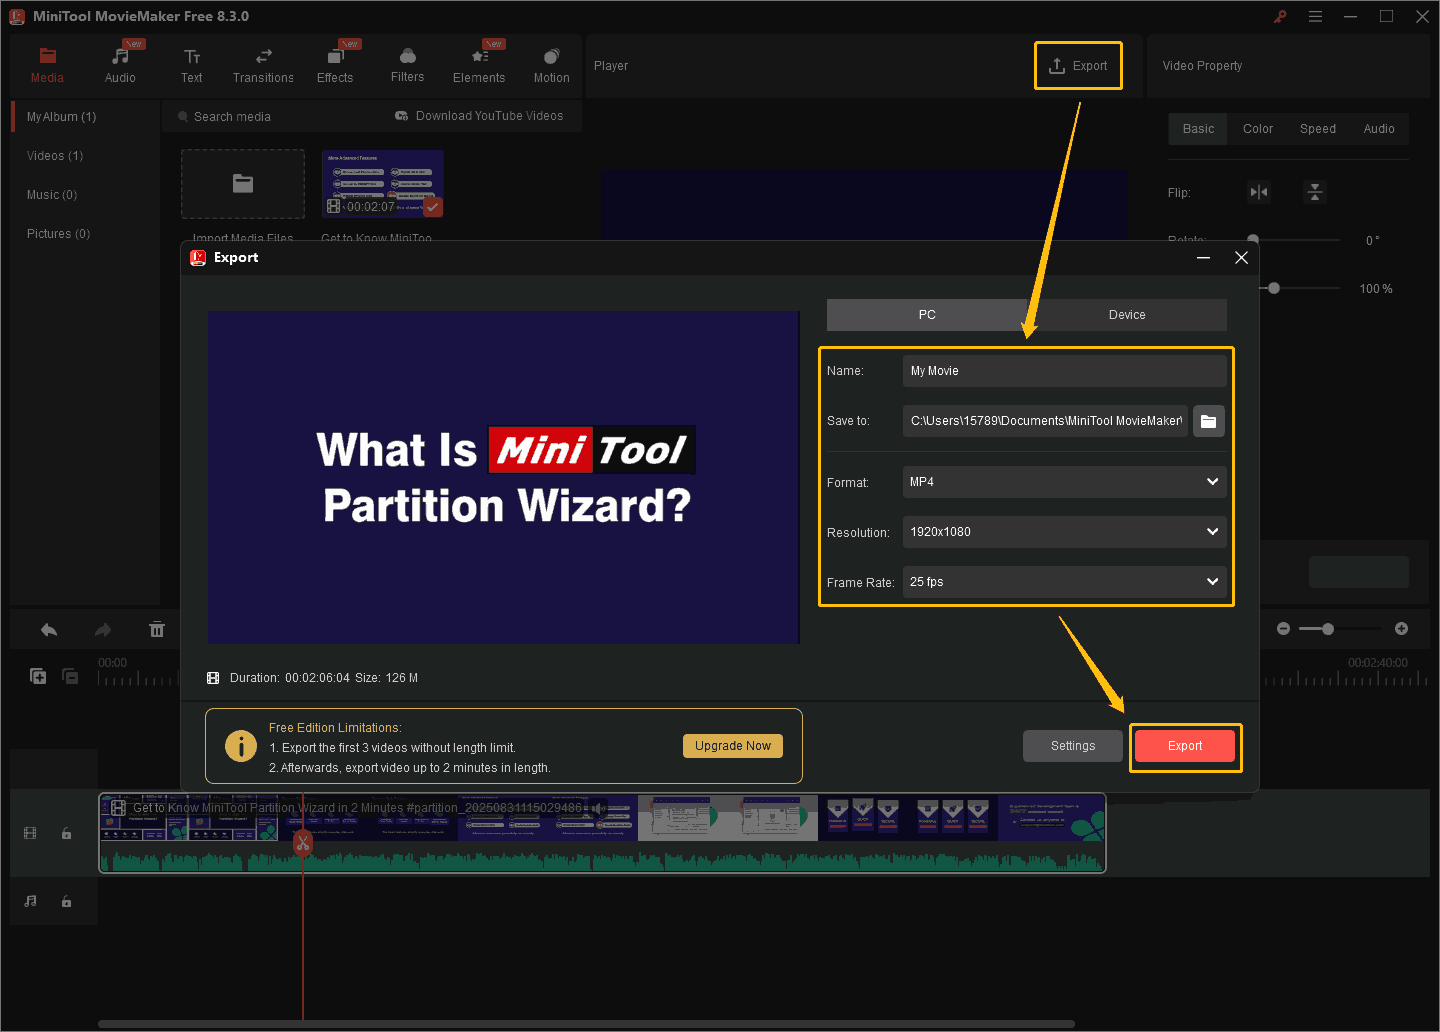
Step 4: Export the Video
Click the Export option in the upper-right of the Player window. In the next pop-up window, you can rename the video, set the save location, choose the output format, resolution, and frame rate. Then, choose the Export button.
Now, you’ve clipped the best moments from your YouTube videos. It’s time to share YouTube to Instagram!
Part 3. Post a YouTube Video on Instagram
Below, I will show you how to post a YouTube video as an Instagram Reel:
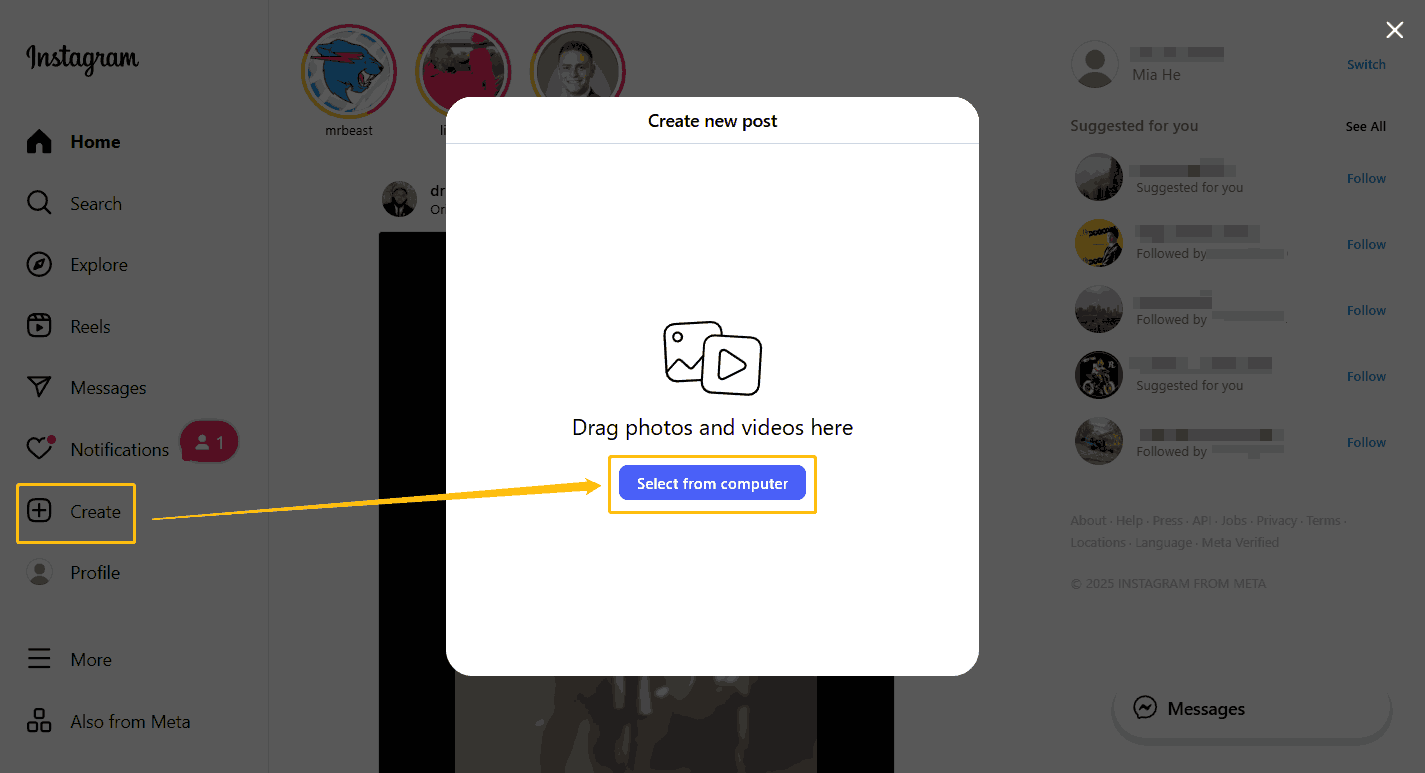
Step 1: Go to the Instagram Official Website
Visit https://www.instagram.com/ on your browser and log in to your account.
Step 2: Create a New Video
Choose the Create option on the left menu and click the Select from computer button. Then, select the YouTube video and click Open.
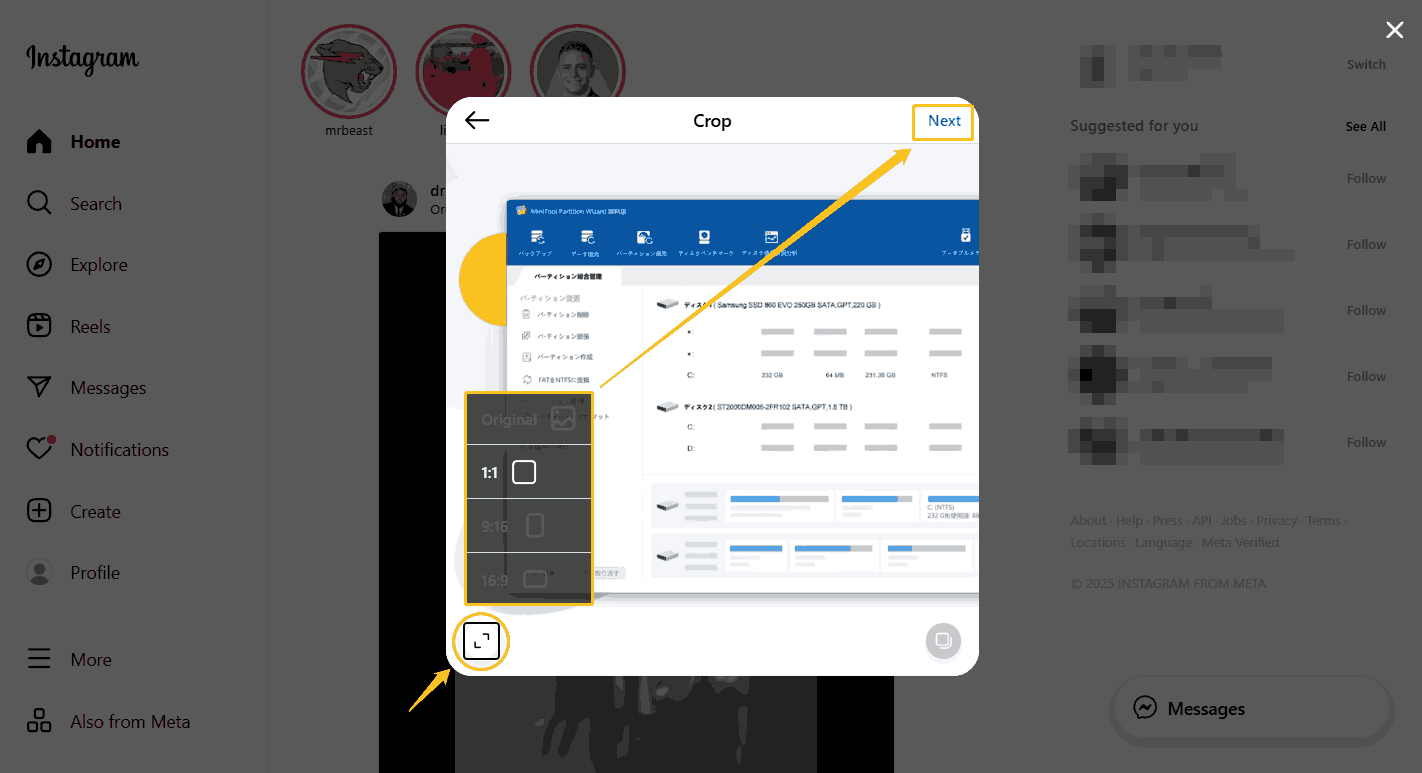
Step 3: Crop the Video
Click the icon in the lower left corner of the Crop window, select a video aspect ratio, and click Next.
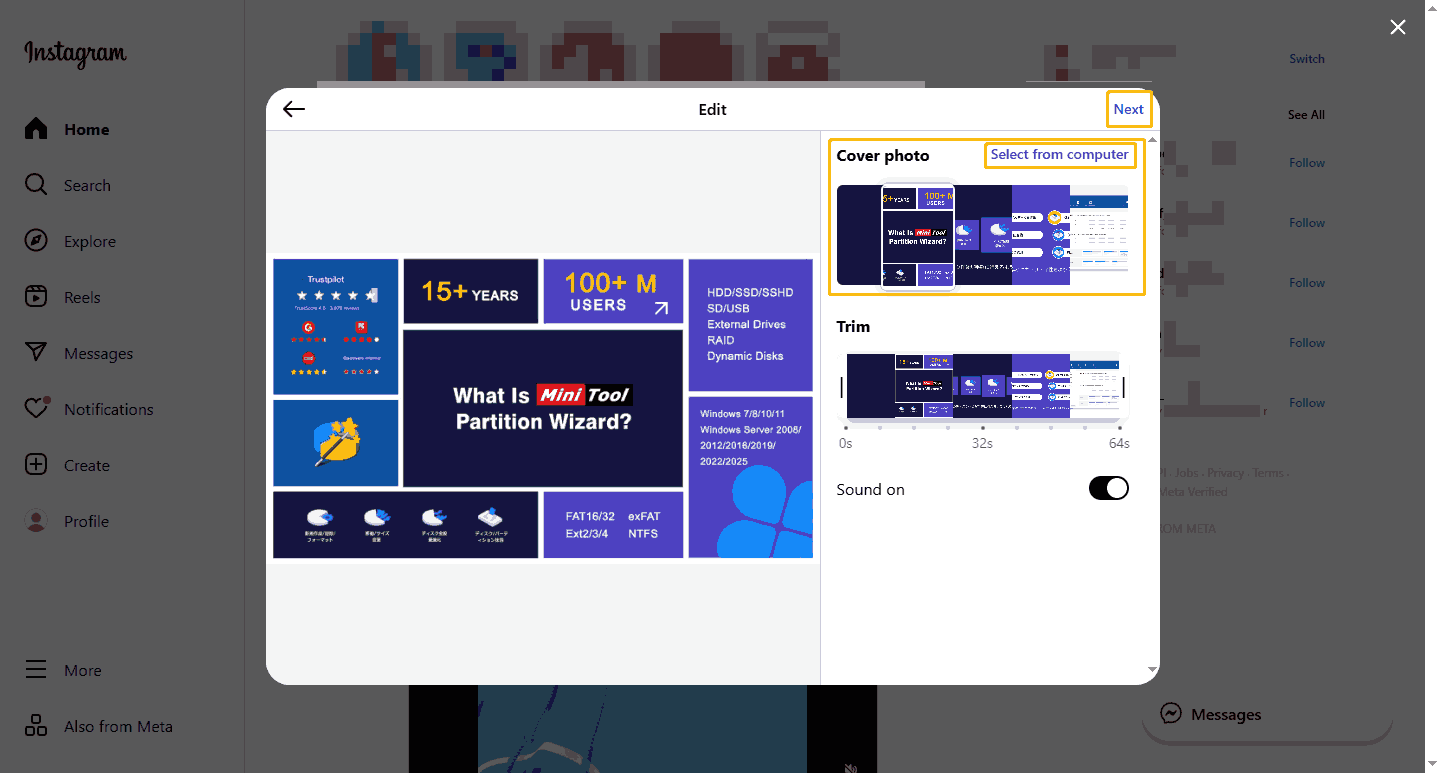
Step 4: Set Video Cover
Select a frame from the video to use as the cover under Cover photo. You can also click Select from computer to select an image as the cover for your video. Then click Next.
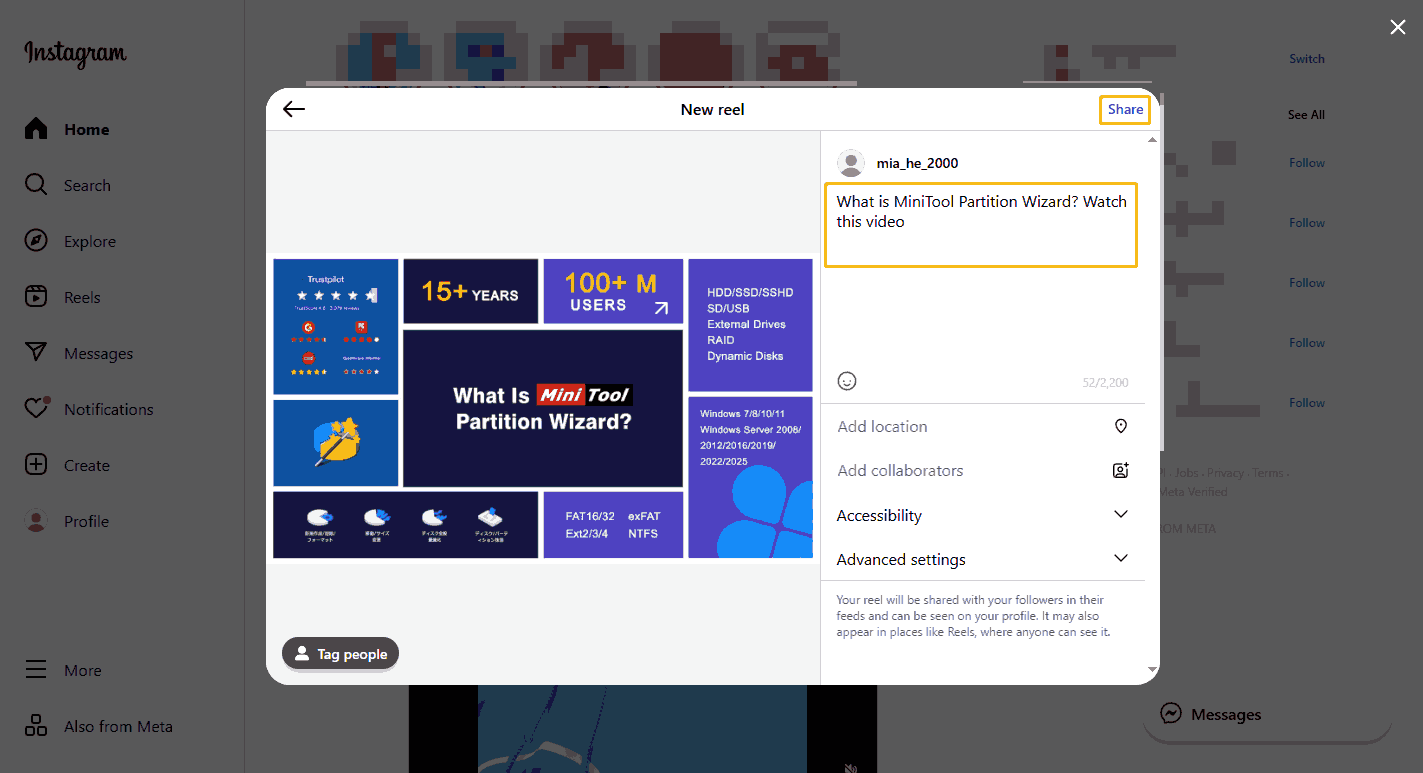
Step 5: Publish the Video
Enter the description for the video. Then, click Share in the upper-right corner of the window to share YouTube to Instagram.
Besides posting YouTube videos on Instagram, you can also add a YouTube video link to Instagram to reach more viewers. Additionally, you can paste your YouTube channel URL into your Instagram bio to further promote your channel.
To Wrap Things Up
In general, uploading a video from YouTube to Instagram requires a video downloader and a video editor. This article recommends two tools for downloading YouTube videos: MiniTool Video Converter and Online Video Downloader on viddown.net. The former is more practical for me because it includes additional features such as screen recording and video compression.
In addition, because Instagram videos are limited in length, it’s important to present the most useful information to viewers. Therefore, using MiniTool MovieMaker to clip YouTube videos is also essential.
You can reach out to us via support@minitool.com at any time if you have any questions or problems while using MiniTool Video Converter or MiniTool MovieMaker.
About The Author

Position: Columnist
Mia joined MiniTool as an SEO editor following her university graduation, bringing a strong foundation in digital content optimization. She has since developed extensive expertise in creating technical articles and delivering practical solutions for video conversion, video compression, and audio transcription. She remains current with emerging software trends and continuously refines her content strategy based on real user feedback and industry developments.