Reposting is when you take other people’s photos and videos and share them on your own profile. Instagram, as one of the biggest photo and video sharing platforms, offers diverse content formats, including Reels, Stories, and posts (single photo posts). Each of these presents opportunities for strategic reposting.
How to repost on IG for photos, Reels, and Stories? They are divided into three parts, and I will introduce them one by one for you. Below are the benefits of reposting on Instagram. If you are not interested, you can go directly to Part 1 to learn how to repost an image on Instagram.
Benefits of Reposting on Instagram
Below’s a detailed breakdown of why reposting should be part of your Instagram strategy.
1. Save Time and Reduce Content Creation Pressure
One of the biggest points for users to repost on Instagram is the constant demand to produce fresh content. Reposting eliminates the need to write, record, and edit original material every time you post.
2. Expand Your Reach and Attract New Followers
Reposting exposes your account to the original creator’s audience. When you tag the creator in your repost, their followers may click through to your profile to see more.
3. Keep Feed Diverse and Engage Your Audience
Reposting adds variety, keeping your followers interested and coming back for more. Diversity also helps you tap into trends without having to create trend content from scratch.
Part 1. How to Repost Instagram Photos
The simplest approach to reposting a photo on Instagram is to take a screenshot of the content you want to share. This method is particularly useful when dealing with high-resolution images or content that you can’t download directly. Take the steps below to take a screenshot of an Instagram photo, edit it, and repost it.
Step 1. Taking the Screenshot
To take a screenshot on a Windows PC, you can use the Print Screen (PrtScn) button on your keyboard. Pressing this button captures the entire screen. If you only want to capture a specific part on Windows, you can use the Windows + Shift + S combination. Then, save the photo on your computer.
Step 2. Editing the Screenshot
Once you’ve taken the screenshot, you may need to edit it to crop out any unnecessary parts, adjust the size, or add text or other elements. On Windows, you can use the built-in Paint application.
- Find the screenshot photo, right-click the photo, and choose Edit.
- Use the cropping and editing tools to make the necessary adjustments.
- When the editing process ends, click on the Save button to keep it.

Step 3. Uploading the Screenshot to Instagram
Now, it’s time to upload the edited photo to Instagram.
1. Log in to Instagram
Open the Instagram website in your web browser and log in to your account.
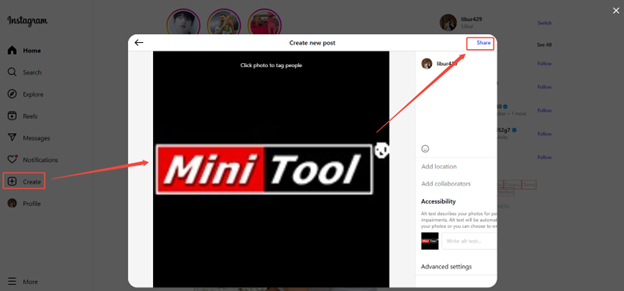
2. Repost the Edited Instagram Photo
- Click on the Create button, which is usually represented by a plus (+) icon.
- Click on Select From Computer to add the edited screenshot from your computer’s storage.
- Add relevant hashtags to increase the discoverability of your repost.
- Remember, you need to add the name of the original photographer in the caption or tag the user.
- Once you’re satisfied with the caption and hashtags, click on the Share button to publish the reposted content.
It’s easy to repost Instagram photos. All right? How about Reels? Let’s dive into Part 2!
Part 2. How to Repost Instagram Reels
Reels are one of the most engaging forms of content on Instagram. Reposting them allows you to tap into trending content. How to repost Reels on Instagram? Here are three steps: downloading the Instagram Reel, editing the Reel, and reposting it on Instagram.
Downloading the Instagram Reels for reposting lets you preserve video quality and customize the content. Below is a detailed guide to master each step with the tools.
Step 1. Download the Instagram Reel
Instagram doesn’t offer native downloads, so you need to use a trusted downloader to save the Reel to your computer. MiniTool Video Converter is a highly recommended one for me.
MiniTool Video Converter is a Windows-based tool that is free of charge, ads, or watermarks. It allows you to save favorite Instagram videos and Reels on your computer in HD, 4K, or even 8K easily and quickly by providing the links. The maximum current download is up to 10 videos at one time, saving you much time and effort.
In addition, as a versatile video downloader, MiniTool Video Converter also supports users in saving videos from other famous platforms, such as Facebook, TikTok, YouTube, and Twitter. The download steps for every video platform are similar.
To download an Instagram Reel using MiniTool Video Converter, follow the guide below.
1. Get MiniTool Video Converter
MiniTool Video ConverterClick to Download100%Clean & Safe
- Download the latest version of MiniTool Video Converter on your Windows PC by clicking the button above.
- Follow the on-screen prompts to install it after downloading.
2. Go to the Download Video Module
- Launch this Instagram Reels downloader.
- Navigate to the Download Video tab on the left side of the main interface.
3. Copy the Instagram Reel Link
- Go to Instagram.
- Find the Instagram Reel you want to download.
- Copy the Reels URL from the address bar.
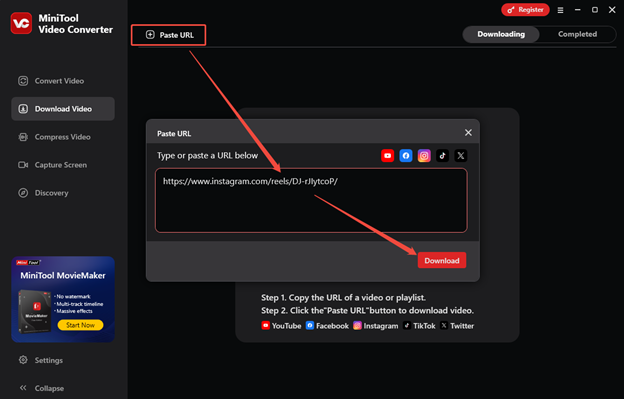
4. Paste the Instagram Reel Link
- Go back to MiniTool Video Converter and click on the Paste URL button.
- Paste the copied URL into the Paste URL window that pops up.
- Click Download to analyze the Instagram Reel URL.
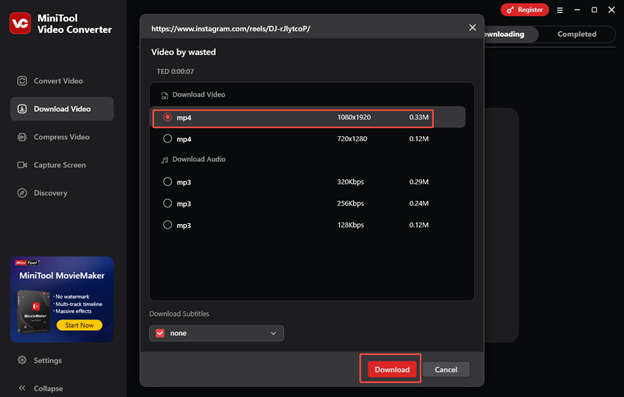
5. Download the Instagram Reel
- In the pop-up window, choose your desired format and quality. Here, I choose MP4 (1080 x 1920).
- Then, click on the Download button to download the Reel.
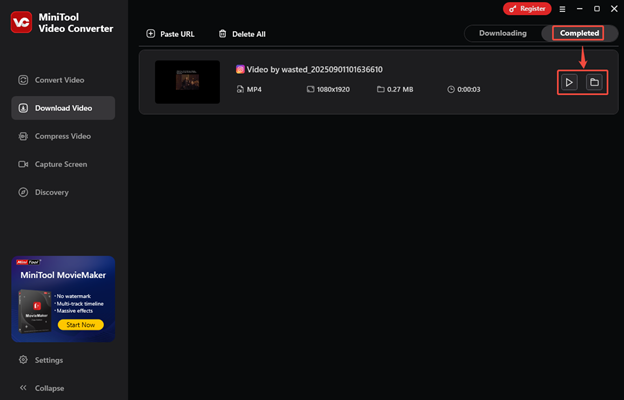
6. Check the Downloaded Instagram Reel
Once it completes, you can check the downloaded Instagram Reel in the Completed tab. Play the Reel by clicking the play icon or find the save folder by clicking the folder icon.
Apart from being a video and audio downloader, MiniTool Video Converter also allows you to convert the downloaded Instagram Reels to over 1,000 video and audio formats you want, such as MOV, MKV, WMV, AVI, M4V, WAV, AAC, AIFF, M4A, WMA, etc.
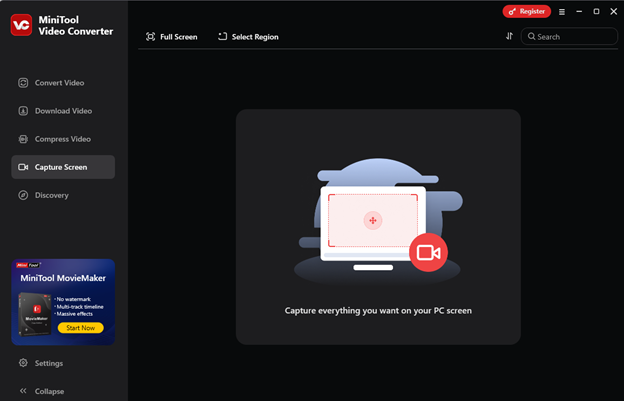
Screen capture is also a must-talk function for MiniTool Video Converter. It enables you to record PPTS, gameplay, tutorials, meetings, and video calls in high quality without any watermarks. Customizing the hotkeys before you record the screen is available. All the recordings are saved in MP4 format.
By the way, using MiniTool Video Converter’s screen capture function is also an alternative way to save Instagram Reels on your device for editing and reposting. If you want to have a try, you can follow this article: Instructions on How to Record YouTube Shorts on a PC and a Phone.
Step 2. Edit the Downloaded Instagram Reel
After downloading the Instagram Reel, I believe you want to make adjustments to it. Whether you want to trim footage, add text, or adjust audio for the downloaded Instagram Reel, you don’t need professional software, but you need a free tool that is beginner-friendly and tailored for short videos like Reels.
I usually make Instagram Reels using MiniTool MovieMaker. It is an easy-to-use video editing application that allows users to edit or make videos for Instagram, YouTube, Facebook, TikTok, etc. This application supports the most popular media file formats and comes with various editing features.
MiniTool MovieMaker allows you to crop, trim, split, rotate, reverse, speed up, slow down, change the aspect ratio, and make color adjustments. It also allows you to add transitions, subtitles, filters, effects, and motions to enhance visual appeal. Then, you can export the Reel in multiple formats, including MP4, AVI, MOV, MP3, etc., in 1080p.
Here’s a step-by-step guide on how to edit the downloaded Instagram Reel using MiniTool MovieMaker.
1. Download & Install & Launch MiniTool MovieMaker
MM
- Click the button above to get the installation package of MiniTool MovieMaker. Then, follow the on-screen instructions to install this software on your Windows PC.
- Launch the software and close the pop-up window to enter its main interface.
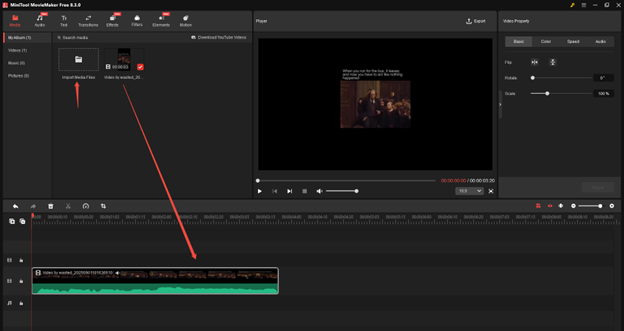
2. Import the Instagram Reel
- Click the Import Media Files area to upload the Reel you want to repost to Instagram.
- Then, drag it to the timeline.
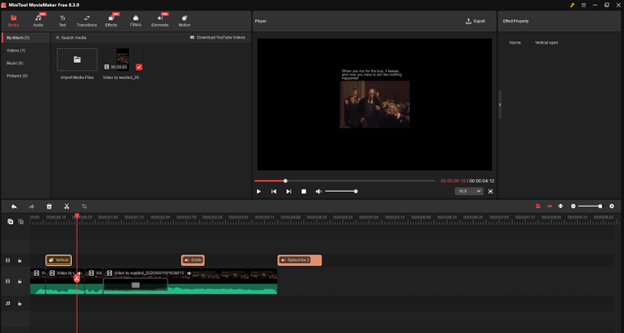
3. Edit the Instagram Reel
You can trim the length of the Reel, add text, transition, effects, stickers, etc. Edit it until you are satisfied.
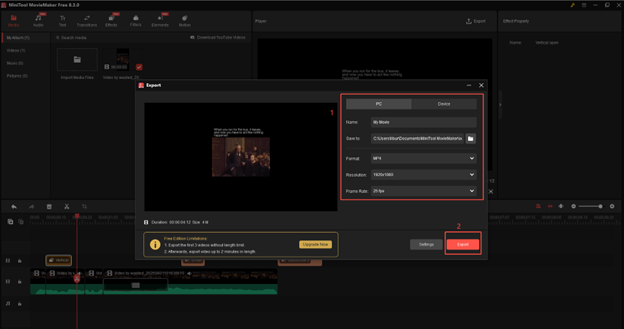
4. Export the Edited Instagram Reel
- Click the Export option in the upper right to open the Export window.
- You can customize the video’s name, destination folder, format, resolution, etc.
- When all is set, click the Export button to save the video.
Step 3. Repost the Edited Instagram Reel
Once the edited Reel is ready, uploading it to Instagram is straightforward. The uploading steps of Instagram Reels are the same as those for photos in the first part. Just repeat the steps above.
In a word, reposting an Instagram Reel needs three steps: downloading it, editing it, and reposting the edited Reel. Go try it now!
![2 Effortless Methods for Instagram Link Download [2026]](https://images.minitool.com/youtubedownload.minitool.com/images/uploads/2025/08/instagram-link-download-thumbnail.jpg)
Part 3. How to Repost Stories on Instagram
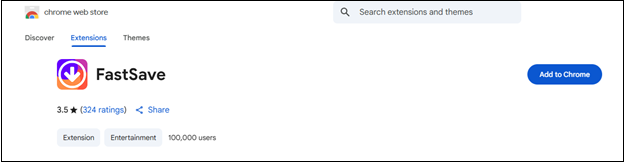
Instagram doesn’t have a built-in feature for directly reposting Stories. One of the easiest workarounds I used is to use a browser extension. There are several browser extensions available that can simplify the reposting process on Instagram. For Chrome users, extension like FastSave is a popular choice.
FastSave is designed for reposting and downloading content from Instagram, with 100K users. It is available for both Chrome and Firefox browsers. There is a Repost button for each post. When you click the Repost button, you can share the Stories to your own Instagram account.
Besides, FastSave enables users to easily download Instagram videos, photos, Stories, Reels, and IGTV content to their PCs. When users visit the Instagram website, a Download button will appear under each post. Clicking this button allows them to save the corresponding content.
We will take Google Chrome browser as an example and show you how to repost a Story on Instagram with FastSave.
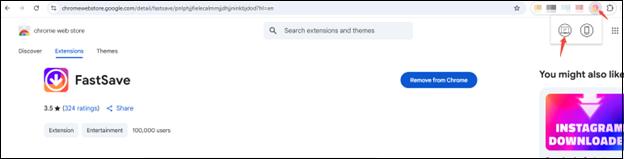
Step 1. Finding and Installing the Browser Extension
- Open the Chrome Web Store in your Chrome browser.
- Search for the extension by name and click on the Add to Chrome button.
- Follow the on-screen prompts to complete the installation.
Step 2. Using the Extension to Repost Instagram Story
1. Once the extension is installed, enable it and click on the computer icon.
2. The extension will take you to the Instagram website automatically if you have already logged in to your account. If not, log in to your Instagram account first.
3. Navigate to the Story that you want to repost.
4. When you hover over the post, you should see Download and Repost buttons for each post.
5. Click on the Repost button.
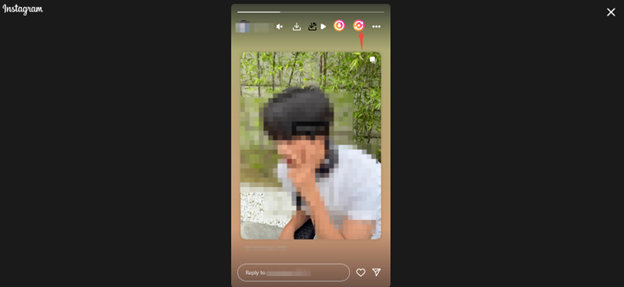
6. Click on the Share button to repost the Instagram Stories.
Final Words
How to repost on Instagram? You can repost Instagram photos, Reels, and Stories on a PC through various methods. For photos, use manual screenshots, editing, and reposting. For Reels, download them, edit them, and repost them. For Stories, use a browser extension to repost them directly.
By effectively reposting content, you can reduce content creation pressure, attract new followers, keep content diverse, and engage with your audience on the platform. But there is one thing you need to remember: you must have the creator’s permission to repost their content on Instagram. Finally, if you encounter any problems while using MiniTool Video Converter or MiniTool MovieMaker, please feel free to contact us via support@minitool.com for help.
About The Author

Position: Columnist
Libur is always willing to try new things and full of enthusiasm for life. At the same time, she is passionate about making fantastic movies. Now, she has become an English editor about multimedia in MiniTool. She is good at writing articles about video editing, video conversion, and screen recording. During her spare time, Libur loves climbing mountains and listening to music. By the way, her favorite singer is Taylor Swift.