Developed by Zoom Video Communications, Inc., Zoom is a proprietary videotelephony application software that allows users to create and join virtual meeting rooms for video conference meetings, webinars, and live chat.
Zoom allows you to not only make live communications but also save what you have discussed for later playback. Among the numerous video file formats, Zoom supports recording in MP4, M4A, M3U, TXT, CC.VTT and VTT for both local and cloud recordings.
Do you want to upload the recorded Zoom video to YouTube to reach more viewers? How do I upload a Zoom recording to YouTube? Here’s a comprehensive guide on how to upload Zoom recording to YouTube. Just follow the three steps below.
Step 1. Prepare Your Zoom Recording File
Just as we mentioned above, Zoom supports recording in multiple formats. However, we also need to consider the supported upload formats of YouTube. From YouTube Help, you can learn that audio files, like MP3, WAV, or PCM files, can’t be uploaded to create a YouTube video. It only allows people to upload video files like MP4, WMV, WebM, MOV, AVI, FLV, and more. So, please save your Zoom recording in MP4 format.
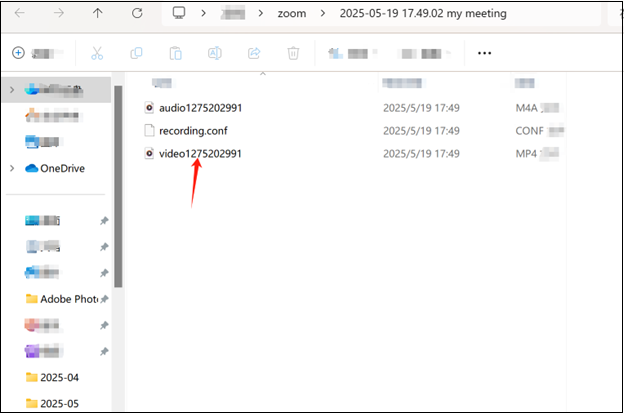
When you record a Zoom meeting, the recording is saved to your local device by default. The location depends on your settings. The local recordings of Zoom will be stored in the following directory:
- Windows: C:\Users\[Username]\Documents\Zoom
- Mac: /Users/[Username]/Documents/Zoom
- Linux: home/[Username]/Documents/Zoom
MiniTool Video ConverterClick to Download100%Clean & Safe
Step 2. Edit The Recording
After you record the Zoom meeting, you may want to edit your Zoom recording to enhance its quality. Zoom recordings are in MP4 format, which can be easily edited with most editing software, and there are numerous video editing software options available, such as Camtasia, iMovie, or MiniTool MovieMaker.
I usually use MiniTool MovieMaker to edit my video. I can use it to trim out any unwanted parts at the beginning or end, add subtitles, captions, transitions, or make other adjustments to optimize the video content. If you want to edit your Zoom recording to optimize it, you can click on the button below to try it.
MiniTool MovieMakerClick to Download100%Clean & Safe
Step 3. Upload the Saved Zoom Recording to YouTube
Once you are satisfied with the Zoom recording, it’s time to upload it to YouTube. Now, follow the steps to upload a Zoom recording to YouTube.
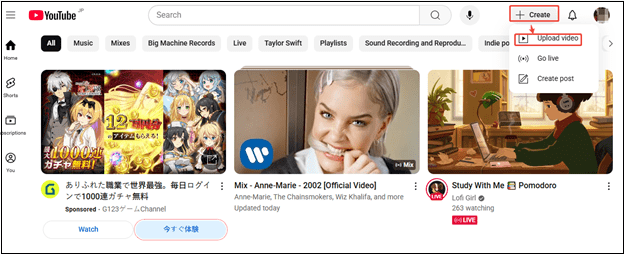
1. Go to YouTube and sign in to your account. Click on the Create button in the top right corner and select Upload video.
2. Click on Select files, choose the downloaded Zoom recording, and click on Open. Alternatively, drag and drop the recording.
3. You can then edit the title, description, tags, thumbnail, and category of the video before uploading it.
4. After you finish all the content, click on Save.
5. Wait patiently for YouTube to complete the uploading process.
After you upload the Zoom recording to YouTube, you should share the video on the social media platforms. You can also collaborate with other YouTubers or influencers in your niche. They could mention your video in their own content or share it with their subscribers, exposing your Zoom recording to a new and potentially larger audience.
Bottom Line
By following these steps, you can learn how to upload a Zoom recording to YouTube and reach a broader audience, whether it’s for educational, business, or entertainment purposes. Just save the Zoom recording to a YouTube-supported video first, edit it, and upload it to YouTube.
About The Author

Position: Columnist
Libur is always willing to try new things and full of enthusiasm for life. At the same time, she is passionate about making fantastic movies. Now, she has become an English editor about multimedia in MiniTool. She is good at writing articles about video editing, video conversion, and screen recording. During her spare time, Libur loves climbing mountains and listening to music. By the way, her favorite singer is Taylor Swift.