Want to upload WAV to YouTube? A stable way is to convert the WAV file format to a YouTube-supported format. You can find many tools in the market that seamlessly convert WAV files to other formats. This MiniTool Video Converter will give you a step-by-step guide on how to convert and upload your WAV files to YouTube.
The full name of WAV is Waveform Audio File Format. It is one of the oldest audio encoding formats in use today. WAV files have a very simple structure and they are uncompressed. This means that they store audio data in a raw and original quality. The size of the WAV file is much larger.
Can You Upload WAV to YouTube
Can you directly upload WAV file to YouTube? The answer is “No” according to Google Help. Being an exclusive video hosting website, YouTube doesn’t accept or recognize common audio files such as MP3, WAV, WMA, AAC, and others. It only allows people to upload video files like MP4, MOV, AVI, FLV, and more.
However, nothing is impossible. Although YouTube does not allow users to upload audio files, there is an effective method to upload a WAV file to YouTube. But please bear in mind that uploading audio files is much harder than uploading videos. The method is to convert a WAV file to another YouTube-supported format and upload it to YouTube.
How to Convert WAV to YouTube-Supported Format
As we mentioned above, YouTube doesn’t support uploading WAV format, so you need a converter to convert WAV files to other available formats. Here MiniTool Video Converter comes in.
MiniTool Video Converter is a versatile application. First of all, as the name suggests, it is a converter that can convert WAV to any YouTube-supported format, such as WAV to MP4, WAV to WMV, and more. At the same time, it can quickly convert these files at the same time. Last but not least, this MiniTool Video Converter can also download YouTube videos in MP3, WAV, WebM, and MP4 formats.
How to convert the WAV format to another YouTube-supported format? Here, we take MP4 as an output format example. Follow the below guide:
Step 1: Download and install MiniTool Video Converter on your computer.
MiniTool Video ConverterClick to Download100%Clean & Safe
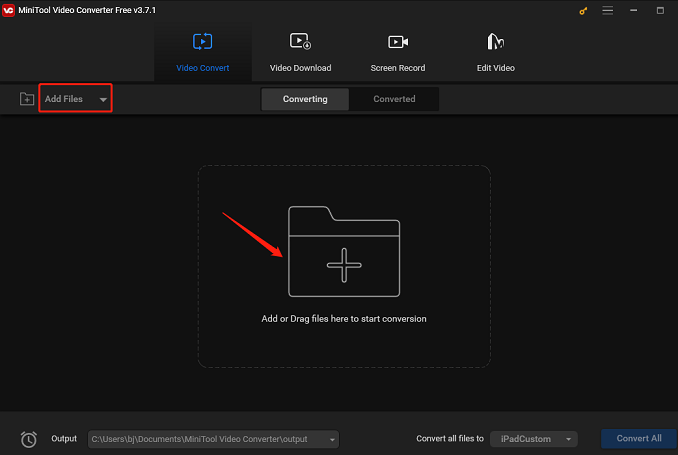
Step 2: Open this application and click on Add files to import the target WAV file. Or, you can import the file by dragging and dropping.
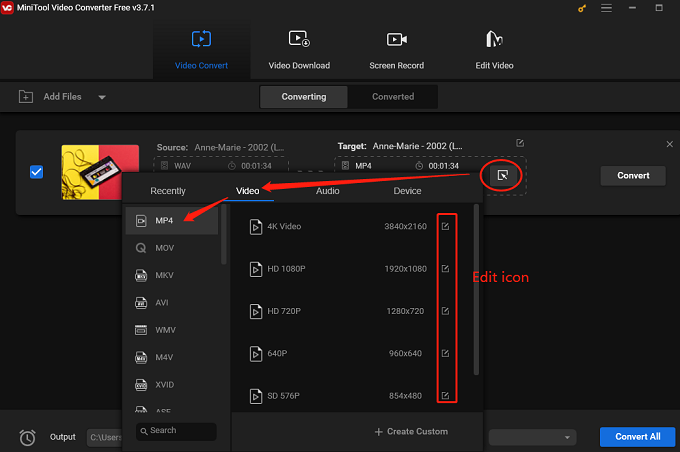
Step 3: Click the diagonal arrow icon under Target, switch to the Video tab, and choose MP4 on the left panel. Select an output quality, and if you want to adjust some parameters including encoder, sample rate, bitrate, and channel, click the Edit icon next to it.
Step 4: Click on the Convert button to start the WAV to MP4 conversion process.
Step 5: Once it’s done, go to the Converted section and click the Show in folder icon to check the converted MP4 file.

How to Upload WAV to YouTube
When the conversion process finishes, it’s time to WAV to YouTube upload. Now, let’s see the uploading steps:
1. Visit the official website of YouTube and log in to your account.
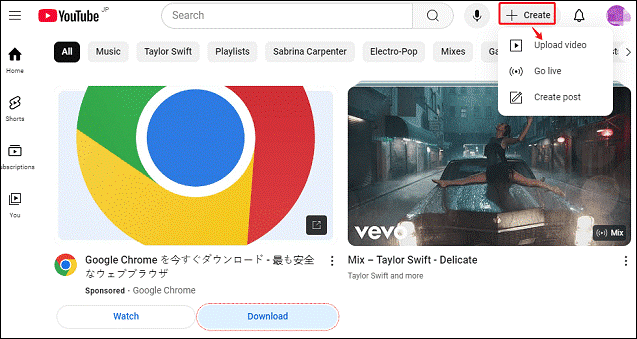
2. Click on the Create button at the top right corner of the main interface and choose Upload video.
3. In the pop-up window, click on Select files or drag and drop video files to upload. After uploading the file to YouTube, you can change the video’s title, description, and thumbnail. After you finish all the content, then click on Save.
4. Wait patiently for YouTube to complete the uploading process.
Conclusion
All in all, YouTube doesn’t support uploading WAV format to it. Fortunately, there is an indirect way to upload WAV to YouTube. You can use a video audio converter like MiniTool Video Converter to convert the WAV audio format to YouTube-supported format and upload it to YouTube. Hope this post can solve your trouble.


