If you have some DVDs, you may want to upload them to YouTube, but you may encounter some difficulties. This MiniTool Video Converter post will provide a complete guide on how to upload a DVD to YouTube in several easy steps.
As a popular video-sharing site, YouTube is indeed a good option for uploading and sharing your DVD clips, such as wedding videos, birthday parties, or other unforgettable moments. But have you noticed that you can’t directly upload DVDs to YouTube?
DVDs are not compatible with YouTube’s video format and size requirements. To break this limit, you need to convert the DVD into a format that’s supported by YouTube before uploading. In this post, we will guide you through the process step by step.
Part 1: Rip the DVD to YouTube-Supported Format
First, you’ll need to convert your DVD into a format that can be uploaded to YouTube. This process is known as ripping. There are many DVD ripping software available, such as Vidmore DVD Monster, HandBrake, WinX DVD Ripper, Freemake DVD Ripper, and more.
Here, we’ll take Vidmore DVD Monster, a free DVD to YouTube converter, to show you how to rip the DVD to a digital file that YouTube can recognize. It also allows you to edit the DVD videos before uploading, such as trimming, merging, adding watermarks, adjusting effects, etc.
To rip a DVD for YouTube using Vidmore DVD Monster, follow the steps below:
1. Download and install Vidmore DVD Monster on your computer.
2. Insert the DVD disc into your DVD drive and launch the program.
3. Click the Load DVD button and select the DVD disc from the drop-down list.
4. Choose a ripping mode and output format. You can select MP4, MOV, AVI, WebM, and other formats that YouTube supports.
5. Select the path to output your videos and click the Rip All button to start the ripping process.
Part 2: Edit the Video (Optional)
Once you have your video file, you may want to edit it to make it more appealing to your audience. You can use YouTube’s built-in video editor to do some basic editing when you upload the video. Or, you can use other video editing software, like MiniTool MovieMaker, Adobe Premiere Pro, Clipchamp, iMovie, etc. to do more advanced editing, such as adding transitions, animations, filters, music, voiceovers, and titles.
MiniTool MovieMakerClick to Download100%Clean & Safe
Part 3: Upload the Ripped DVD Video to YouTube
After you’ve ripped and edited your DVD, you’re ready to upload it to YouTube. Here are the steps on how to upload a DVD to YouTube:
1. Go to YouTube and sign in to your account. If you don’t have one, create one for free.
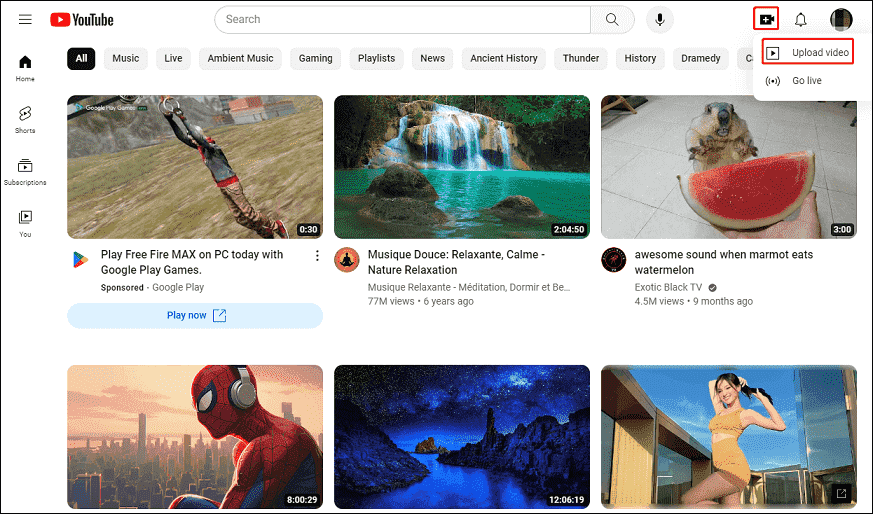
2. Click on the Create button (represented by a video camera icon) in the upper right corner, and select Upload video.

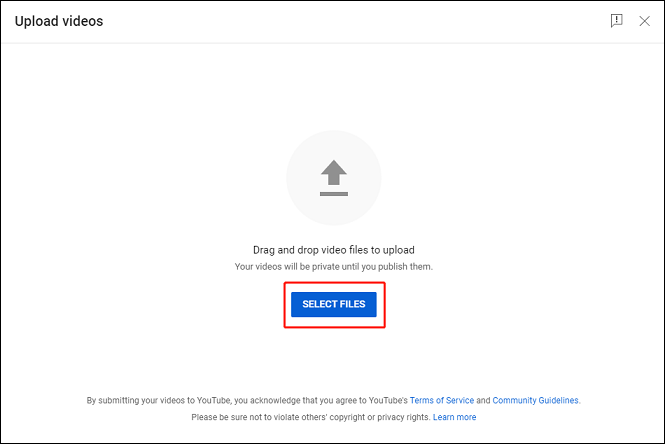
3. Drag and drop the ripped DVD file to the uploading box, or click the SELECT FILES button and browse for the file on your computer.

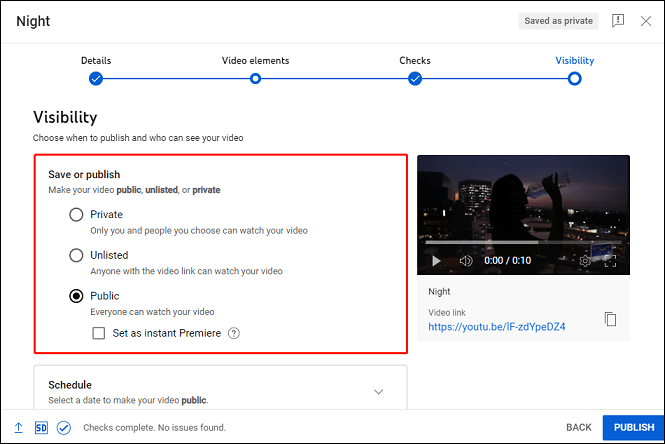
4. Enter the video title, description, and tags, and fill in other information when necessary. You can also choose the video privacy settings for your video (Public, Private, or Unlisted).

5. Click on PUBLISH to finish the uploading process.
MiniTool Video ConverterClick to Download100%Clean & Safe
Final Thoughts
Uploading a DVD to YouTube can be a bit tricky, but don’t worry, we have got you covered. You just need to follow the steps in this post to rip and upload a DVD to YouTube. We hope this detailed guide has been helpful to you.


