Are you wondering how can you check the audio bitrate of a YouTube video? If so, the post from MiniTool Video Converter is for you. I will walk you through the process of how to check YouTube audio bitrate.
In YouTube videos, audio quality is equally important as video quality, especially for those who enjoy music or listen to podcasts. You might be curious about the audio bitrate of YouTube videos, as it directly affects the clarity and fidelity of the sound.
If you’ve ever wondered how to find audio bitrate of YouTube video, this post will help you with it. Read on to master the method.
What Is YouTube Audio Bitrate
Before diving into how to check YouTube audio bitrate, let’s first define what audio bitrate is. Bitrate refers to the amount of data transmitted per unit of time in an audio stream, usually measured in bits per second (bps).
Simply put, the higher the bitrate, the more data is used to represent the audio, leading to better sound quality.
Now that you understand audio bitrate, let’s look at how to check the audio bitrate of a YouTube video.

How to Check YouTube Audio Bitrate
Unlike video resolution, which is displayed directly on the YouTube interface, audio bitrate isn’t as obvious. While there’s no built-in tool on YouTube to check the audio bitrate during playback, you can save the video to your device and then check its audio bitrate by taking advantage of third-party tools.
Part 1: Save YouTube Videos to Your Device
To save YouTube videos to your local folder, MiniTool Video Converter is a nice YouTube video downloader. With it, you can download content from YouTube with just several clicks. More than 10 videos can be downloaded at the same time.
Follow these steps to save YouTube videos with MiniTool Video Converter.
1. Download and install this video downloader by clicking the button below.
MiniTool Video ConverterClick to Download100%Clean & Safe
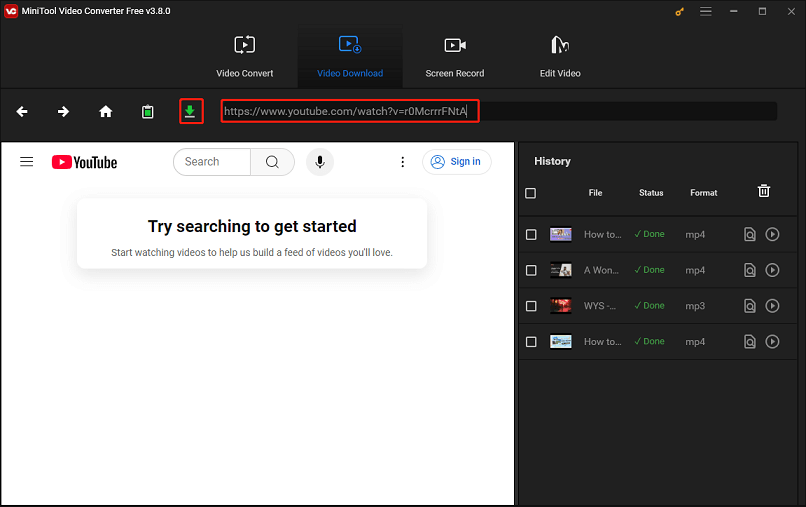
2. Open the software and go to the Video Download module.
3. Go to YouTube to copy the link to the video whose audio bitrate you want to check.
4. Paste the video link into the address bar of MiniTool Video Converter and click the Download icon.
5. In the pop-up windows, select the output format and quality and click the DOWNLOAD button.
After it’s downloaded successfully, proceed to the next part.

Part 2: 2 Third-Party Tools to Check YouTube Audio Bitrate
Then, you can try the File Properties or VLC media player to check the downloaded YouTube video audio bitrate.
#File Properties
Using File Properties is an easy and quick way for Windows users to check the audio bitrate of a YouTube video. It shows you the detailed information about the file. Here’s how:
1. Go to the folder of the downloaded YouTube video and locate it.
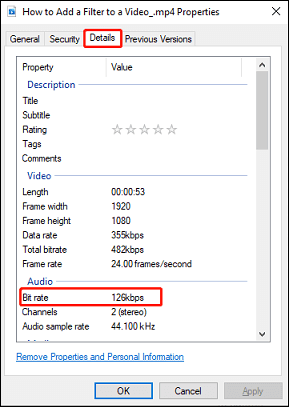
2. Right-click the downloaded YouTube video file and select Properties from the menu.
3. Go to the Details tab and find the Bit rate option under Audio.
#MediaInfo
MediaInfo is powerful tool to analyze and retrieve detailed information about your media files, including audio and video codecs, bitrates, frame rates, and much more. It’s particularly useful for checking the properties of downloaded videos, such as YouTube videos, without needing to open them in a media player.
Here’s how to check the audio bitrate of a downloaded YouTube video:
1. Download and install MediaInfo.
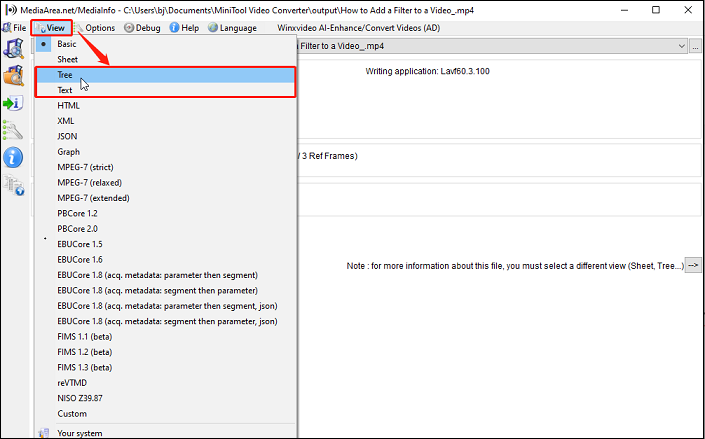
2. Once installed, right-click on the downloaded YouTube video file and select MediaInfo.
3. In the MediaInfo interface, click the View tab and choose Tree or View for a more detailed information of the file’s properties.
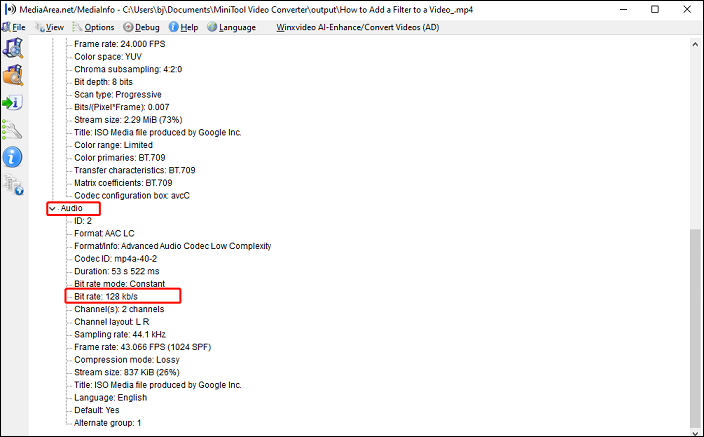
4. Look for the Audio section to see the video’s audio bitrate.
Conclusion
Checking YouTube’s audio bitrate can be helpful if you care about the audio quality. While YouTube doesn’t directly display audio bitrate as easily as video resolution, there’s a workaround to access the information. You can first download the video to your local folder and then use File Properties or VLC media player to check YouTube audio bitrate.