About YouTube Playlist Privacy Settings
A playlist on YouTube is a collection of videos that are organized by a specific theme or topic. Vides in a playlist will play one after another automatically. It seems like a music playlist you might create on Spotify, but this is for videos. You can create a YouTube playlist easily, read here: How to Make a Playlist on YouTube – Just Several Steps.
Of course, you’re allowed to change playlist privacy settings on YouTube. Privacy matters to social media platforms. You can rename the playlist, share the playlist, edit the playlist’s description, change the playlist status, and more. There are three statuses about the YouTube playlist.
Public: It’s accessible to anyone. Anyone can search for, watch and share the playlist.
Unlisted: The one who has the video link can watch and share the playlist.
Private: This playlist can only be viewed by yourself.
Playlist privacy settings are important, because you may want to share your playlists with others or make them private. All playlists on YouTube are created as public by default. You can change the playlist from public to private or unlisted, or from private to public or unlisted.
If you have changed a YouTube playlist to private, are you wonder that: how do I change a playlist on YouTube from private to public? You’re in the right place.
How to Change a YouTube Playlist from Private to Public
There are two options for you to change a YouTube playlist from private to public. You can change it through your YouTube Library or YouTube Studio.
Option 1: Through YouTube Library
Step 1. Go to YouTube’s website in a web browser and log in to your account.
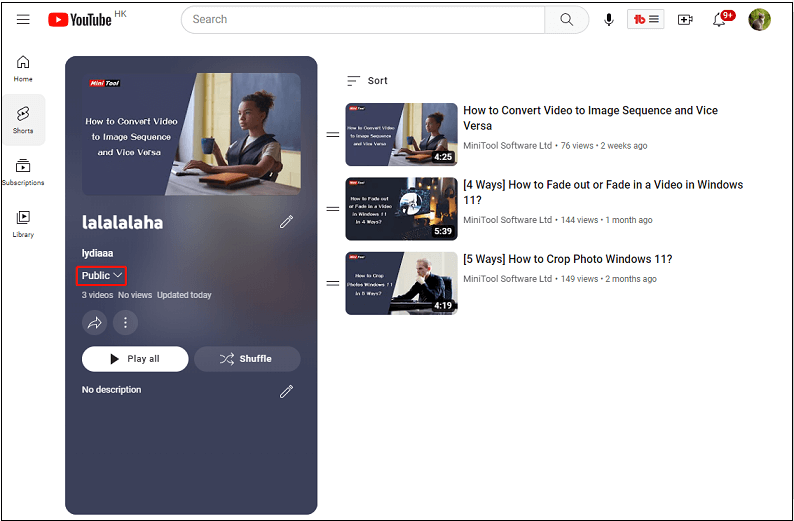
Step 2. Click on the Library tab from the left menu. Then, you will see your watch history, watch later videos, all playlists, liked videos, and your clips.
Step 3. Scroll down to see all your playlists and select the playlist you’d like to edit.
Step 4. Click on the little arrow beside Private, then tap on Public from the list.

Step 5. Alternatively, you can also edit the playlist’s title, and description, or share it according to your needs.
Now, your playlist is public so that everyone can view it.
Option 2: Through YouTube Studio
The second option to change your YouTube playlist to the public is YouTube Studio. You can refer to the following steps:
Step 1. Open a browser and log in to your YouTube account.
Step 2. Tap on your YouTube profile picture in the upper right corner.
Step 3. Click on YouTube Studio from the given menu.
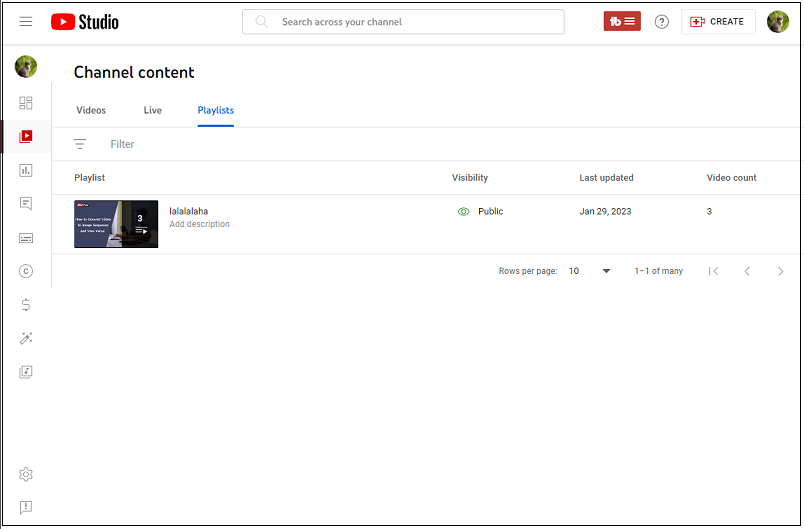
Step 4. Choose Content on the left menu and go to the Playlist tab.

Step 5. Select a playlist you’d like to edit, then click Edit on YouTube with a pencil icon beside it.
Step 6. Tap on Private, and will appear three options: Public, Unlisted, and Private.
Step 7. Choose Public from the three options. Same as the first option, you can also edit the playlist not just change the status.
If you want to know how to make your YouTube playlist private, it’s similar to the above steps. Just go and follow the same steps.
To watch wonderful videos in a YouTube playlist when there’s no Internet connection, have a try on MiniTool Video Converter.
MiniTool Video ConverterClick to Download100%Clean & Safe
Conclusion
How to change a YouTube playlist from private to public? You must have known the way to change it after reading this post. You can change it from your YouTube Library or YouTube Studio.


