Types of Tutorial Video
Before we start making tutorial videos, let’s understand their types first. Here are some common types of tutorial videos on YouTube:
1. Screen Recording Tutorials
Screen recording tutorials are the most common video tutorials. This type of video is generally used to record the usage and techniques of many software, applications, and platforms. Furthermore, you can record presentation files like PowerPoint to create tutorial videos.
2. Physical Demonstration Tutorials
Tutorials on how to use everyday items or electronic devices can be recorded directly with a phone or camera. The demonstrator can guide the audience while demonstrating the operation. Some creators also use video editors to add dubbing in post-production.
3. Animated Tutorial Tutorials
Animated tutorials are also a major type of video tutorial. These videos are usually created by people with basic animation design and video editing skills. Animations can be more interesting than physical demonstrations.
Of the three types of video tutorials mentioned above, the simplest is the screen recording tutorial. All you need is a screen recording software and a video editing software to make a good video.
How to Make a YouTube Tutorial Video
Here is a step-by-step guide on how to make a tutorial video.
Part 1: Record Your Screen
If you want to make a screen recording tutorial video, you can use MiniTool Video Converter to capture your screen.
MiniTool Video Converter supports recording the full screen or a selected region. Plus, it supports choosing whether to record system and microphone audio. In addition, you can also set the recorded video frame rate and video quality.
How to use MiniTool Video Converter to capture your screen? Here are detailed instructions for your reference:
Step 1: Download and Install MiniTool Video Converter
Click the button below to get the installation package. Then, install MiniTool Video Converter on your computer.
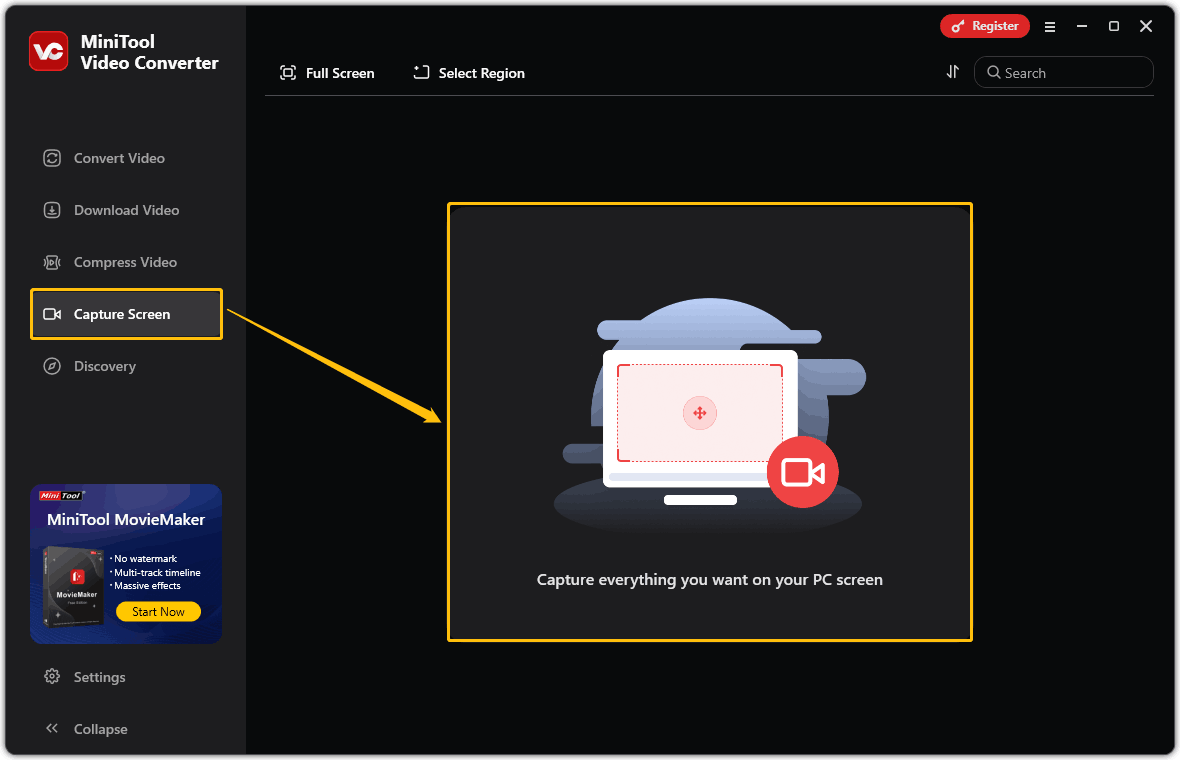
Step 2: Access the MiniTool Screen Recorder Window
Run MiniTool Video Converter, choose Capture Screen, and click Capture everything you want on your PC screen to open the recording window.
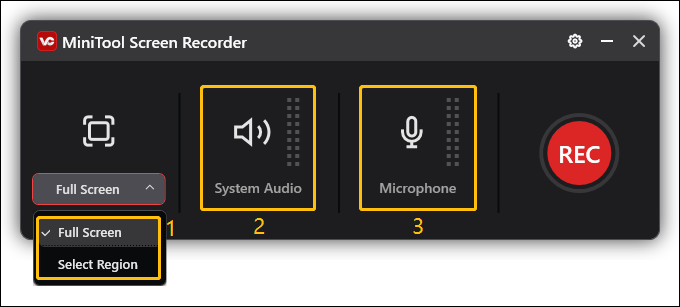
Step 3: Select Recording Region and Audio
In the MiniTool Screen Recorder window, select whether to record the entire screen or a specific area. After that, click the System Audio and Microphone option to decide whether to record them.
Step 4: Start Recording
Open the window or interface you want to record. Then, click the REC button to start recording.
Step 5: Press F6 to Stop Recording
When you are finished presenting, press F6 on your keyboard to end the recording.
Step 6: Locate the Recorded Video
In the MiniTool Video Converter’s interface, you can find the recorded video. Then, click the play icon the watch this video. You can also click the folder icon to locate the recorded video.
The recorded video may have some artifacts, such as some noise. You can use a video editor to remove these artifacts.
Part 2: Edit Your Recorded Video
Video editors can add subtitles, transitions, background music, filters, and more to your video, making it more engaging. MiniTool MovieMaker includes all of these features. Furthermore, this video editor can also change the aspect ratio, add picture-in-picture, and export videos to various formats, including MP4, MOV, WMV, MKV, GIF, and MP3. Below, I’ll briefly demonstrate how to use it to edit videos:
Step 1: Download and Install MiniTool MovieMaker
Install MiniTool MovieMaker by clicking the button below. Then, launch it.
Step 2: Import Your Video
Go to the edit interface and click the Import Media Files option to add the recorded video. Then, drag the video to the video track.
Step 3: Delete the Unwanted Clip
Click the Split icon to clip the segment you want to delete. Then, right-click the unwanted clip and choose the Delete option.

Step 4: Add Subtitles, Transitions, Effects, and Filters to Your Video
Select the tabs on the top left to add texts, transitions, effects, and filters to your video. You can also make an intro and an outro, and then add them to your video.
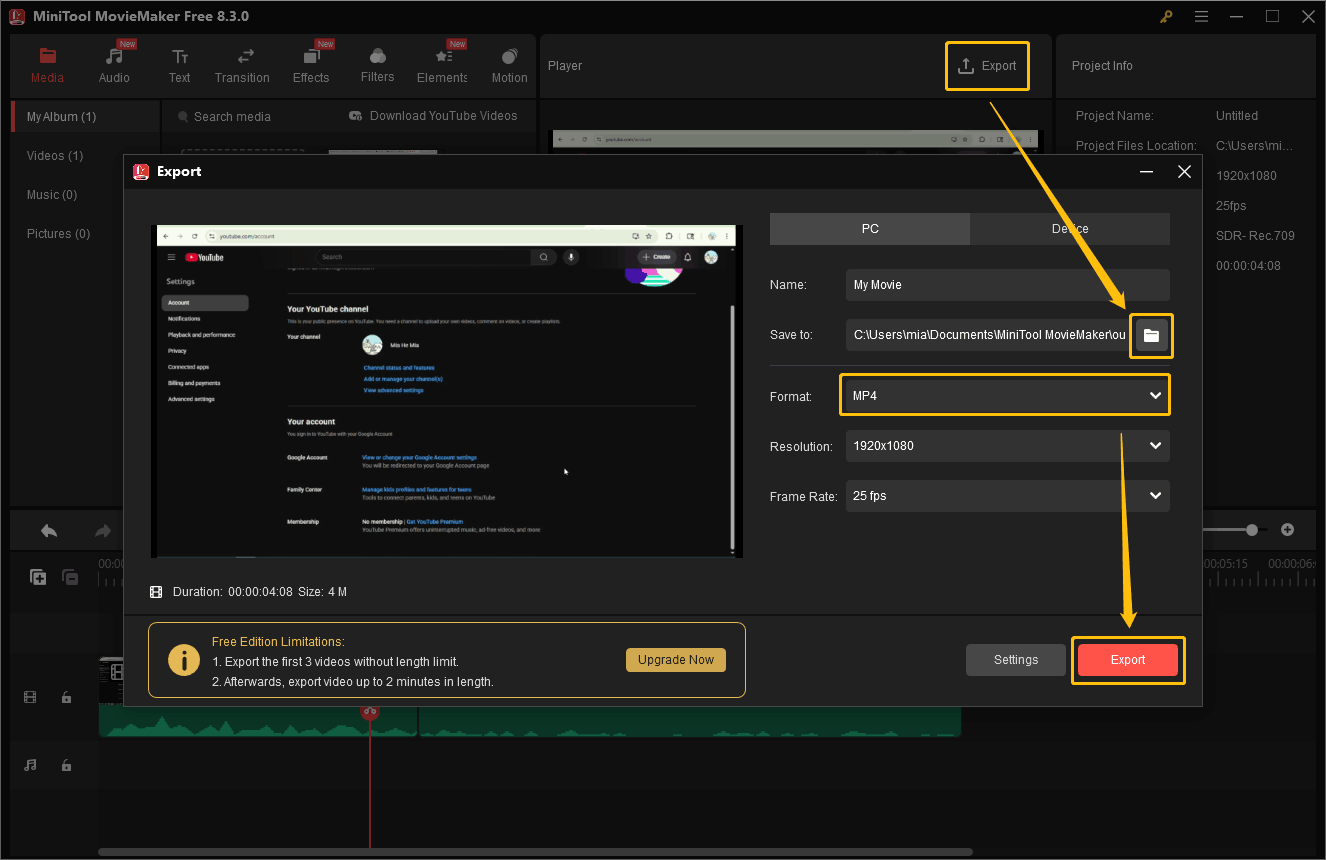
Step 5: Export the Video
Click the Export option. In the pop-up window, choose the output format and save location, and then click the Export button.
Now that you know how to make a basic tutorial video, I will share some tips on how to make a tutorial video with you.
Tips for Making a YouTube Tutorial Video
Creating a tutorial video is more than just recording it. Here are some tips to make your tutorial video more engaging:
1. Add Subtitles
Whether you’ve filmed or recorded a video, you can add subtitles to it using a video editor. While YouTube automatically generates subtitles, creating your own is more accurate.
2. Add Audio Effects to Grab Attention
Add audio effects at important points in your video. This will grab your audience’s attention.
3. Use a High-Quality Microphone
If you want to add voiceovers to your videos or record your own voice while recording your computer screen, it’s important to choose a good-quality microphone to ensure your voice comes through clearly.
4. Add Chapters to Your YouTube Video
YouTube allows you to add chapters to your videos. After setting the chapters, viewers can directly jump to the step they want to watch on the progress bar.
Conclusion
This post gives you a full guide on how to create a YouTube tutorial video. MiniTool Video Converter can be an excellent screen recorder to capture your screen. There are also 4 tips for making a YouTube tutorial video.
About The Author

Position: Columnist
Mia joined MiniTool as an SEO editor following her university graduation, bringing a strong foundation in digital content optimization. She has since developed extensive expertise in creating technical articles and delivering practical solutions for video conversion, video compression, and audio transcription. She remains current with emerging software trends and continuously refines her content strategy based on real user feedback and industry developments.