Have you ever uploaded a carefully designed YouTube banner only to find it appears blurry? In this article, you’ll learn the reasons why is your YouTube banner blurry and provide effective solutions.
What Is the YouTube Banner
A YouTube banner refers to a static or animated image uploaded to the top of a YouTube channel page. Serving as the channel’s visual identity, it is a key element in conveying the professionalism and credibility of its videos. Consequently, many creators invest significant effort into designing banners that align with their channel’s unique style.
However, some creators often wonder why is my YouTube banner blurry. This issue also undermines the credibility and professionalism of their channels, ultimately driving away potential viewers. If you frequently encounter this issue, please continue reading below for troubleshooting guidance.
Why Is Your YouTube Banner Blurry
Before exploring solutions, it’s necessary to understand why your YouTube banner looks blurry, which is the first step toward resolving the issue. Here are four key reasons why banners may appear blurry:
Use A Low-Resolution Image
When designing an aesthetically pleasing YouTube banner, your source image may suffer from low resolution. And during the upload process, YouTube may stretch the image dimensions, resulting in degraded YouTube banner quality and blurring.
Use Incorrect Image Size
Using the wrong YouTube banner size is the primary cause of blurry banners. According to the official banner guidelines provided by the YouTube platform, the recommended size is 2560 x 1440 pixels, with a minimum size of 2048 x 1152 pixels.
Since YouTube banners appear across multiple devices such as computers, phones, and tablets, if the uploaded banner dimensions fall below the recommended minimum size, the YouTube system will automatically crop and resize the YouTube banner to fill the space, thereby adapting to different display devices.
Ignore the Safety Zone Specifications
When designing the key message layout for a banner, you must adhere to YouTube’s banner safe area specifications. According to official banner requirements, a safe zone (also known as the center zone, measuring 1546 x 423 pixels) exists within the banner canvas.
Therefore, key elements such as brand logos, taglines, and calls-to-action must be placed within this safe zone. Otherwise, YouTube’s system may crop or stretch the banner to adapt to different display devices, potentially obscuring or distorting core messages.
Utilize Incorrect File Size and Image Format
Incorrect image formats or excessive compression can cause YouTube banners to lose detail and appear blurry. YouTube typically supports banner formats such as JPG, PNG, BMP, or non-animated GIF. Additionally, after creating a YouTube banner, ensure the output image size is below YouTube’s 6MB file size limit for banners.
How to Fix YouTube Banner Blurry
After reviewing the potential causes of blurry banners, you can use this information to inspect your YouTube banner. Then, follow the detailed guidelines below to fix your blurry YouTube banners.
Step 1: Check If the Resolution of the Image is Too Low
When you notice your YouTube banner becoming blurry, the first step is to check whether the source image on your computer is high-resolution. If the image quality is insufficient, you can use appropriate software to enhance it or directly replace it with an image in higher resolution.
Step 2: Use Design Tools for Re-creation
After reviewing image quality, use professional design platforms like Canva, Adobe, or Picmaker to recreate visual assets. Of course, you can choose between platforms suitable for beginners or those with more advanced features based on your skill level.
These platforms offer canvases specifically tailored to YouTube banner dimensions, ensuring your banner won’t be cropped or distorted by YouTube’s system while saving time on manual resizing. What’s more, during production, ensure core elements, such as slogans, brand logos, and call-to-action buttons, always remain within YouTube’s designated safe zones.
Additionally, when selecting a platform for re-creation, verify whether the platform supports high-resolution images to prevent deep compression during image export.
Step 3: Ensure the Export Format and File Size Are Correct
After completing the re-creation, please ensure the output image format and file size meet YouTube’s banner upload requirements:
- Format Requirements: You may use JPG, PNG, BMP, or non-animated GIF formats. However, I recommend using PNG format here, as it is a lossless format that better preserves banner details and clearly displays text elements within the image.
- File Size: Ensure the exported file size is less than 6MB. If it exceeds this limit, use a lossless compression tool to reduce its size.
Step 4: Upload the New YouTube Banner and Check It
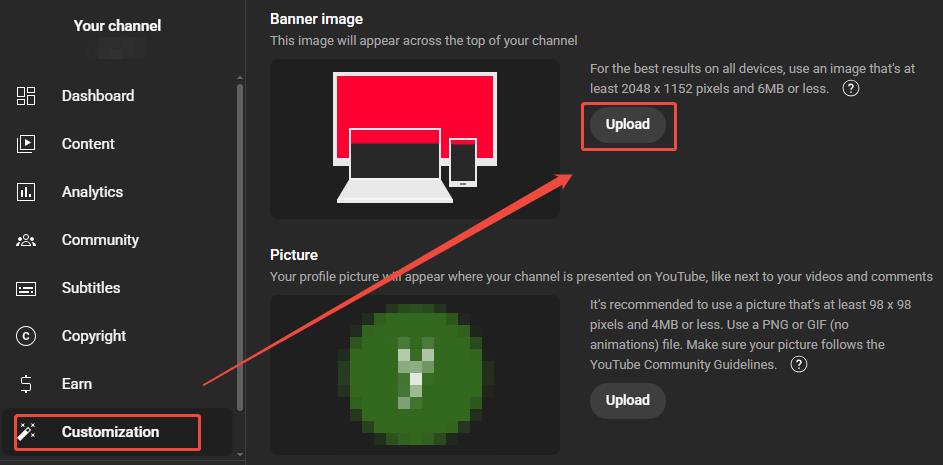
After confirming the above information, you can proceed to YouTube Studio for uploading. Simply click the Customization option in the left-hand menu to access the upload page. Then, click the Upload button in the banner image area to select the banner you wish to upload.

After selecting your banner, you can use YouTube’s built-in preview tool to check how the banner will appear on devices like computers and phones. Once you confirm the banner displays clearly and accurately, you can proceed with the upload.
MiniTool Video ConverterClick to Download100%Clean & Safe
Final Words
Blurry YouTube banners undermine viewer trust in the channel, leading to audience loss, but this issue is far from unsolvable. By analyzing the root causes and implementing the solutions outlined above, we are confident you can fix the YouTube banner blurry and prevent such problems from recurring.


