When you upload your favorite video to YouTube for the world to see, the video quality might not be as good as it should be. Why does this happen? How do you change the upload quality on YouTube? This post answers the two questions. If you want to want to download YouTube videos, try MiniTool Video Converter.
Why YouTube Upload Quality Is Bad?
Your Computer Is Occupied by Some Malware
When you are uploading YouTube videos on your computer, please first check whether the computer’s CPU is occupied by some malware. If you find that something other than your browser is taking up the CPU, please terminate it. Start an antivirus program, and then run a full scan on your system.
Your Video Has Been Incorrectly Encoded Before Uploading
If you encode your video as 480p, YouTube will not and cannot expand it to 720p or 1080p. If you want to make the video look good on YouTube, you need to provide the highest possible resolution. The same is true for bitrate. High bitrate video looks smoother than low bitrate video.
Your Video Is Excessively Compressed
If the video you want to upload to YouTube is converted from other video formats (for example, from WMV to MP4), the compression ratio may tend to save bandwidth by reducing the file size as small as possible.
If you want to know more about video compression, please read: Compress Video File Sizes on Windows/Mac/Android/iOS [MiniTool Tips]
Your Video Is Automatically Compressed by YouTube
YouTube will automatically compress all videos. Engineers can update the compression algorithm as long as they think fit. Although the compression algorithm they use works well in most situations, it may not always work for your videos.
The YouTube server will compress the submitted video and resize it in various possible resolutions, from the highest to the lowest.
So if you send a 4K high quality video (3840×2160) YouTube will compress the video with all possible resolutions: 4K (3840×2160), 2K (2560x1440p), full HD (1920×1080), 720p (1280×720) and standard resolution versions 576p, 480p….
In the past, in many cases, video creators uploaded 1080p videos, but YouTube only provided 480p max. It drove video creators crazy. Some people said that this was a glitch or that converting high-res video only took more time than converting low-resolution video.
That is, YouTube is free to use any algorithm they want. If it contradicts the content creator’s preferences, then we only need to adapt or find other video sites to put our creative works.
How Do You Change the Upload Quality on YouTube?
When you are uploading your videos to YouTube, you might be unable to upload your videos with the highest quality possible. Here is a step-by-step guide on how to upload high quality on YouTube.
Step 1: Open your YouTube app, tap on your profile picture on the top rightand corner.
Step 2: From the left menu, select Settings and tap on it.
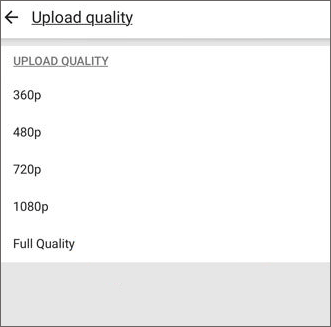
Step 3: Find Upload quality and tap on that. Once Upload quality opens, you will see a range from 360p to Full Quality. Full quality can make sure your videos are smooth and clear. You can choose what you want.

Step 4: Select Save.
This article has shown you why YouTube upload quality is bad and how to change quality on YouTube. Hope it can be helpful to you.
Also read: [Answered] Does Google Drive Compress Videos? Yes or No? Why?


![[Solved!] Why Did My YouTube Videos Upload in 360p?](https://images.minitool.com/youtubedownload.minitool.com/images/uploads/2020/08/why-did-my-youtube-videos-upload-in-360p-thumbnail.png)