PowerPoint is a popular tool for presenting products or messages. It comes with many layouts, themes and tools to help you build professional presentations. What if you want to share your presentation with those people who don’t have Microsoft Office? Converting it to a video can help you out.
Why Convert PowerPoint to Video
Video is more attractive than PowerPoint presentation.
View the presentation without the PowerPoint software or app installed.
Upload PowerPoint videos to YouTube, Facebook, and other video sharing websites.
Converting PowerPoint to video is pretty simple even without a third-party tool. However, what if the video you converted from the presentation is incompatible with your computer? Try free MiniTool software to change video formats.
How to Convert PowerPoint to Video on Windows
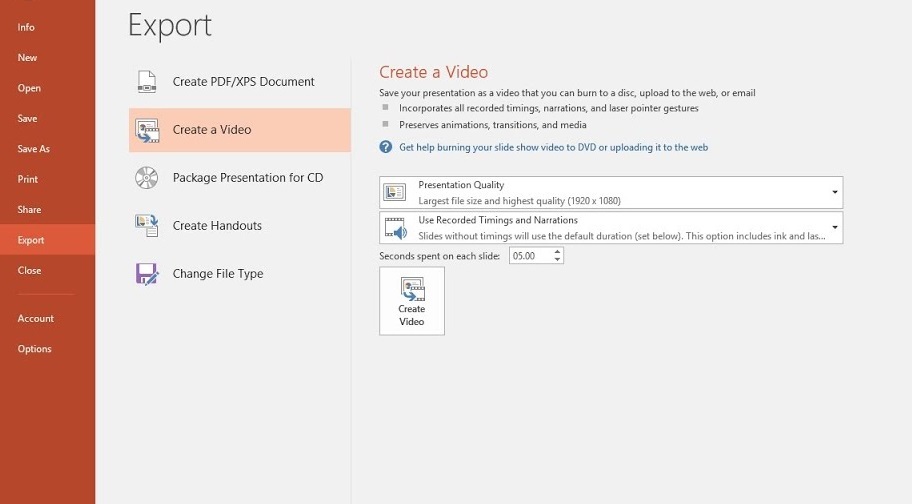
Would you like to convert your presentation to an attention-grabbing video? Follow the instructions below to make a video from a PPT or PPTX file on Windows.If your presentation is complete with automatic timings, transitions and animations, you might be shocked to find how easy it is to convert it into a video.Step 1. Launch PowerPoint on your PC and open the presentation file you want to convert.Step 2. Navigate to the File option, select Export, click Create a Video and then choose a suitable video quality you want to use for your presentation in the Presentation Quality drop-down menu.
Step 3. Selecting Use Recorded Timings and Narrations if your presentation doesn’t contain recorded timings and narrations.Step 4. Click the up arrow (lengthen time) or the down arrow (shorten time) behind the Seconds spent on each slide text box to adjust the amount of time that each slide displays.
Note: By default, each slide in the PowerPoint lasts for 5 seconds before transitioning to the next.
Step 5. After you finish these settings, select Create Video and a dialog box pops up.Step 6. In the Save As dialog box, choose a location to save your new video file, enter a file name and then select the Save as down arrow to choose either MPEG-4 Video (MP4) or Windows Media Video (WMV).Step 7. Click Save to start the video creation process.The progress of your video creation displays in the status bar. This can take a few minutes up to several hours to complete, depending on the size of your presentation.
How to Convert PowerPoint to Video on Mac
The above has introduced how to convert PowerPoint to video on Windows. Now, let’s learn how to operate on Mac.Step 1. Launch PowerPoint and open your presentation file that you prepare to turn into a video.Step 2. Go to File and select Export. Then a pop-up window appears that contains multiple options.Step 3. In the Format drop-down menu, select either MP4 or MOV.Step 4. Choose a video quality option as you like. This quality selection also dictates the video’s width and height below the Quality menu.Step 5. If you want to include recorded timings and narrations in your video, place a check next to Use Recorded Timings and Narrations to enable this feature.Step 6. To increase or decrease the duration for the slides, select the up or down arrow next to Seconds spent on each slide.Step 7. When you finish these operations, select Export.Then the process of converting PowerPoint to video begins. Please wait patiently.
Bottom Line
After reading this post, it would be much easier to convert PowerPoint to video no matter on Windows or Mac. If you have any questions or suggestions about it, please let us know via support@minitool.com or share them in the comments section below.