What’s Safe Zone for YouTube Shorts
If you want to make all the important elements appearing on your short video clear, you must know the YouTube Shorts safe zone in advance. YouTube Shorts safe zone is a 4:5 area of the vertical 9:16 frame that is typically centered within the frame.
The safe zone is crucial for preventing elements such as a logo, title, captions, call-to-action button, and more from overlapping and obscuring. For example, the logo is on the right side, the text is at the bottom, and the cropped content is on the sides. Then, the viewers may not get the experience you want.
YouTube Shorts are 1080px x 1920px. These margins help keep your content visible and not blocked by YouTube’s interface. Apart from YouTube Shorts, other platforms like TikTok and Instagram Reels also have their safe zones.
Do you want to check whether important YouTube Shorts elements are outside of the safe zone? The section below offers two methods.
How to Check YouTube Shorts Safe Zone
How to check whether your short video is in the safe area? Recommend using an online safe zone checker and using a free template.
Method 1: Use a YouTube Shorts Safe Zone Checker
Recommend using an online safe zone checker - aiCarousels.com. Why do I recommend this tool? It has no watermark, account, or paywall when I use it to check my short videos. With it, you can instantly see how it lines up with YouTube Shorts overlays once you drag and drop the 9:16 video.
aiCarousels.com is accurate and matches YouTube’s mobile layout. Additionally, aiCarousels.com can also be a LinkedIn video safe zone checker, LinkedIn QR code generator, TikTok safe zone checker, TikTok captain generator, etc.
Here’s how to use aiCarousels.com to check the YouTube Shorts safe zone.
Step 1: Go to aiCarousels.com’s YouTube Safe Zone Checker
Visit https://www.aicarousels.com/ and choose YouTube Safe Zone Checker under the Free Tools tab at the top of the main interface.
Step 2: Upload the Short Video and Preview the Safe Zone
1. Click on Upload Vertical Video to add your short video.
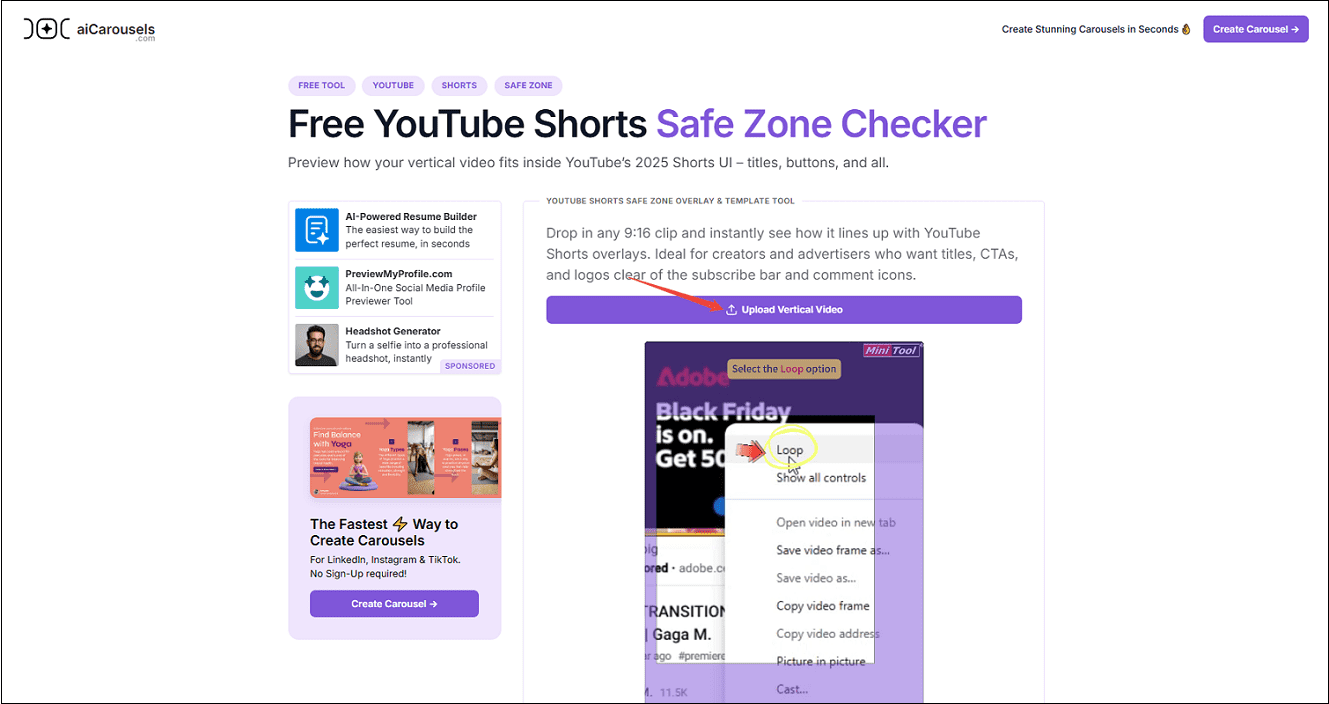
2. Then the YouTube Shorts overlay loads by default.
3. Play the video clip and check spacing around the title bar, subscribe button, etc.
Step 3. Adjust the Elements
According to the safe zone shown, adjust some elements not in the safe zone.
Method 2: Use the YouTube Shorts Safe Zone Template
Apart from using online tools and testing the YouTube Shorts safe zone by uploading them to the platform, you can also directly download the YouTube Shorts safe zone PNG template and apply it to your short video.
CreateComfy is a free YouTube Shorts safe zone template downloader that allows you to get templates in PNG format without a watermark. You can use it to preview your Shorts and make sure they fit, and use it as many times as you need. Of course, you can download safe zone templates for Facebook Reels and Instagram Reels.
You can download the YouTube Shorts safe zone template with CreateComfy. For the usage, you need to prepare a video editor in advance. Here, MiniTool MovieMaker is my frequently used application, and I use it as an example to explain how to apply the downloaded template. If you don’t install a video editor on your computer, try using it. It’s free and easy to use for beginners.
MiniTool MovieMakerClick to Download100%Clean & Safe
Now, below are the steps to download the safe zone template with CreateComfy and use it on MiniTool MovieMaker.
Step 1. Download the PNG Templates
1. Visit the website: https://createcomfy.com/youtube-shorts-safe-zone-overlay-template/#download.
2. Scroll down to locate Download 9:16 Overlay and click on the button.
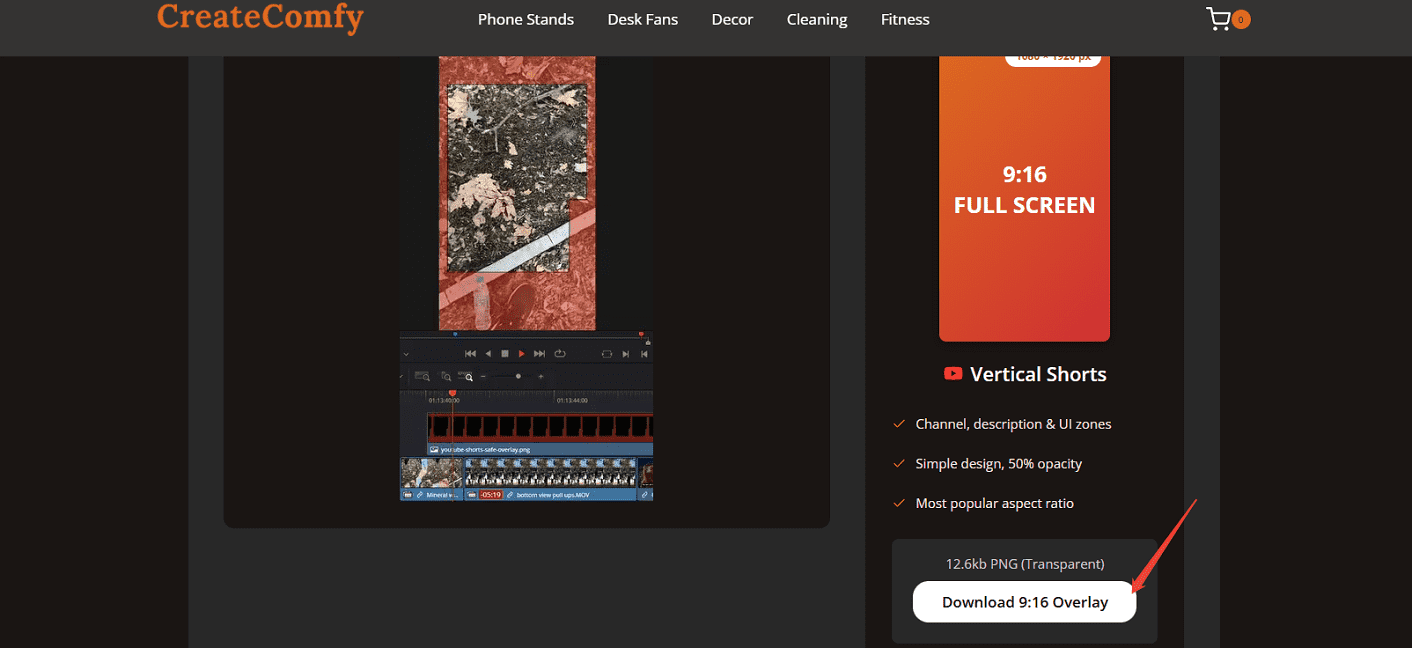
3. The downloaded YouTube Shorts safe zone template will be saved in Downloads on your browser.
Step 2. Add the Template to the Video Editor and Edit the Video
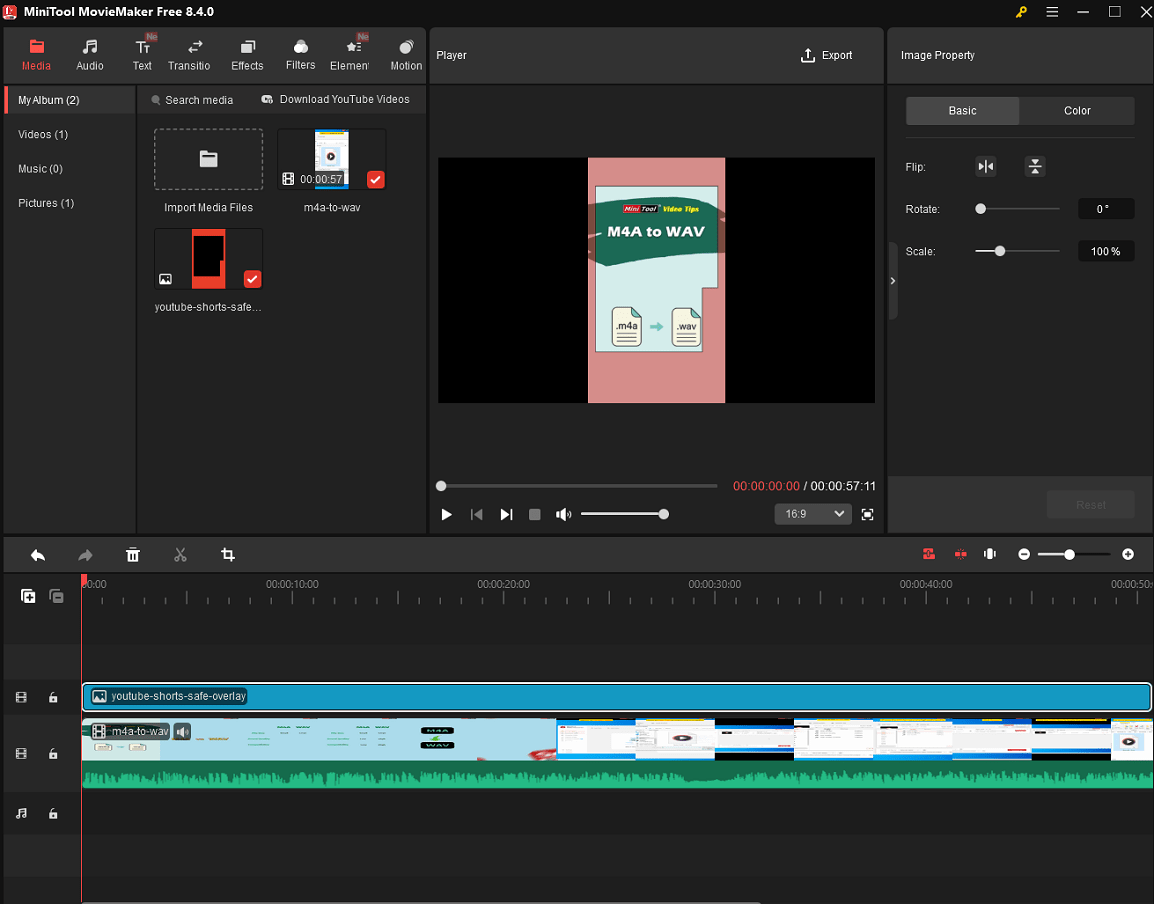
1. Open MiniTool MovieMaker and click on Import Media Files to import your short video and the downloaded template.
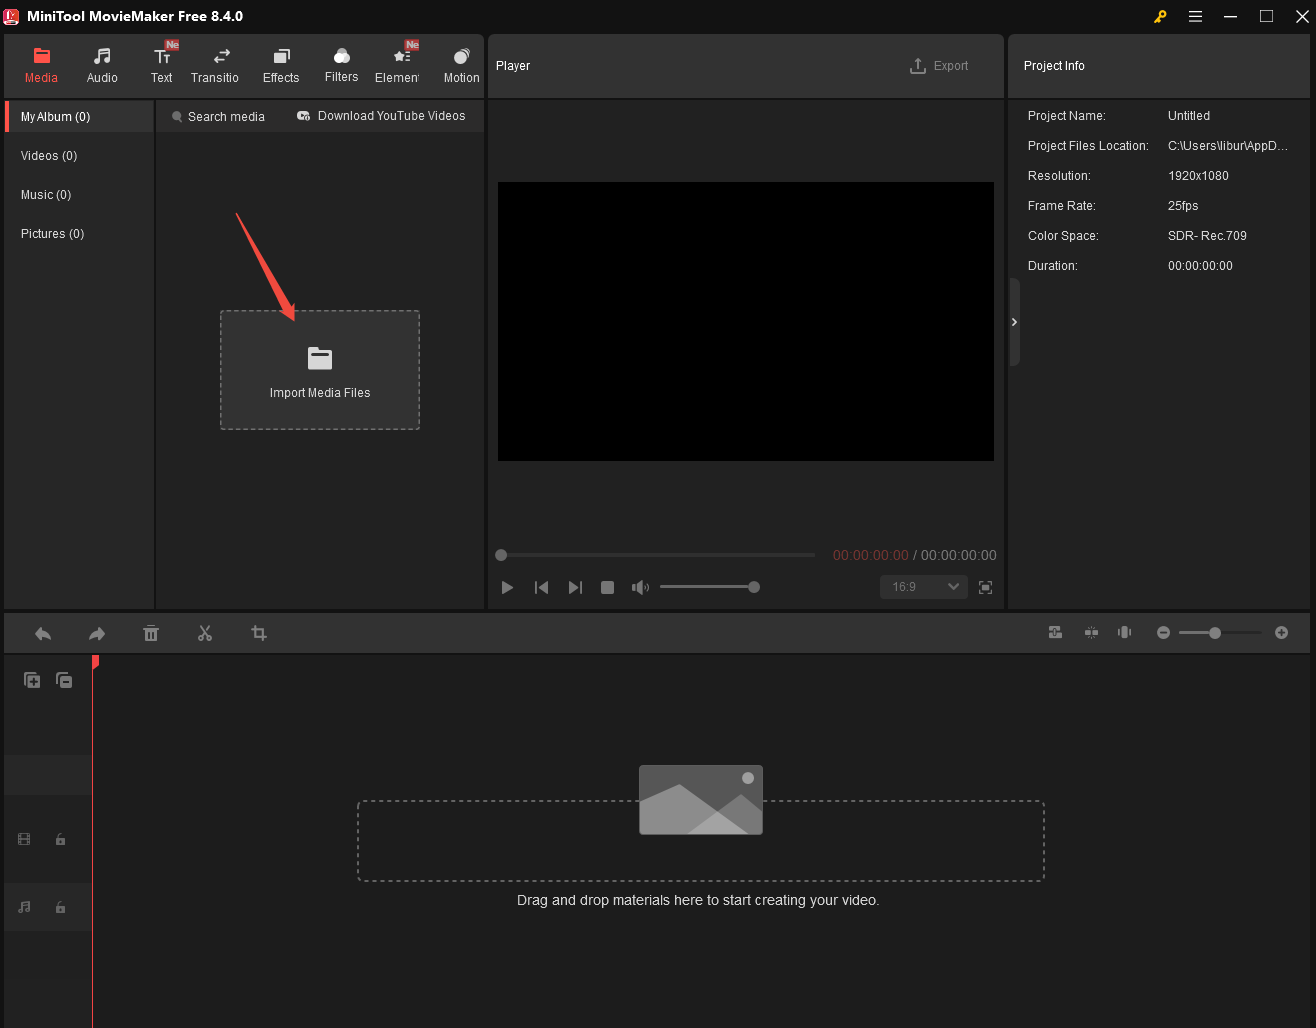
2. Drag the template and short video into the timeline. Make sure the template is on the top layer above your video content.
3. Now you can see exactly where YouTube’s UI elements will appear. Keep important content in the safe zones and adjust some elements not in the safe zone.
Step 3. Remove the Template and Export the Video
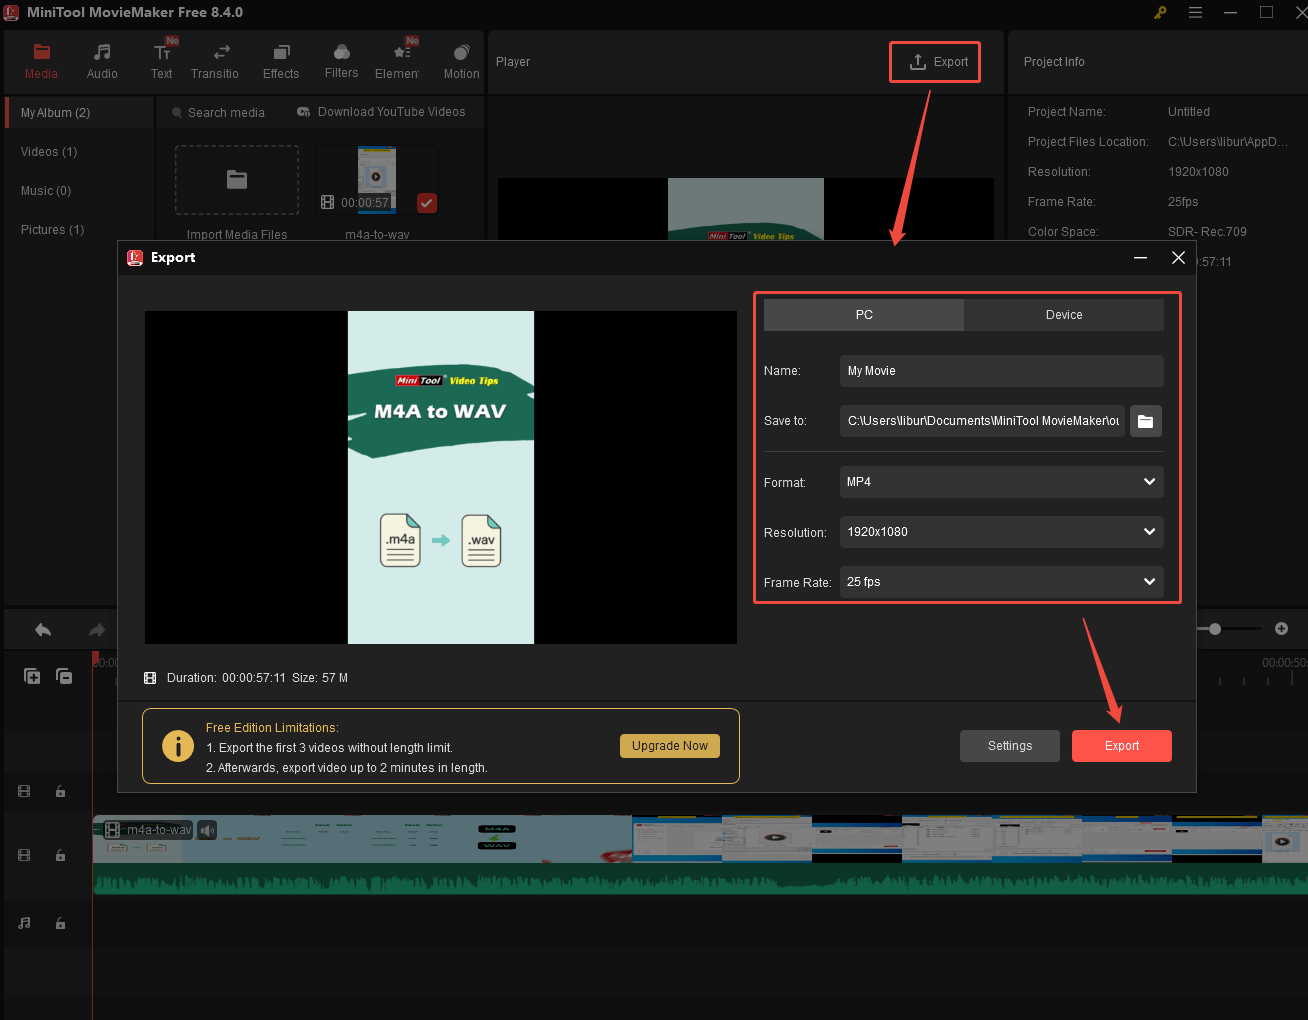
1. When you are satisfied with your short video and make sure all the important elements are in the safe zone, delete the template on the timeline.
2. Click on the Export button at the top of the player, choose output parameters, and click on Export to export the short video.
MiniTool Video ConverterClick to Download100%Clean & Safe
Bottom Line
YouTube Shorts safe zone is important to check text and branding visibility before you upload, and prevent key elements from being cropped or blocked. You can use an online safe zone checker or download a free template to check whether these elements are in the safe zone. Use one of the methods and check now!
About The Author

Position: Columnist
Libur is always willing to try new things and full of enthusiasm for life. At the same time, she is passionate about making fantastic movies. Now, she has become an English editor about multimedia in MiniTool. She is good at writing articles about video editing, video conversion, and screen recording. During her spare time, Libur loves climbing mountains and listening to music. By the way, her favorite singer is Taylor Swift.