What Is YouTube Monetization
YouTube monetization is a process of making money from YouTube platform. If you, as a YouTube content creator, want to earn on YouTube, your account should first meet YouTube monetization eligibility requirements. Then, join YouTube Partner Program. Finally, you can get money from visitors through various forms of videos:
- Regular (long) videos
- Short videos
- Live streams
Or various video contents:
- Tutorial videos
- Course videos
- Entertainment videos
- Shopping videos
- Vlogs
- …
YouTube Monetization Requirements
As mentioned above, your channel needs to firstly reach the requirements for YouTube monetization, then you can go to the next step for conducting monetization on YouTube.
1. Follow the YouTube channel monetization policies.
2. Currently, your channel isn’t under any active community guidelines strike.
3. The 2-step verification of your Google account is enabled.

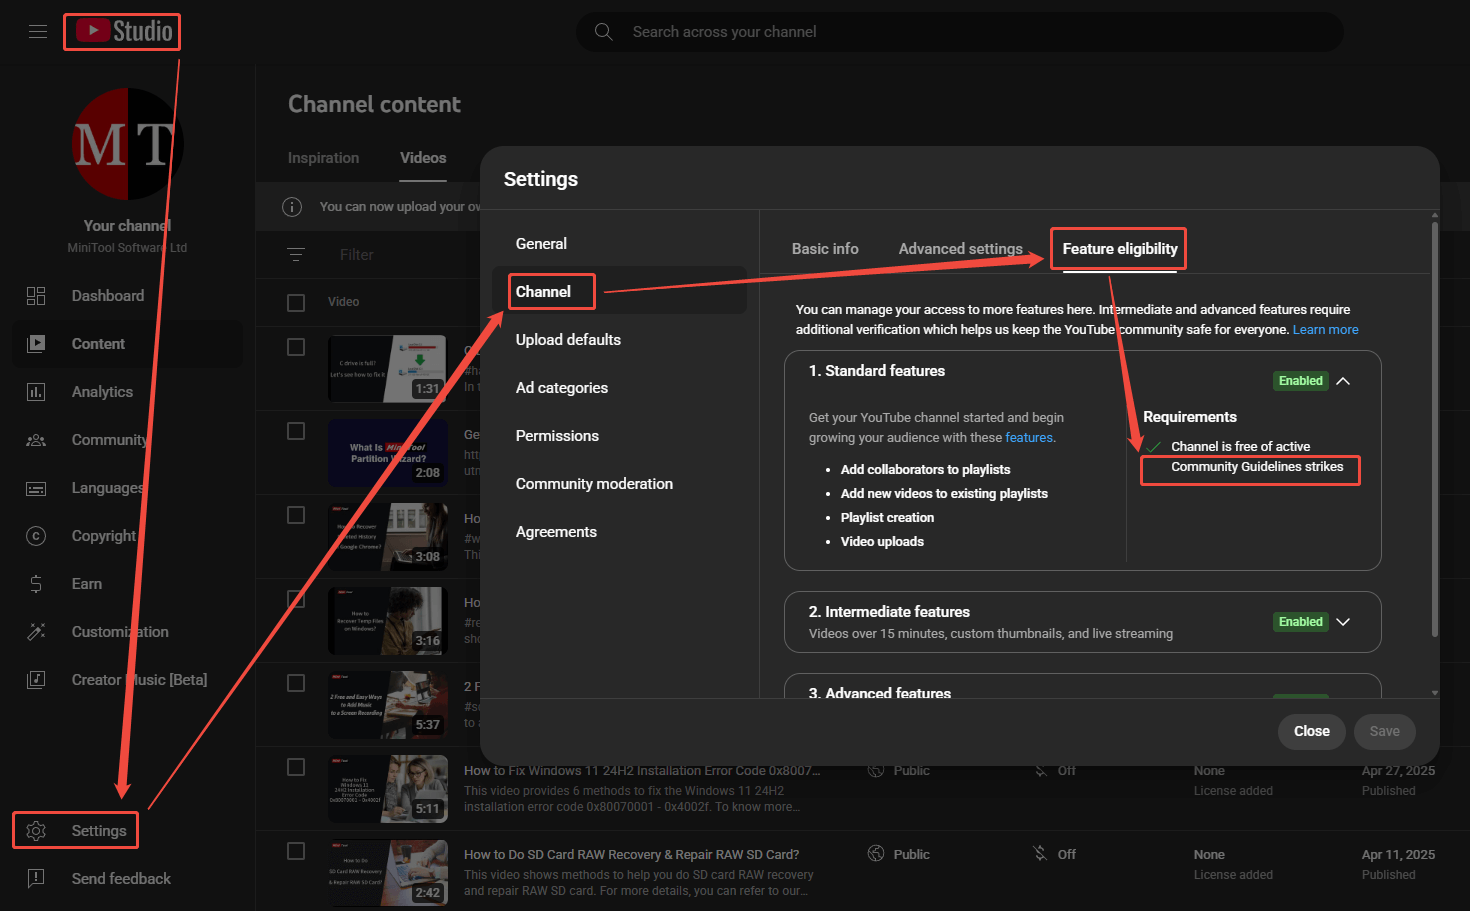
4. The YouTube channel advanced features are enabled.

5. Set up or link an AdSense to your YouTube account.
6. Your channel is currently based in a country or region where the YouTube Partner Program is available.

Then, you need to reach the corresponding thresholds to earn from different programs.
#1 Fan Funding and Certain Shopping Features
If you want to earn from Super features, channel membership, and YouTube Shopping, your channel needs to meet the following requirements.
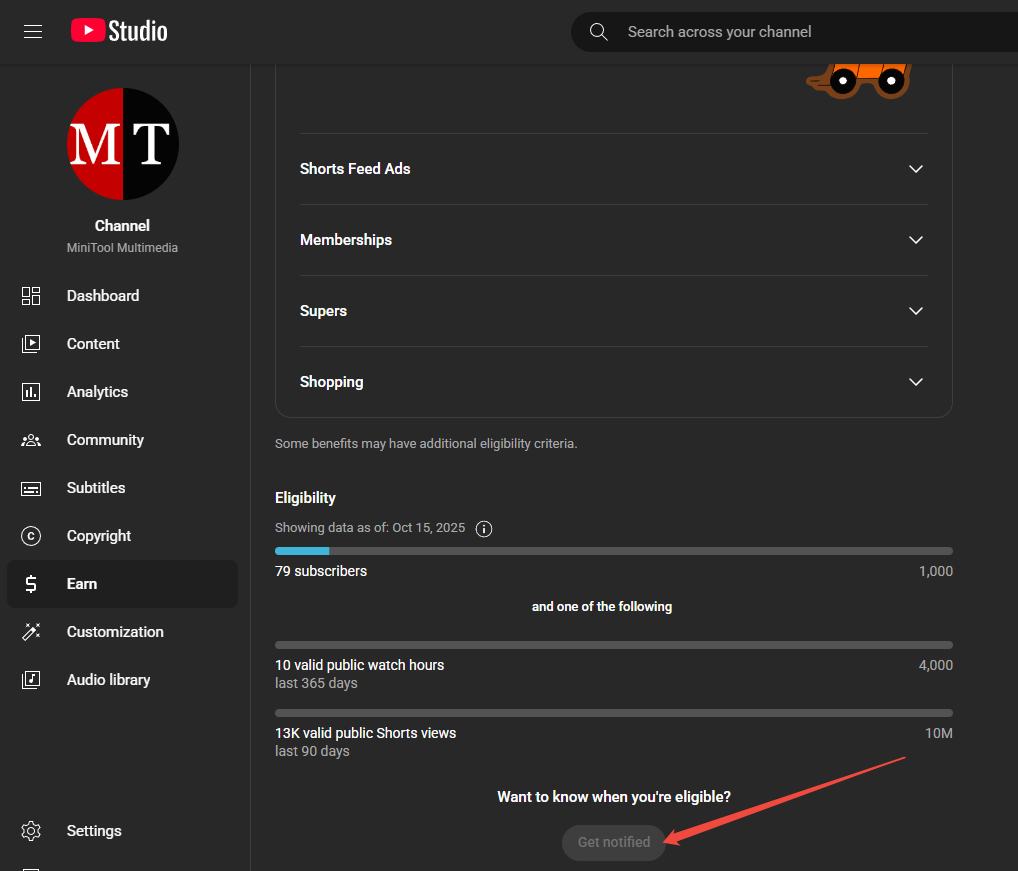
- 500 subscribers.
- 3 valid public uploads in the last 90 days.
- Either 3,000 valid public watch hours from regular videos in the past year, or 3 million valid public Shorts views in the last 90 days.
#2 Revenue Sharing from Ads and YouTube Premium
- 1,000 subscribers.
- Either 4,000 valid public watch hours from regular videos in the last 12 months, or 10 million valid public Shorts views in the last 90 days.
If your channel is not eligible for YouTube Partner Program currently, you can order an official notification service from the Earn section in YouTube Studio. Just select Get notified, and you will receive an email notice once your channel meets the requirements.
For YouTube creators whose channels don’t meet the above requirements currently or who even don’t have a channel, some of them may consider purchasing a channel and starting to earn money immediately.
This is not recommended for the purchased channel probably don’t match your content niche. Also, the channels for sale are mainly organized for sale and they are not well-managed; or they are under some risks.
That is to say, when you try to apply for YouTube Partner Program with such channel, you may fail the check process due to policies or guidelines violation.
How to Join YouTube Partner Program
Once your channel is eligible for YouTube Partner Program, you can apply to join YPP with the steps below. Before that, you’d better have a self-check through your channel and remove videos that violate or may violate YouTube policies and guidelines.
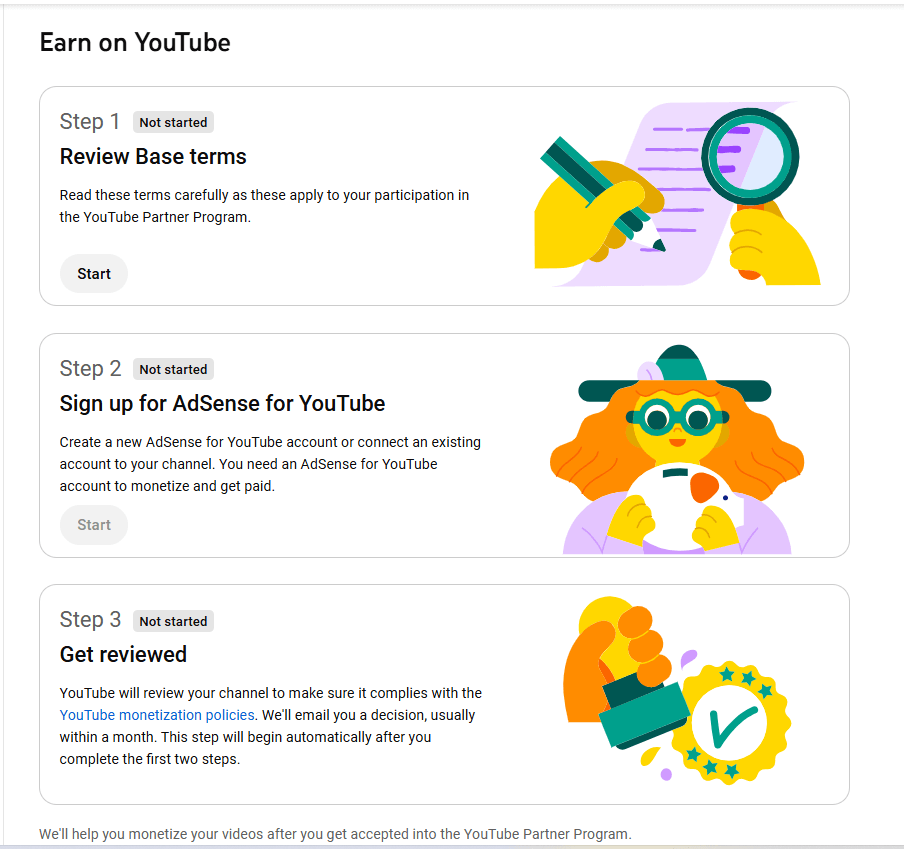
Step 1. Go to YouTube Studio Earn Section and Click Apply Now.
Sign into your YouTube account and go to YouTube Studio page. There, click the Earn option from the left menu. Then, click the Apply now button from the right-side area.

Step 2. Review Base Terms
On the Earn on YouTube page, click the Start button under Step 1 to read the related terms for joining YouTube Partner Program.
Step 3. Sign up for AdSense for YouTube
Connect your AdSense to your channel to monetize and get paid. If you currently don’t have an AdSense account, just create one!
Step 4. Get Reviewed
Then, YouTube will automatically review your channel with a combination of automated system and human to make sure it complies with the YouTube monetization policies. The review result will be mailed to you within a month.
If unfortunately, you fail the review, you can appeal the decision within 21 days. YouTube tend to check whether most part of your channel follow its guidelines and policies. If not, it will tell you the specific policies that are flagged in YouTube Studio Earn section.
If your channel does have the problem find by the review, fix it accordingly and re-apply for YouTube Partner Program after 30 days. If this isn’t your first application to be rejected or you’ve previously reapplied, you can try again after 90 days.
2. The review process isn’t once and for all. YouTube continuously review your channel to make sure it continues to meet YouTube policies over time even if you are already in the Partner Program.
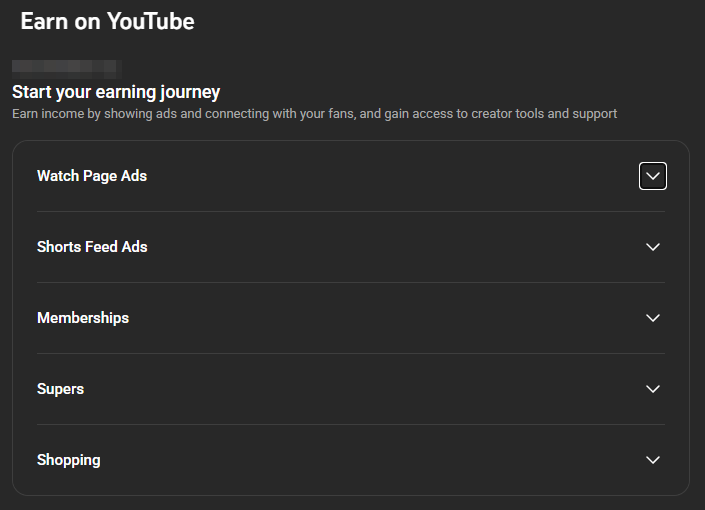
YouTube Monetization Methods
When you have successfully applied YouTube Partner Program, you can enable monetization on YouTube. There are many ways to earn on YouTube.
#1 YouTube Ads
“YouTube ads are compelling video campaigns with a range of video ad formats to engage customers in different ways on YouTube and across video partner sites.”
The most popular monetization method is advertising revenue. You can earn ad revenue from display, overlay, and video ads that run on your channel. With YouTube Premium, you can earn a portion of a subscriber’s fee when they watch your videos.
There are many YouTube ads formats you can create to engage audience in different ways on YouTube and across video partner sites.
1.1 Ads Classified by Its Position in Your Video
(1) Pre-Roll Ads
Show before your video and could be skippable or non-skippable.
(2) Post-Roll Ads
Show after your video and could be skippable or non-skippable.
(3) Mid-Roll Ads
Show during your video and could be skippable or non-skippable. They are for videos longer than 8 minutes. When you check the Show mid-roll ads during my video option, the mid-roll ads will be automatically placed at natural break points. If you are not satisfied with the automatic ad slots, you can manually manage ad slots.
1.2 Ads Classified by Whether They Are Skippable
(1) Skippable In-Stream Ads
This kind of ads allows viewers to skip so they can understand attention. These ads have no max length but are recommended to keep less than 3 minutes. After 5 seconds, the viewer has an option to skip the ad.
Skippable in-stream ads can be applied before, during, or after regular YouTube videos on watch pages or across websites. They can also play as full screen interstitial ads that paly before a viewer can proceed within a mobile app. Some skippable in-stream ads may also appear on YouTube TV and game consoles depending on eligibility.
(2) Non-Skippable In-Stream Ads
This type of ads is non-skippable and its viewers have to watch the entire ads. Therefore, non-skippable in-stream ads are usually short: 15 or 20 seconds depending on regional standards; may be 30 seconds for TVs only.
Non-skippable in-stream ads can also be put before, during, or after YouTube videos, videos across websites, or videos on apps running on Google video partners. Some non-skippable in-stream ads may also appear on YouTube TV and game consoles, which depends on eligibility.
1.3 Ads Classified by the Situation Where They Appear
(1) Watch Page Ads / Watch Feed Ads
This type of ads shows up before, after, and around your videos on the Watch Page. They can be in the feed of recommended videos next to the player on computers and below the player on mobile. They can’t be controlled within YouTube Studio.
To earn from ads or YouTube Premium revenue on long-form or live streaming videos viewed on the Watch Page, which can present pages within YouTube, YouTube Music, and YouTube Kids, or when embedded on other sites in the YouTube Video Player, you must accept the Watch Page Monetization Module.
(2) Masthead Ads
On desktop, at the top of the YouTube Home feed, a featured video in a Masthead ad auto-plays without the sound for a maximum of 30 seconds. Viewers can click the mute icon to hear the sound.
The Masthead ad can appear in a widescreen or 16:9 aspect ratio and includes an info panel on the right section that automatically uses assets from your channel. Advertisers can optionally add up to 2 companion videos in this panel.
When autoplay finishes, the main video will turn to the video thumbnail by default. If viewers click on the video or its thumbnail, they will be redirected to the YouTube watch page of the video.
On mobile, the masthead ads behave similar as they are on computer.
(3) In-Feed Video Ads
In-feed ads are shown to highly engaged viewers in the Home feed, Discovery (next to related YouTube videos), searching phase (as part of a YouTube search result), or the homepage of YouTube mobile app. They are non-skippable in-stream ads that have no length limit.
In-feed video ads consist of a thumbnail image from the video with some text. The exact size and appearance of the ads may vary depending on where it appears. They intend to encourage audience to click the video and the video will play on the YouTube watch page or channel homepage.
(4) Bumper Ads
Bumper ads are quick messages that cannot be skipped like non-skippable ads. They can raise awareness or reinforce other ads. Bumpers ads have a duration of 6 seconds long or shorter.
Bumper ads can be placed before, during, or after regular YouTube videos, across websites, or on apps running on google video partners. Some bumper ads may also appear on YouTube TV and game consoles relying on eligibility.
(5) Back-to-Back Ads
Back-to-back ads are also called ad pods. 2 back-to-back video ads can occur when you turn on ads for your long video (at least 5 minutes long). They help reduce interruptions for viewers of longer videos and provide a better watching experience.
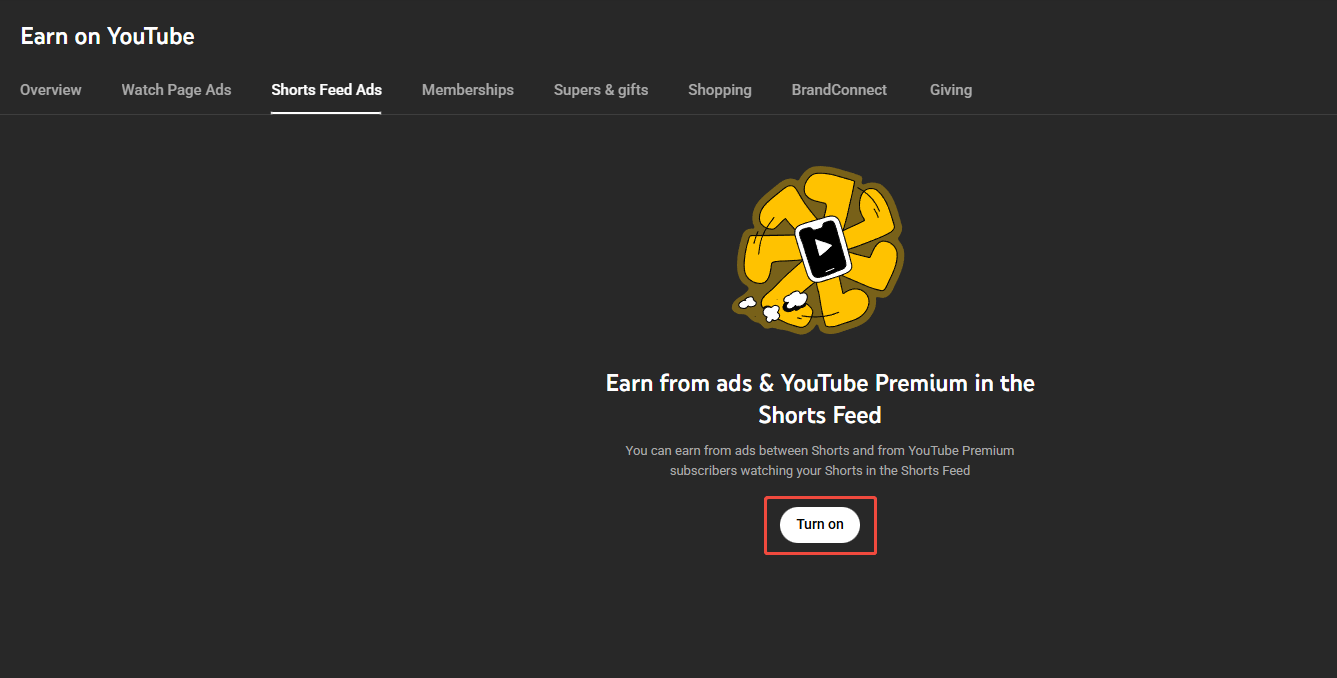
(6) YouTube Shorts Ads / Shorts Feed Ads
Finally, the ads between two YouTube Shorts videos are intended for highly engaged audience in a mobile-optimized experience. They are usually less than 60 seconds and have a similar viewer experience as organic Shorts videos.
Shorts ads will be rendered and show up randomly between organic Shorts videos. Viewers can quickly skip the ad by swiping up or down. However, if viewers scroll back, the ad video will be kept and reshown. Shorts ads serve on mobile apps, tablets, and desktop, as well as connected devices like TVs, streaming devices, and gaming consoles.
You can earn from ads between Shorts and from YouTube Premium subscribers watching your Shorts in the Shorts Feed.
1.4 YouTube Audio Ads
YouTube audio ads allow advertisers to extend their access to new audio inventory. This kind of ads run during long listening sessions or background moments. They run as creatives up to 30 seconds and use CPM bidding.
#2 YouTube Super Features
Super Chat, Super Stickers, and Super Thanks can strengthen connections between you and your community. Your fans can get their messages or animated images highlighted in live stream or Premiere with Super Chat and Super Stickers; they can also get messages highlighted in comments section of regular or short videos by Super Thanks.
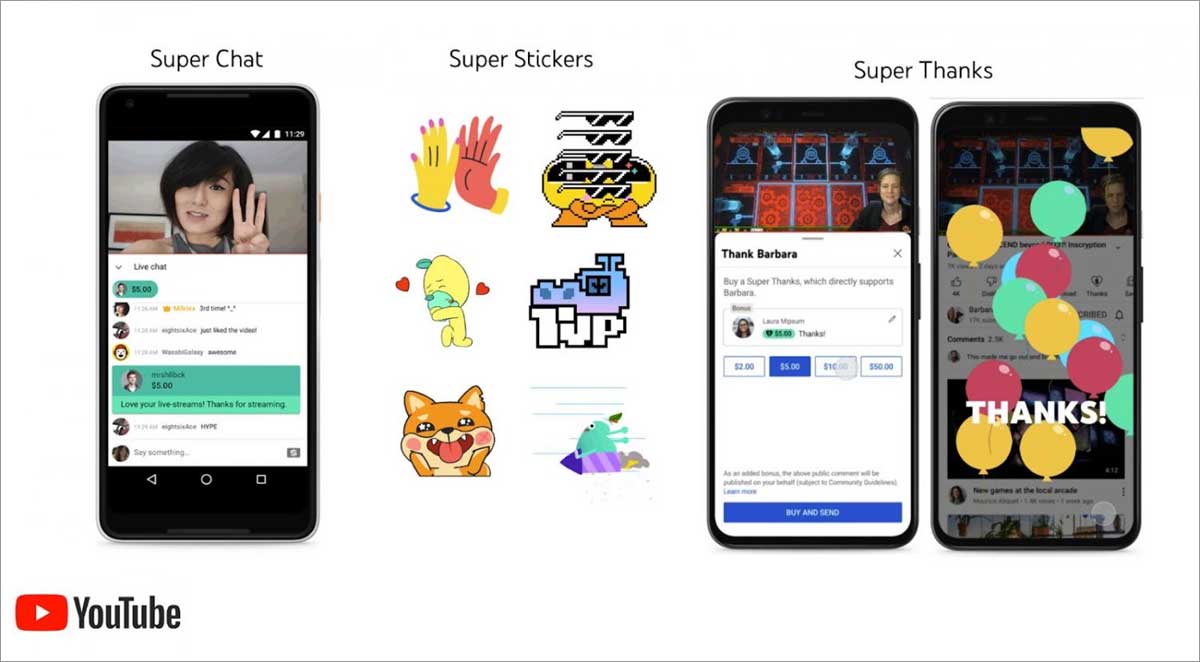
To make more money with Supper features, you need to make your videos or streams engaging by interacting with your audience and add call to action (CTA) parts.
Besides, you can turn on gifts on live streams to let your fans join the fun and be a part of your stream by sending gifts. Then, you will earn Rubies each time you receive a gift from your fans.
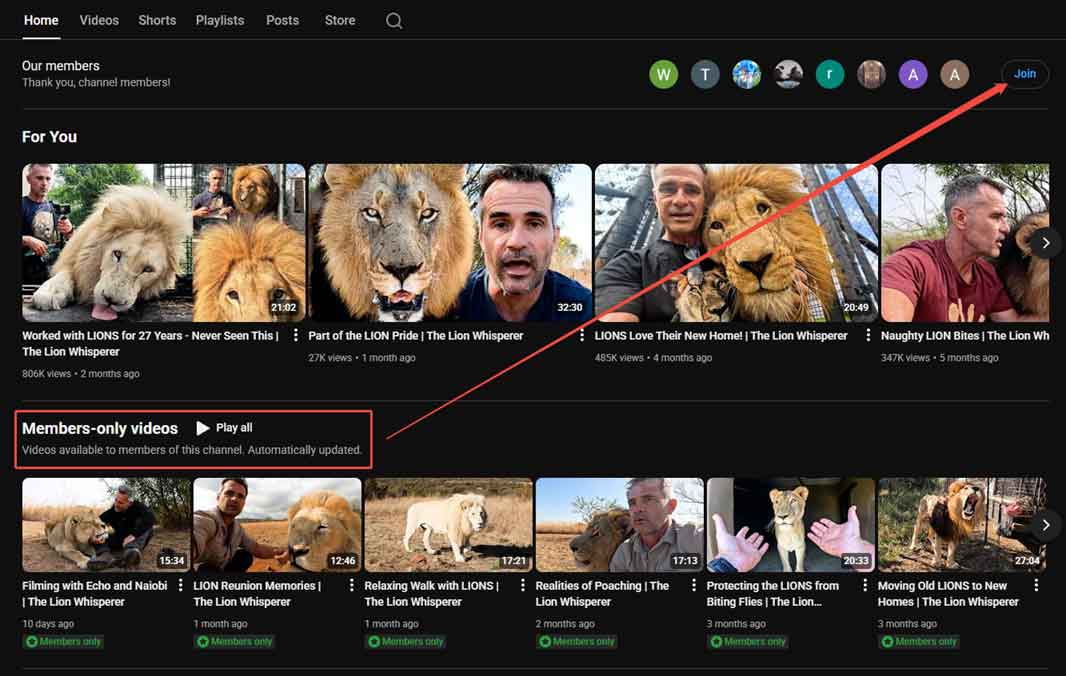
#3 YouTube Channel Memberships
Through YouTube channel membership, you can make some of your channel contents paid, like highlight videos, product discounts, Q&A services, and events Behind the scenes. If viewers want to enjoy these contents, they need to join to be your channel member. By providing exclusive perks for your channel paying members, you can get 70% of the net revenue.
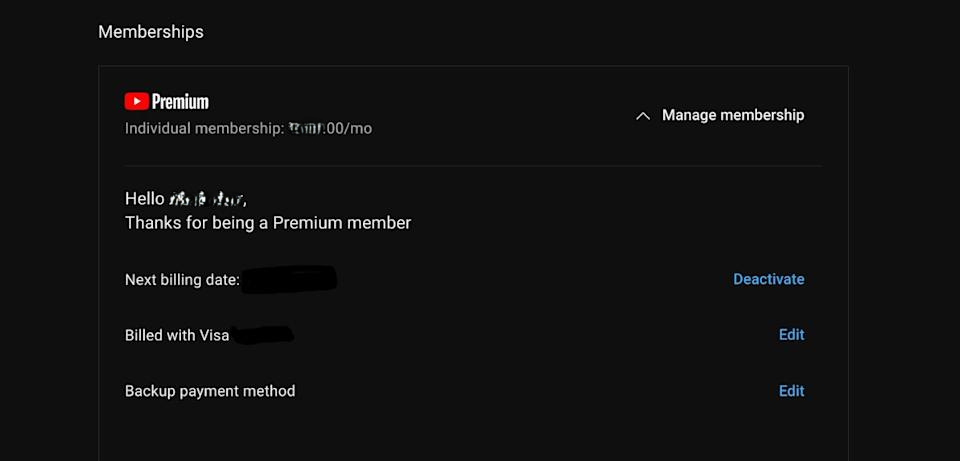
#4 YouTube Premium Revenue
Be different from the above-mentioned YouTube channel membership, YouTube Premium is a kind of membership that applies to the entire YouTube platform. YouTube Premium members can watch videos without ads, watch paid videos, download videos, etc.
Therefore, you can’t make money from YouTube Premium members through ads. However, you can get part of the membership fee paid by them. As for how much you can get, it depends on how many members watch your video.
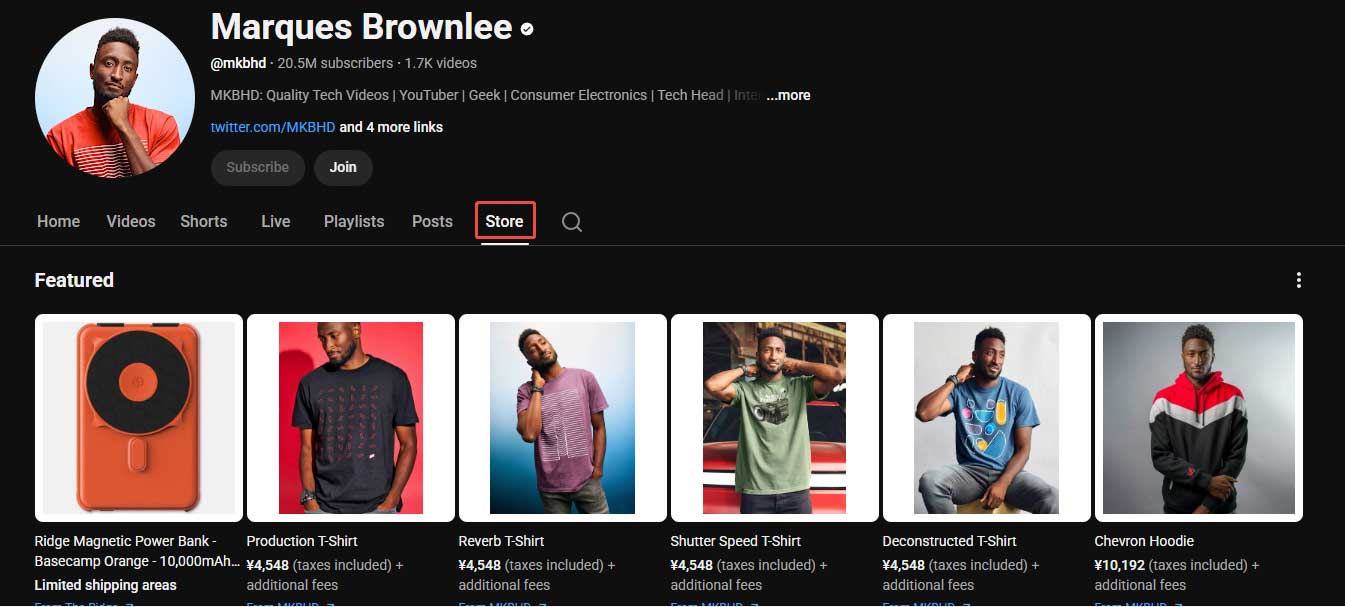
#5 YouTube Shopping
Connect YouTube with your online store to sell your products on your videos. Or, you can sell channel peripheral products to your fans. Just set up a store on YouTube or directly add purchase link in your videos, video info cards, video descriptions, or video comments.
5.1 Affiliate
Affiliate is one of the YouTube Shopping ways. By adding product publishers’ links into your video description, you can get commission once your visitors buy through the links.
5.2 Sponsor
A sponsor video is a type of video that promote products from its sponsors. There are many ways to promote products in a video. You can create a dedicated product review video or just mention the product in your video.

5.3 Influencer
If you are a KOL (Key Opinion Leader) on YouTube, you can directly sell products in your live streams. Please note that you should better choose products that match your character.
No matter which shopping way you use, the first thing you need to do to earn more money is to grow your fans and stay connected with them. Also, select the products you are going to promote carefully. Make sure they have good quality and match your channel niche. Only in this way, can your fans be willing to buy the products or services you introduce.
Besides, you need to be honest and don’t give fake information. Otherwise, viewers will find the truth soon or later. Then, you will lose the trust of your fans.
#6 YouTube BrandConnect
BrandConnect allows brands to cooperate with creators for branded content campaigns. Creators may be contacted directly by advertisers for collaborations and get more opportunities to earn money working on branded content campaigns that match their niches.
BrandConnect program eligibility requirements for a YouTube channel:
- At least 18 years old.
- In the YouTube Partner Program and eligible for revenue sharing from Ads.
- Based in one of the available countries/regions.
- No active Community Guidelines strikes.
- Follow YouTube’s monetization policies and any applicable terms you agree to, including the YouTube BrandConnect Module.
How to Turn on Monetization on YouTube
Now, it is time to talk about the process of setting up monetization on your YouTube account.
Go to YouTube Studio and sign into your account. In the left menu, select Earn. Then, you can select your way(s) to earn on YouTube.
#1 Turn on Ads on YouTube
The following guide teaches you how to enable ads for your videos.
1.1 Turn on Ads for Regular Videos
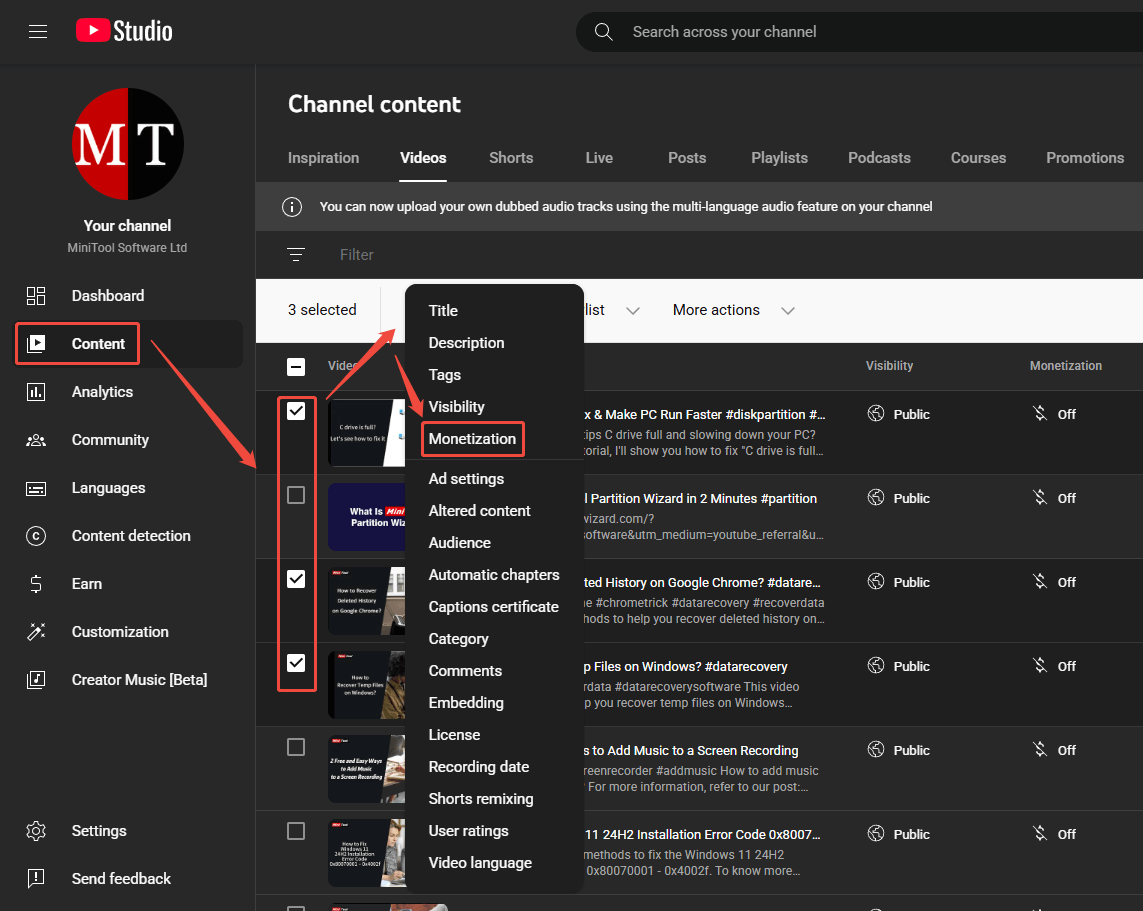
Step 1. Select Your Video(s) to Monetize
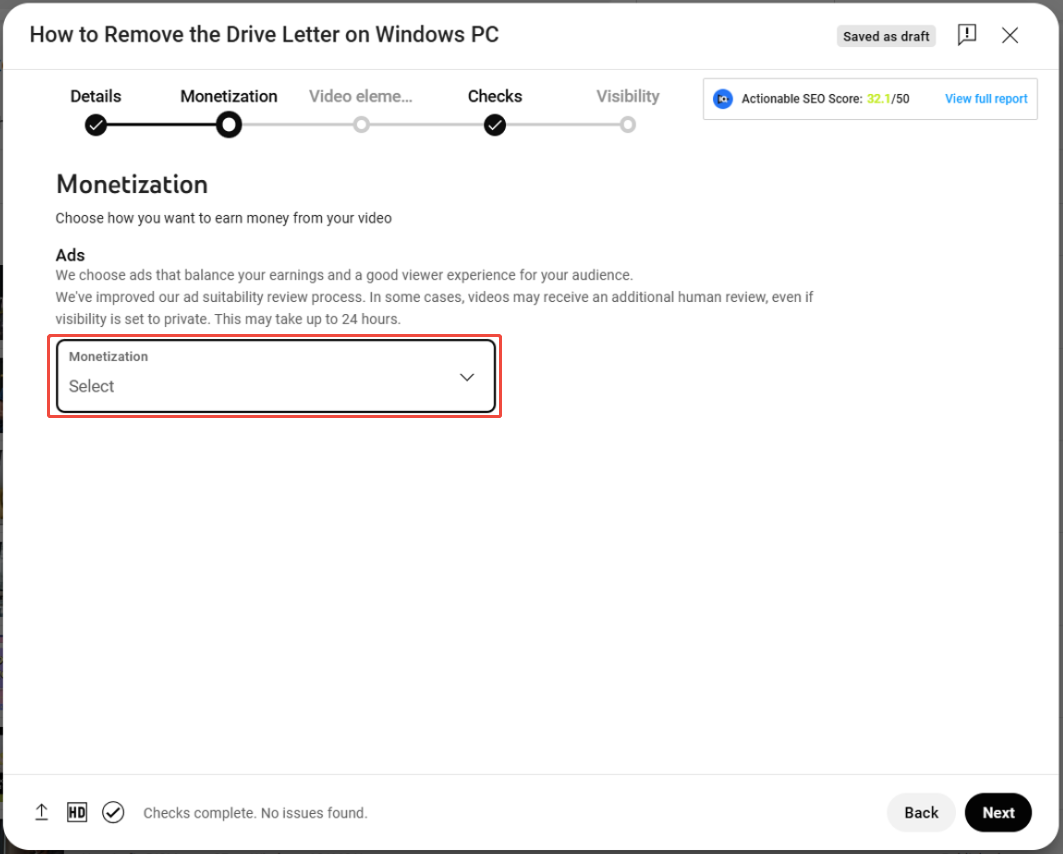
Go to the Content tab from the left menu. Then, find and tick your target video(s). Click the Edit option above and select Monetization.
Step 2. Make Sure the Selected Video(s) Are Advertiser Friendly
Then, it will pop up informing you to make sure that the video(s) you select comply with the advertiser-friendly guidelines. To make it simple, your video(s) should not contain inappropriate language, violence, adult content, drug-related content, sensitive events, etc. unproper content. Confirm your operation by clicking the Update videos button in the top right.

If your video(s) have content mentioned above, they are not suitable for ads. If you continue to turn on monetization for them, it may lead to your channel being reviewed for YouTube Partner Program eligibility.
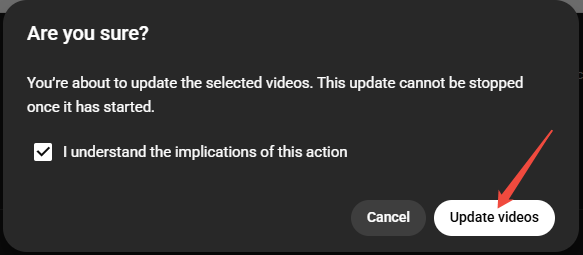
Step 3. Confirm Your Operation
It will give a popup window to ask for confirmation again. Just click the Update videos button once more.
Step 4. The Selected Video(s) Are Monetized
Finally, you will see the video(s) you selected are all on monetization with a green dollar icon next to them.
Another Way to Monetize a Single Video
If you only want to turn on monetization for a single video, you can directly expand the monetization option for the target video and choose on.

Next, it will ask you to rate the video. This is the process to make sure that your video is ads-friendly. If your video contains none of the listed unfriendly content, just tick the None of the above option at the bottom left and click the Submit button at the bottom right.

Turn off Monetization for Your Videos
As for how to turn off monetization for your videos, use the two entrances mentioned above for turning on monetization. Just switch to Off. Done!
1.2 Turn on Monetization for Processing Videos
Once you have turned on Watch Page ads, you will be asked to whether turn on monetization for a video during its upload process. Just choose On from the Monetization drop-down menu.
1.3 Turn on Mid-roll Ads for Long Videos
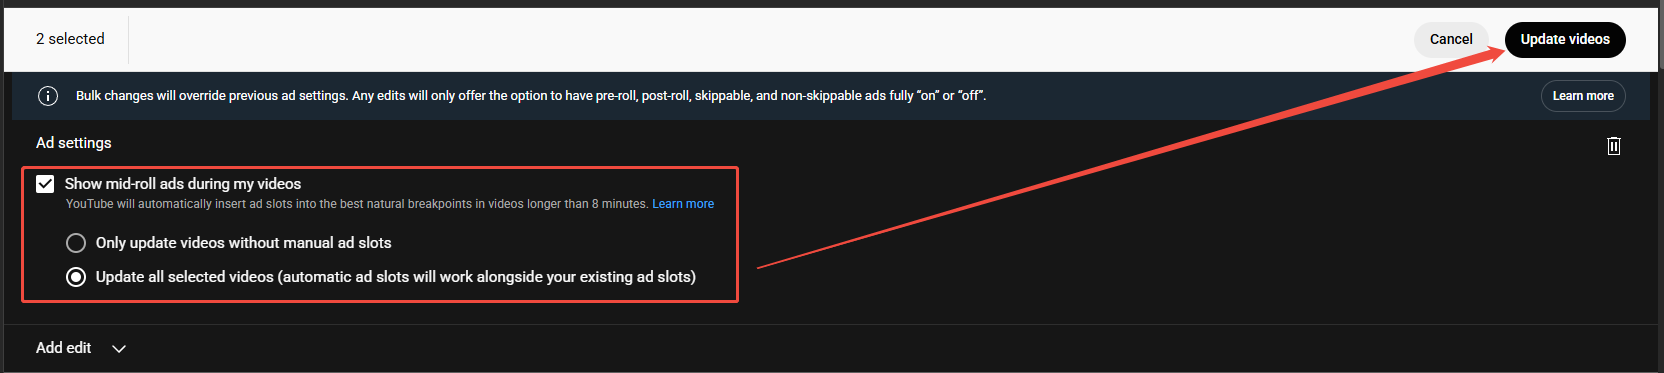
If you want to enable mid-roll ads for videos longer than 8 minutes, just select the target videos, then click Edit > Ad settings and select only update videos without manual ad slots or update all selected videos (automatic ad slots will work alongside your existing ad slots) for showing mid-roll ads during your videos. Next, Click the Update videos button in the upper right.
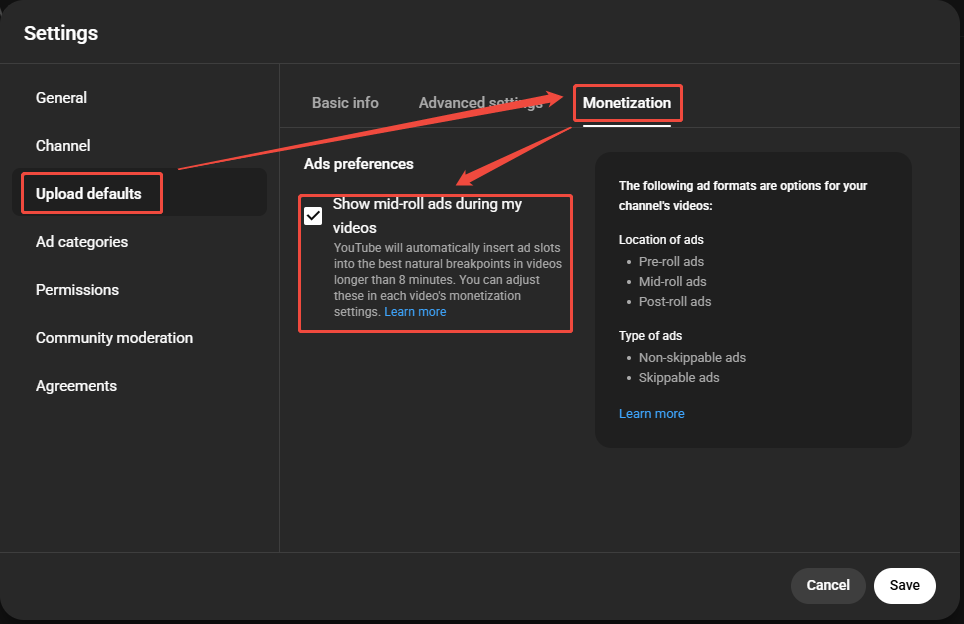
You can also set upload defaults for mid-rolls at the channel level. Just go to YouTube Studio > Settings > Upload defaults > Monetization, under Ad preferences, tick the Show mid-roll ads during my videos option to automatically insert mid-roll ads into videos longer than 8 minutes during the upload process in the future.
1.4 Turn on Ads for YouTube Shorts
Regard to the special ad application of Shorts feed, there is no need or ability to enable ads for individual Shorts. If you want to earn from Shorts revenue, you need to accept Shorts Monetization Module in YouTube Studio and turn on monetization for ALL your Shorts videos.
1.5 Turn on Ads for Live Streams
Finally, let’s see how to enables ads for live streams.
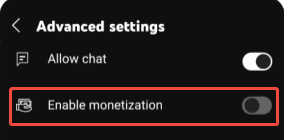
On Mobile
On the stream detail screen, tap Advanced settings, then Enable monetization. That’s it!
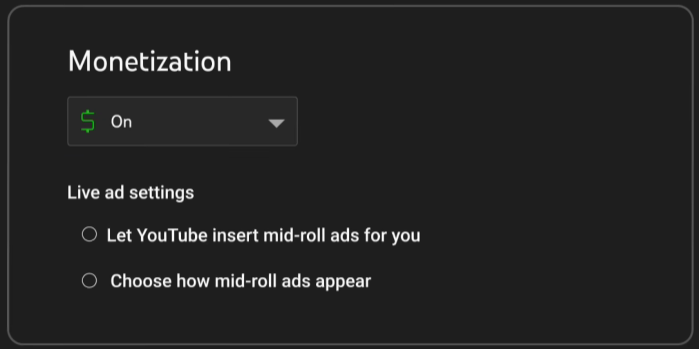
On Computer
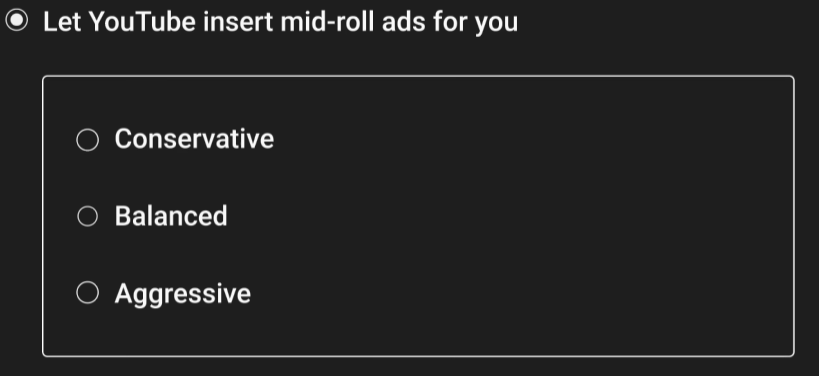
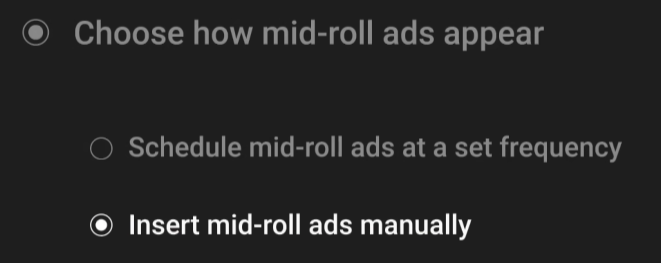
In a live stream control room, click on the Edit option to go to the Monetization page. There, you can turn on monetization and further customize live ad settings, whether to let YouTube insert mid-roll ads for you or choose how mid-roll ads appear manually.
If you let YouTube insert mid-roll ads for you, there are 3 frequencies available:
- Conservative: less interrupted viewer experience but lower earning potential.
- Balanced: normal viewer experience and medium earning potential.
- Aggressive: more interrupted viewer experience but higher earning potential.
If you choose how mid-roll ads appear manually, you can either set an ad frequency or manually add ads one by one.
Just use the corresponding icon on the top right to manually add ads.
Once your live stream starts, if you have set scheduled ads, they will start appearing at the frequency you selected. Before an ad appear, you will be notified when the ad is going to be served with a countdown at the bottom of the live stream page.

If you think it’s not the proper time to show an ad, you can use the delay ads icon next to the insert mid-roll icon to pause ads for 10 minutes.
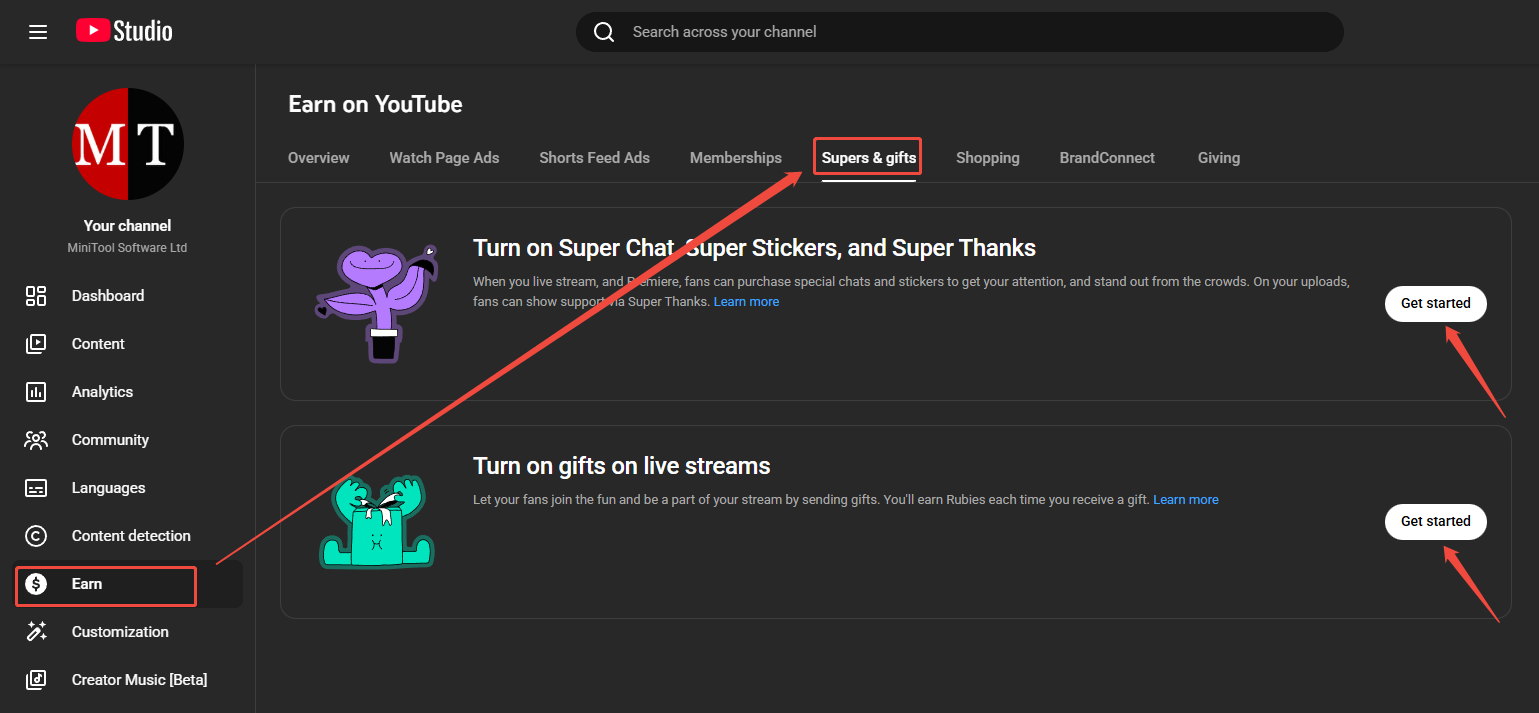
#2 Turn on YouTube Super and Gifts Features
The way to turn on YouTube Super and Gifts features is simple.
2.1 Turn on Super Features for Your Network
To earn revenue from Super features, you and your MCN (Multi-Channel Network) must accept the Commerce Product Module (CPM) first. In YouTube Studio, go to Settings, select Agreements, and accept the Commerce Product Module.
2.2 Turn on Super and Gifts Features for Your Channel
Just navigate to the Earn section in YouTube Studio. Then, switch to Supers & gifts tab from the top menu. Finally, click on the Get started button and follow the process.
2.3 Turn on Super Features for Premieres
If you have turned on super features for your channel, they are automatically turned on when you premiere a video.
To premiere a video with Super features:
step 1. Sign in to YouTube with Super features-enabled channel.
Step 2. Click Upload from the top.
Step 3. Select Schedule in the dropdown menu.
Step 4. Choose the target video to upload.
Step 5. Turn on Premiere.
Step 6. Choose date and time of your premiere.
Step 7. After processing, click Premiere in the top right.
#3 Set up Membership for Your Channel
To turn your engaged subscribers into paying members, in the Earn section of YouTube Studio, select the Memberships tab and start the setup.
Step 1. Choose Your Channel Perks
If you want to earn from channel membership, you need to provide your channel subscribers with perks to excite them.
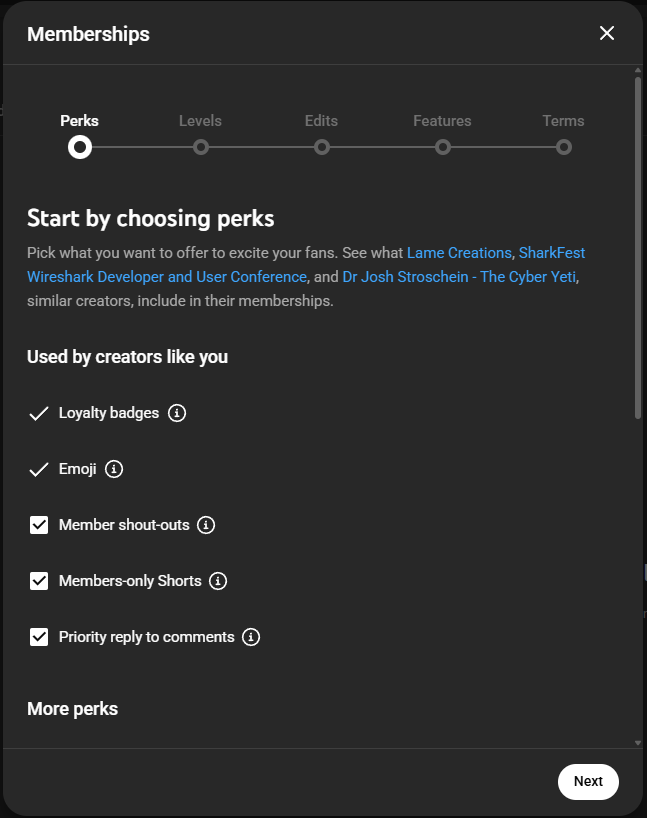
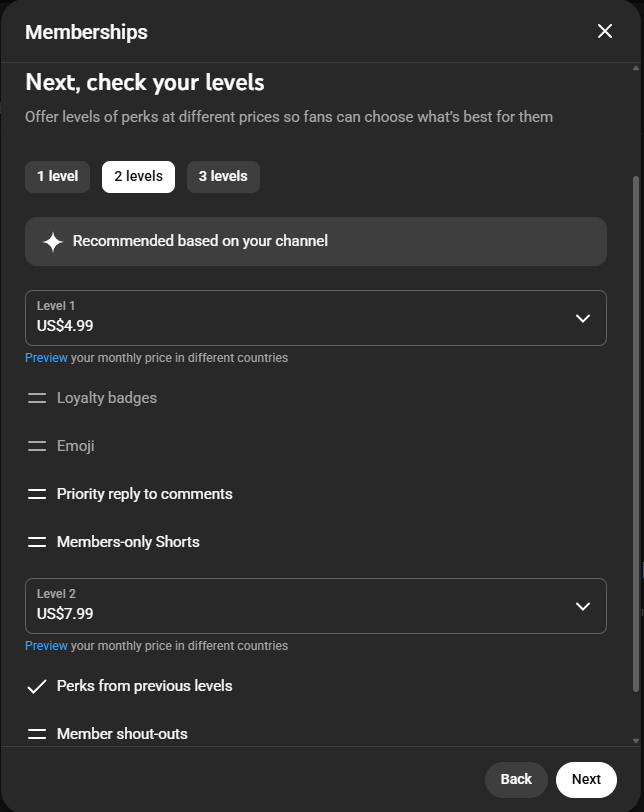
The perks you can select to offer to your fans are:
- Loyalty badges (required)
- Emoji (required)
- Member shout-outs
- Members-only Shorts
- Priority reply to comments
- Members-only videos
- Discounted merchandise
- Connecting on social media
- Members-only polls
- Members-only chat rooms
- Photos and status updates
- Early access to new videos
- Members-only live chats
- Gameplay with you
- Members-only live streams
You can add further perks.
Step 2. Check Your Levels
Create your channel levels with different perks. Of course, different level requires different membership fees. Thus, subscribers can select a level that suits them best.
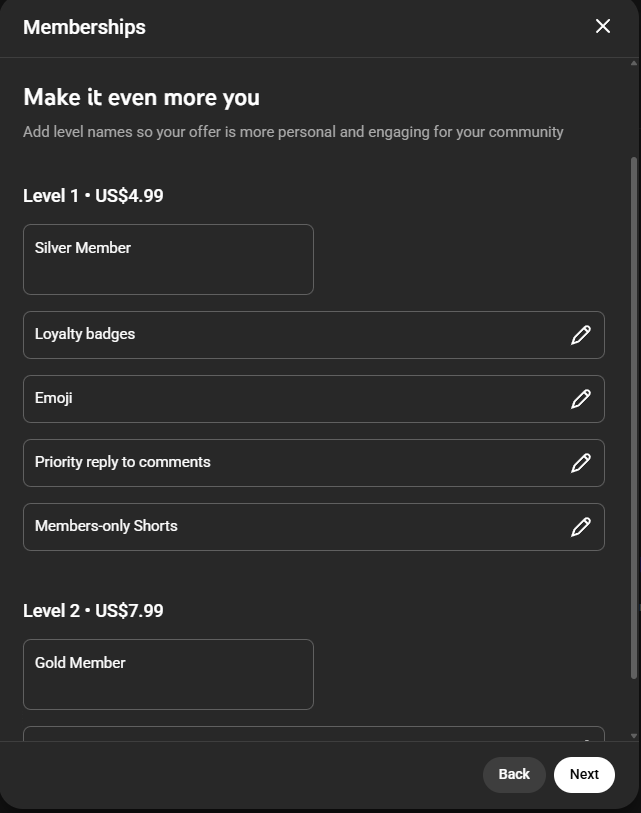
Step 3. Edit Your Levels
Give names to your membership levels and modify corresponding level perks.
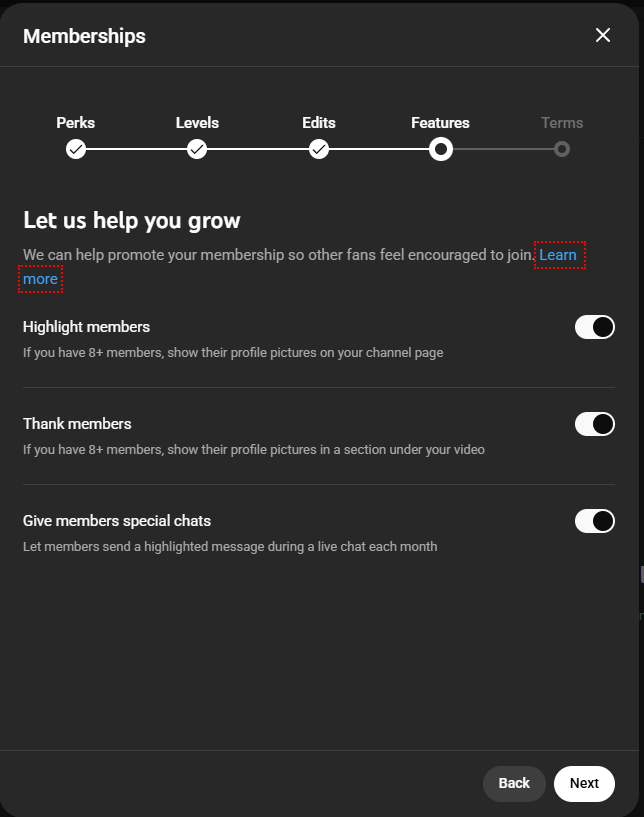
Step 4. Specify Membership Features
To make your subscribers feel more engaged and superior, you can show their profile on your channel page or under your video, or even allow members to send a highlighted message during a live chat.
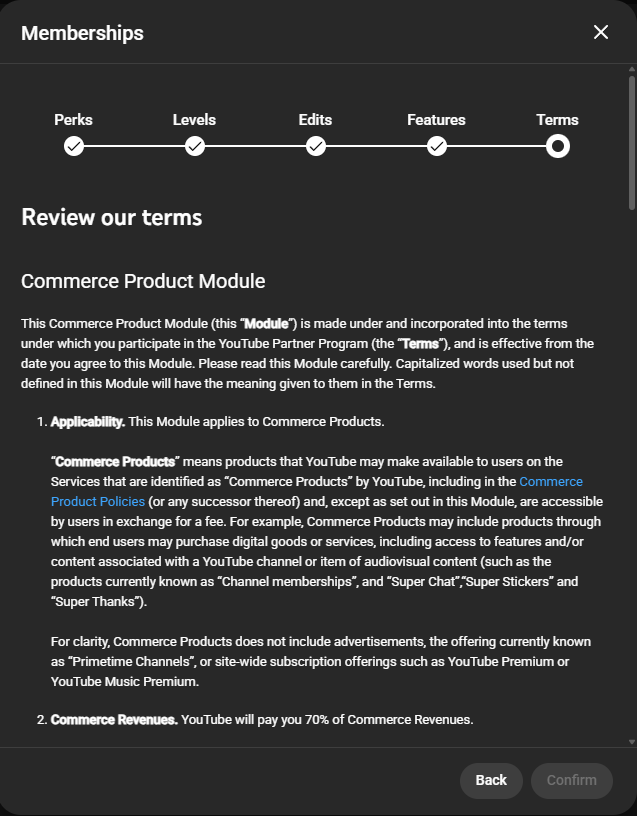
Step 5. Confirm the Terms of Commerce Product Module
Read the terms of Commerce Product Module and agree it by clicking the Confirm button.
Finally, you have your channel membership successfully established. Congratulations! Now, you can grow your community and earn monthly!
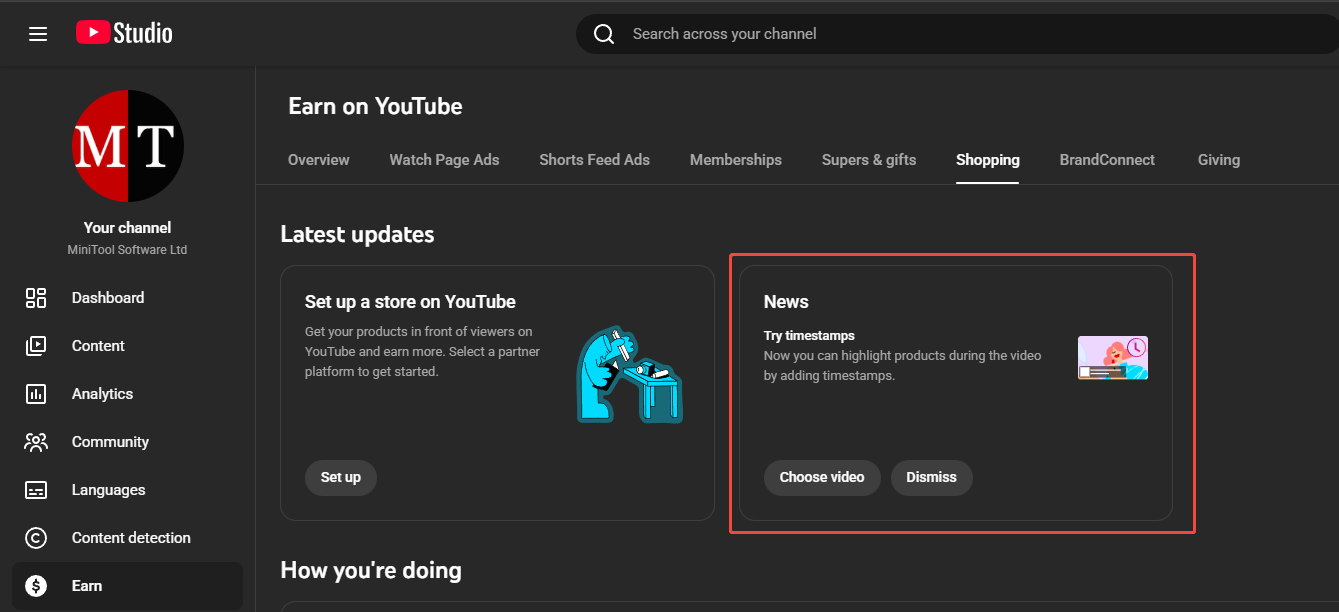
#4 Set up YouTube Shopping Features
Once you are eligible to YouTube Shopping, you can customize the shopping features in the Earn section in YouTube Studio.
Connect Your Store to Your Channel
First of all, you can link your online stores to your YouTube channel. Go to the Shopping tab, click the Set up button to set up a store on YouTube. In the new popup, select a partner platform to set up your online store.

Currently, there are several online shopping platforms available:
- Fourthwall
- SHOPLINE
- Shopify
- Spreadshop
- Spring
- TeePublic
- Wix
Once you have connected your store with YouTube, a Store tab will appear on your channel, where your visitors can browse and buy your products. The Store tab will automatically pull products from your online store and you can also personalize the products in the Shopping tab of the Earn section in YouTube Studio.
Highlight Products in Your Videos
To sell the products appear in your videos, you can highlight them by adding timestamps.
Or, you can turn on the automatic tags and timestamps feature and let YouTube find and tag products in your video. If the automatic tagging makes a mistake, you can manually correct it in video details.
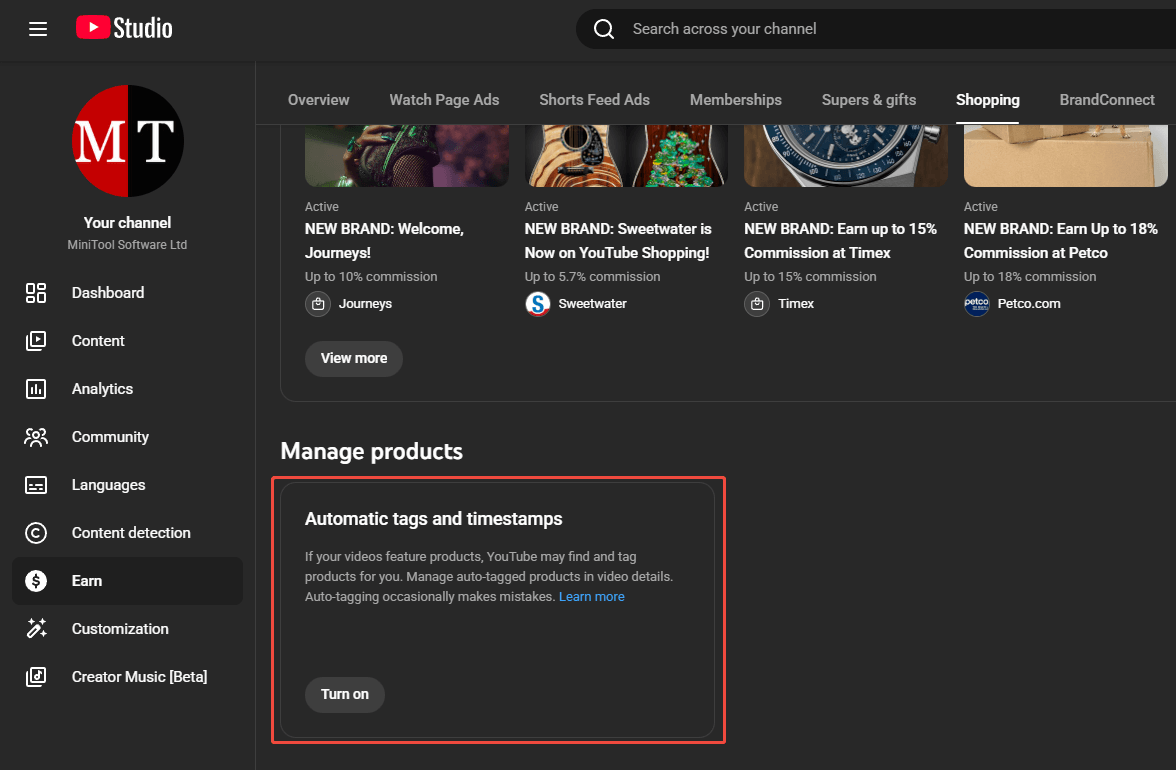
Also, you can tag products in your video during its upload process. To tag products in existing videos, go to the video details page and use the Products feature. For live streams, you can tag a product by going to Live Control Room > Stream (or Manage) > Shopping (below the preview window) and click the plus icon. You can also pin one product to feature it prominently on your live stream.
When you tag products in your videos, the product overlay will show on your content. When your audience open the overlay, they can get more information about your products while still watching your video. As for live stream viewers, they can click the Shop icon under the play window to see your tagged products without living the stream.
Automatic Product Shelf
When you have a store connected to your channel, the automatic product shelf will appear under all of your videos where you have not tagged specific products. The product shelf will automatically pull products from your store based on specs like availability, price, and popularity. Of course, you can customize your product shelf in the Shopping tab of the Earn section in YouTube Studio.

#5 Turn on YouTube BrandConnect
You can turn on BrandConnect through Creator Insights Sharing by sharing your channel insights in YouTube Studio.
Navigate to YouTube Studio > Settings > Channel > Advanced settings, under Channel insights sharing, check the box for Allow advertisers, brands, and third-party platforms to view channel insights for earning opportunities. Then, click Save.

To turn off YouTube BrandConnect, just uncheck the box.
Once you join BrandConnect, brands may reach out to inquiry deals. Therefore, it’s important to keep your email address and social media contacts up to date. Also, manage your preference to ensure they are relevant and acceptably priced.
How Does YouTube Revenue Sharing Work
Now you are earning on YouTube. However, how much can you learn from the various monetization methods? Let’s see some common revenue sharing polices.
#1 Watch Page Ads Revenue Sharing
From ads showed or streamed on your public videos on your content Watch Page, YouTube will pay 55% of the net revenues to you. This rate also applies to public videos streamed within the YouTube Video Player on other apps or websites.
#2 YouTube Shorts Revenue Sharing Model
Since Shorts don’t have traditional watch pages, it has a unique ad revenue sharing model below. This model will reward all monetizing creators, not just those who have an ad before or after their videos.
Step 1. Shorts Feed Ad Revenue Is Pooled.
Every month, revenue from Shorts feed ads will be used to reward monetizing Shorts creators and cover the cost of music licensing.
Step 2. The Creator Pool Is Calculated.
A portion of the ad revenue will be allocated to the Creator Pool based on views and music usage across all watch Shorts. If a creator uploads a short video without music, all the revenue associated with its views goes towards the Creator Pool. If a creator uploads a video with music, the associated revenue will be split among the Creator Pool and music partners based on the number of music tracks he use.
For example, a short video with 1 music track will have 50% of its revenue go towards the Creator Pool and 50% set aside for music licensing. A video with 2 music tracks will have 1/3 of its revenue go towards the Creator Pool and 2/3 for music licensing.
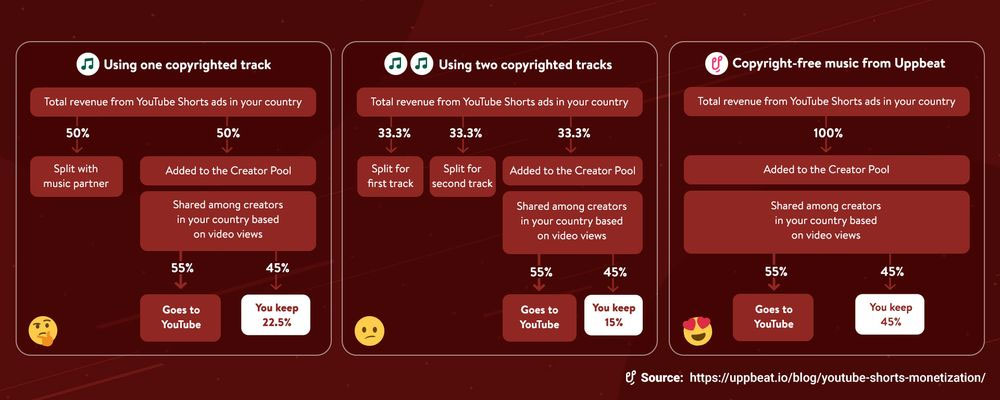
This calculation enables creators to show their creativity without copyright issue. Also, they don’t have to worry about less earning due to use music in their videos.
Step 3. The Creator Pool Is Allocated to Creators
From the Creator Pool in each country, YouTube will allocate revenue to monetizing creators based on their share of total views in the Creator Pool. For instance, among all the short videos uploaded by monetizing creators, if you gain 1% of eligible views, you will be allocated 1% of the revenue in the Creator Pool, no matter there is music in your videos or not.
Step 4. Shorts Revenue Share Is Applied
45% of the monetizing creator’s allocated revenue will be paid to them. That is to say, if you are allocated $100 from the Creator Pool, you will finally get $45.
#3 Fan Funding Revenue Sharing
From Super Chat, Super Stickers, Super Thanks, and channel memberships, creators receive 70% of net revenue after deductions like sales tax from local government and applicable app store fees.
#4 YouTube Premium Revenue Sharing
Part of YouTube Premium’s monthly membership fee is shared with content creators based on video watch time. The more videos and the longer your videos are watched, the more money you get.
Where to View Earnings and Performance
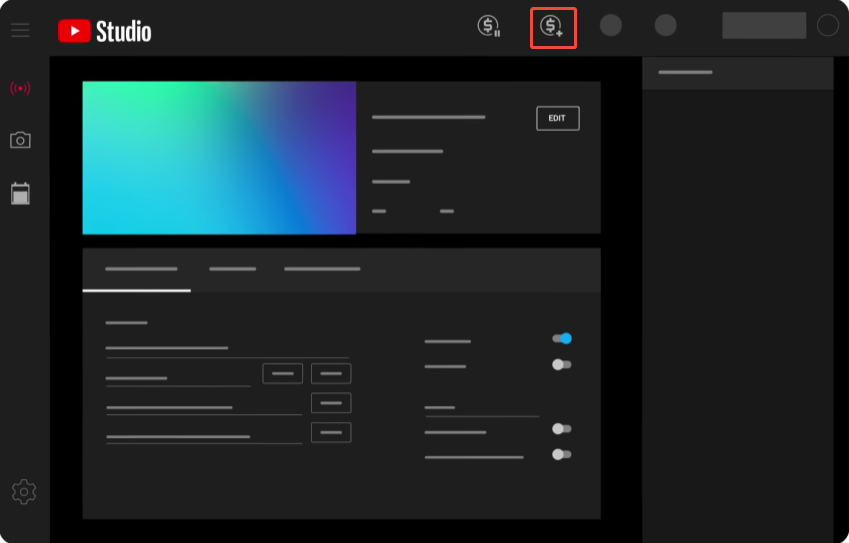
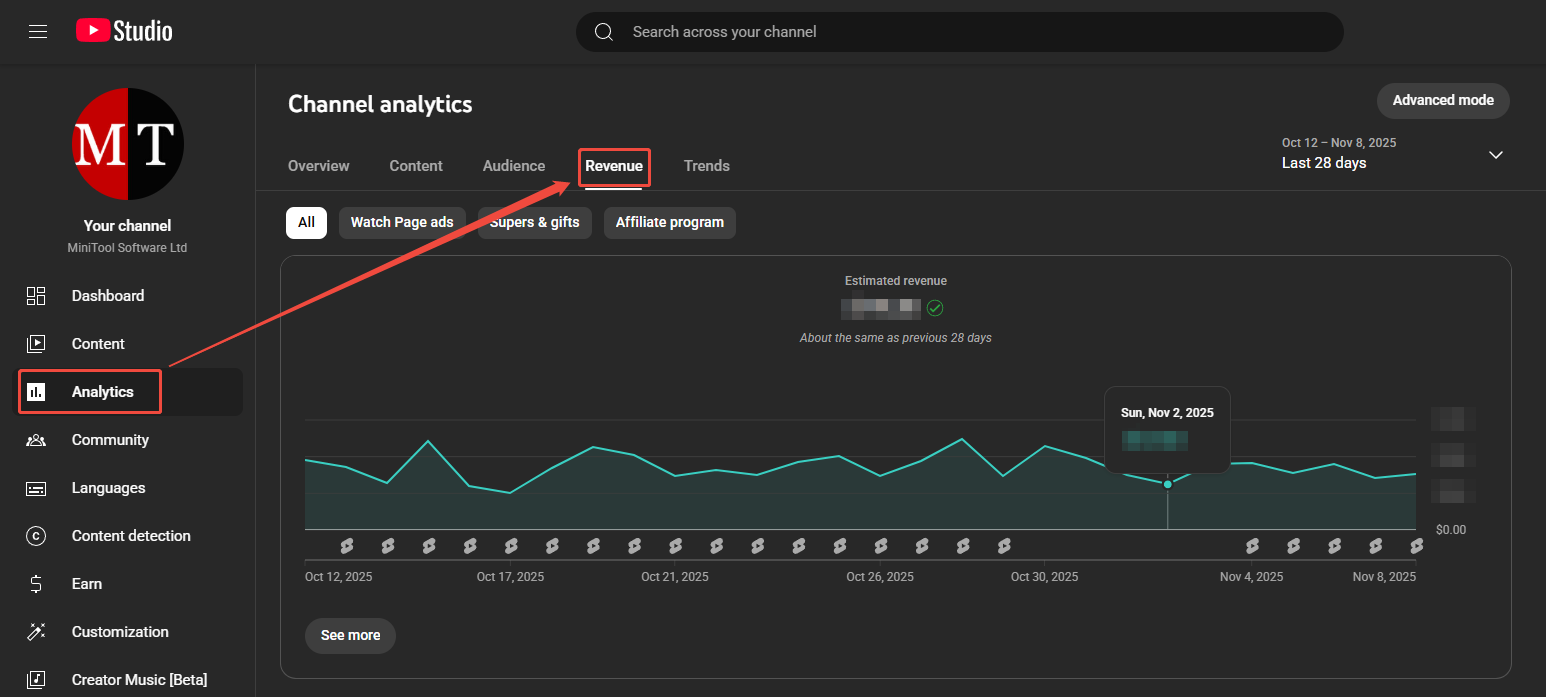
After turning on monetization on your YouTube channel, you must want to know how much you are earning, which videos perform good, or the estimated revenue in the next period. Where to see the details? Just navigate to YouTube Studio > Analytics > Revenue.
How Will You Be Paid
It depends on the way you use to earn on YouTube.
AdSense for YouTube
In general, you will be paid through AdSense. Your final earnings are only visible in Your AdSense for YouTube. Final earnings for the last month are added to your AdSense balance between the 7th and 12th of each month. To check for your AdSense balance, just go to Settings > Payments.
Your YouTube earnings are paid out between the 21st to 26th of the current month as long as your total AdSense balance has reached the payment threshold and if you have no payment holds. Generally speaking, you will get paid when you meet these criteria:
- Your earnings reach your local payment threshold.
- There is no hold on your account.
- You have paid the tax if any apply.
- Your channel monetization isn’t paused or suspended.
- You are in compliance with YouTube monetization policies.
Multi-channel Networks (MCN)
If your channel is affiliating with MCN, you will be paid by MCN directly. YouTube issues payment to the MCN and the MCN are responsible for issuing payment to their affiliates.
Shopping Payments
If you have sold products from your channel’s store, you will be paid directly by the official merch retailers or platforms. Besides, eligible creators may also get commission when audience buy third-party products or services that are featured in their videos through a direct link.
YouTube Monetization FAQ
Generally, audience from wealthier countries or regions tend to bring more ad revenue; videos with higher engagement are more likely to earn more money; and content niche with higher advertiser demand typically increase potential income. As for monetization methods, ads are suitable for all kinds of videos on YouTube, super features are better for live streams, and channel membership is a good choice for channels that have valuable contents.
1. Go to YouTube Studio, choose Earn from the left menu and you will see whether you are monetized as well as what monetization methods you are using.
2. Select Analytics from the left menu and check out whether you have Revenue option on the top menu of the next page. If you have, it means you are monetized.
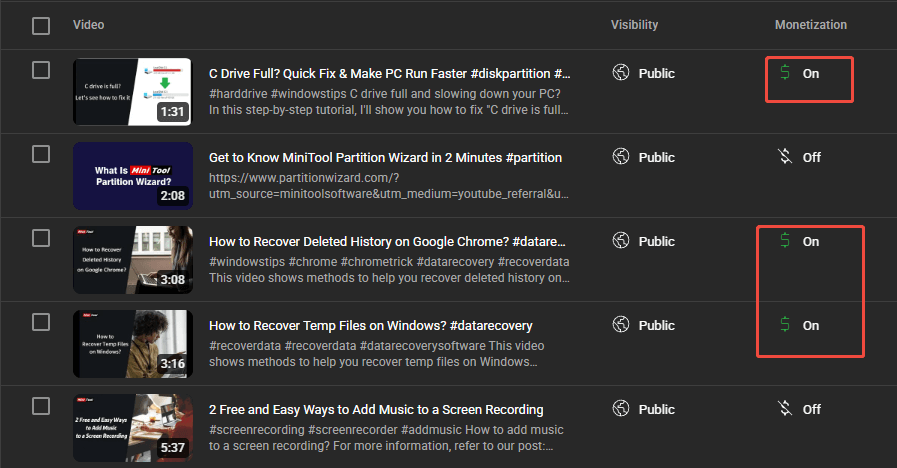
3. Directly scroll through your videos and search for videos that have a green dollar icon displayed next to it. This means the specific video is being monetized.
About The Author

Position: Columnist
Helen is a tech writer with over 10 years of experience. She specializes in creating easy-to-follow guides for video editing, media file conversion, and computer performance. Helen doesn't just write—she tests every software herself and listens to feedback from users and experts. Her goal is to make complex programs simple so that everyone can solve their tech problems with confidence.